| Downloading Files for Importing |
|
|
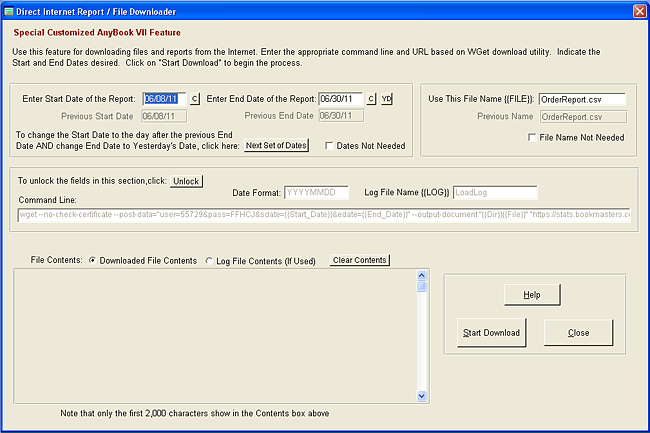
This is an AnyOrder Level 7 Feature The usual method to import files from a shopping cart (or a fulfillment contractor) website involves several steps: first you first log-in to the website. Second, you select the orders or data that you need. Third, you download the files, and lastly, you import them into AnyOrder. AnyOrder also has the ability to download files directly. Instead of manually logging in, AnyOrder does the log-in and the download for you. This shortens the process. Once the files are downloaded, it's just a matter clicking "Start Import Process" and your invoices are ready to go. In order to use this feature, you or an IT person needs to create a small program on the shopping cart which allows AnyOrder to log-in and obtain the data. (Have an IT person or web programmer read the information below and they may be able to construct the program for you.) You may be lucky. Some shopping carts or fulfillment contractors may already have this feature built into their website. To reach this part of the program, select FILE >> IMPORT. At the bottom of the dialog that appears, click on the button: "Download File from Internet." The "Direct Internet Report / File Downloader" dialog box appears:
To use this portion of the program, you need to enter a WGet command in the "Command Line" field. Information on the WGet program and its commands are found here: http://www.gnu.org/software/wget/. WGet is a utility program which is included with AnyOrder. Our special thanks to the developers for allowing us to distribute the program. You can enter dates and file names directly in a WGet command. That's called "hard coding." But you can make things more flexible by including variable names in the command line instead of hard coding. AnyOrder has variable names for starting date, ending date, directory, file name, and the name of a log file. Each variable name is indicated by double curly brackets surrounding a key word. Here are the variable names (you can use upper or lower case): File Name {{File}} Directory {{Dir}} Starting Date {{Start_Date}} Ending Date {{End_Date}} Log File Name {{Log}} For example, this command line will download a file from our website. (Note that this is valid command and import.txt exists on our website. Feel free to try it for practice): wget --no-check-certificate --output-document "{{Dir}}{{File}}" "http://www.grc101.com/import.txt" --output-file="{{Log}}" Notice that {{File}} has been inserted where the name of the file (output-document) would be hard coded. What AnyOrder does is look at the "Name of File" field and inserts the contents of that field in the place of {{File}}. So if you have typed in "import.txt" in the "Name of the File" field, that's the file that will be created. The file will be created in the directory {{Dir}} which is the same directory which appears in the "Current Drive/Directory" found on the Import Dialog Box. Always include the {{Dir}} before {{File}} so that the imported file is placed in the proper directory. You'll notice in this example that a log file (output-file) is created. WGet can create a log file which includes details on the download. AnyOrder has a variable name for log file: {{Log}}. When you use {{Log}} in the command line, AnyOrder will use the name found in the "Log File" field and create a log file. You can then examine the log file in the "File Contents" window. That's handy since the log file might give you an indication of what went wrong in the event that a download wasn't successful. Here's another example: wget --no-check-certificate --post-data="user=99999&pass=XXXXX&sdate={{Start_Date}}&edate={{End_Date}}" --output-document "{{Dir}}{{File}}" "https://stats.bookcompany.com/ ordrrpt/order_download.php" --output-file="{{LOG}}" In this example, you can download a report from a fulfillment company. You'll notice that this command line includes a start date and an end date. From the dates entered, a small program runs on the fulfillment company's website which creates a report. (The URL in this command line is not valid, but we wanted to include it so that you can use it as an example to construct your own.) The advantage of this is that it allows you to download shopping cart data and other sales data without having to log into a website, saving you time. More about dates. You'll notice a "YD" button. This means "yesterday's date." Clicking this button will insert yesterday's date in the End Date field. Why yesterday's date? When downloading invoice data, it is a good idea to download a range of dates up to the day before. The reason for this is that you may miss some invoices if you use today's date. For example let's say today's date is December 5, and let's say you download invoices from December 3-5. Then in a couple of days, you download invoices from December 6 to 8. If you, on December 5th, you downloaded invoices in the middle of the day, you would end up missing any invoices created later in the day and up to the start of December 6. Unless you are downloading them at 11:59 PM, there's always a chance that you'll miss some invoices on the ending date. If you use yesterday's date, you can be assured that you've gotten all invoice data. To help you insert dates, you can click on the "Next Set of Dates" button. This will take your previous End Date, add one day to it, and insert it in the Start Date field. For the End Date, it will insert yesterday's date. By using this button, you'll never miss a day of invoice data. Note that this command line includes a login name (99999) and a password (XXXXX). Both have been hard coded into the command line. If you need to log-in to download a file, then you'll want to hard code the log-in name and password into the command line. Once the file has been downloaded, you can examine its contents in the "File Content" window. You can view the downloaded file, or by clicking on the "Log File Contents" radio button, you can also view the log file created. Being able to view the downloaded file is particularly handy. You can quickly determine whether or not you have a valid file. If the file is valid, then you can return to the Import dialog box, click on "Start Import Process" and the import is complete. Once you are set-up, downloading files becomes a very quick and easy process. |