| Import from Clipboard |
|
|
Level 3 Programs and Above
Import from the Clipboard is very useful feature if you receive orders in an email - or if you can copy the order information from a on-line spreadsheet. If the order information is organized in a database (or spreadsheet) format, you can copy the data and then import it into AnyOrder, creating an invoice, without re-typing it. An Example For example, we here at Great Rift Software use a registration contractor to handle all of our software registrations. Each time a program is sold, they send us an email with information on the sale. At the bottom of the email is the following:
*** Text Database Entry *** "orderid","date","status","referrer","item","total","quantity","orderitem_profit","regname","regcode","reginfo","delivered","user","fname","lname","company","add1","add2","city","state","zip","country","phone","email" ¶ "10747","01/21/2014","T","3349","33499","64.19","1","0","RegNow","BC2F","","0","10686","James","Bennett","RegNow","123 Drive Way","123 Drive Way","Seatt;e","WA","98027","US","425-392-2000","jb@gmail.com"
This is a comma delimited database. Each field is separated by commas and delimited by quotes. For the purposes of this explanation, we have colored the lines above. (When this comes to us, however, it's not colored. It's just text included at the bottom of an ordinary email.) The blue colored text up to the first paragraph symbol (¶) is the first record (or to use spreadsheet terms, it would be the first row). This is the so-called "header row" which contains the names of the each of the fields (or in spreadsheet terms, this would be the names of the columns). You may or may not have a header row if you receive orders in this manner. The brown colored row up to the second paragraph symbol (¶) is the second record (or the second row). This row contains the actual data. Looking at the header row, you'll see that the data includes the order ID, the date, who it was referred by, name of item, total amount, etc. To move this data into the clipboard, we highlight it, being careful to include only the blue and brown text, like this:
*** Text Database Entry *** "orderid","date","status","referrer","item","total","quantity","orderitem_profit","regname","regcode","reginfo","delivered","user","fname","lname","company","add1","add2","city","state","zip","country","phone","email" ¶ "10747","01/21/2014","T","3349","33499","64.19","1","0","RegNow","BC2F","","0","10686","James","Bennett","RegNow","123 Drive Way","123 Drive Way","Seatt;e","WA","98027","US","425-392-2000","jb@gmail.com"
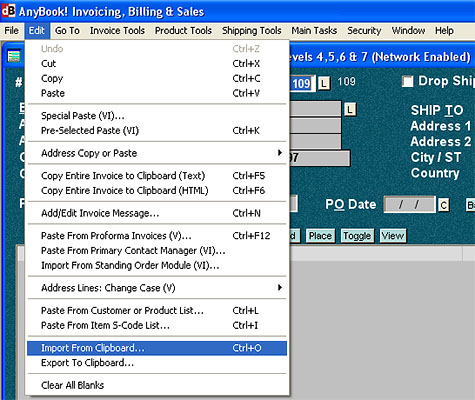
We, then, copy it to the clipboard. Once it is copied and in the clipboard, we select EDIT >> IMPORT FROM CLIPBOARD and the program creates an invoice with the data. That's it. It's pretty amazing how easy it is. Of course, you first need to get the profile set-up in the Import part of the program, but once the profile is prepared, it only takes a couple of seconds to create an invoice. This feature is very, very useful if you receive data in this manner. If you do, and it's not in a database format, give your contractor a call and ask for it in a comma delimited format - or ask them to send it in spreadsheet form (which is a "Tab Delimited" format). (We're still waiting for PayPal to do this. If they sent emails with the data in a spreadsheet or comma delimited format, it would make entering PayPal orders incredibly easy. Note, however, that there is a way to do a PayPal history import. That's covered here.) Getting Set-up "Import from Clipboard" is reached by selecting EDIT and IMPORT FROM CLIPBOARD from the Menu Bar on top of the Main Invoice Screen:
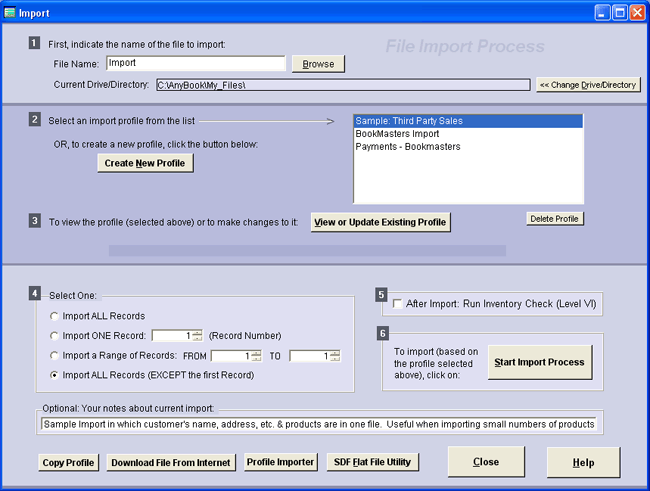
To use this method, first copy the data to the clipboard. For example, you can copy a record from a comma or tab delimited file as in the email example we discussed above. Or you can copy a row from a spreadsheet. Once you have copied the data, select FILE >>IMPORT from the Menu Bar on top of the Main Invoice Screen. The Import dialog box appears:
Next click on "Create New Profile." The import profile dialog box will appear:
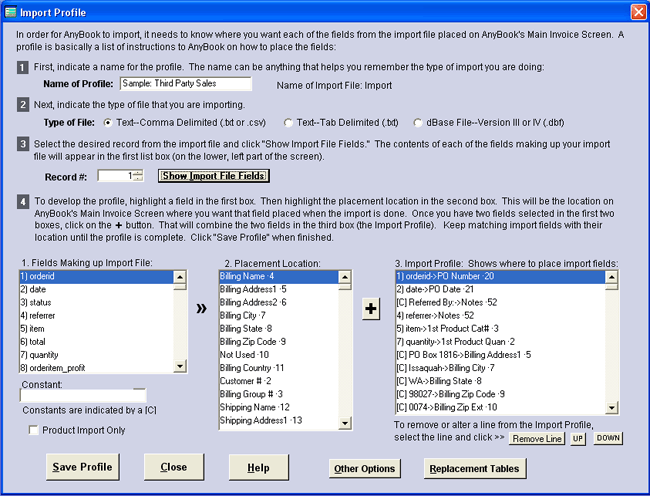
Type in a name that helps you remember the type of information you are importing. Under File Type, indicate what format the data is in. You have a choice between Comma Delimited and Tab Delimited. The dBase format is not available for the Clipboard method. When you've indicated the File Type, click on: "Show Import File Fields." Each of the fields (columns) of the data contained in the clipboard will appear in the first box on the bottom left. From this point on, creating a profile for the clipboard is the same as creating a profile for a file. For detailed information on creating the profile and other information, see Import. Important Note. As the default, only one record at a time can be imported using the clipboard method. This was done for a specific reason. It expands the number of sources that you can utilize for import data. In particular, it works well with email. Email programs place carriage returns at the end of line breaks (causing imported records to be fractured), but AnyOrder will ignore all line breaks and treat the information like one record. However, if desired, you can override the default and allow AnyOrder to import more than one record. For instance, you can copy data from several rows of a spreadsheet or several lines of an HTML table for placement in AnyOrder. To override the default, you'll need to go to "Other Options." At the bottom of the "Other Options" dialog box, place a checkmark in "Clipboard Override" This will allow you to import more than one record. It's important that you make sure that each record is separated with a line feed and a carriage return. If not, AnyOrder will not know how to separate the imported data into individual records. One last caution: there is a limit to how much can be imported by the clipboard. Try to keep the number of records to a reasonable number; a couple of dozen is plenty. Once you have created a profile you can return the first dialog box, select the profile and then click on "Start Import Process." The information in the clipboard will be placed on a new invoice. Exit from the import dialog box. Since the Import process creates new invoices, you'll need to page forward to see the new invoice. Make sure everything came through properly. If you need to remove an invoice that has been imported via the clipboard, select FILE and REMOVE IMPORTED RECORDS.
More Information on Importing Import Profiles (Second Dialog Box) Other Options (Third Dialog Box) Working with Import Files in Excel
|