| Inventory Import Profile |
|
|
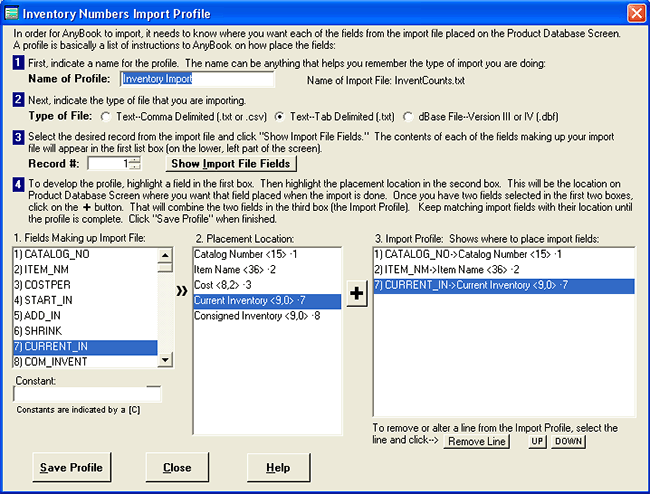
Importing Inventory - Level 4 and Higher Feature Step By Step Procedure (Developing the Profile) For information on the steps leading up to this point: First Dialog Box (This is the second dialog box for importing products. It is reached from the first inventory dialog box (select FILE >> IMPORT from the Product Database Screen.). Once at the first inventory dialog box, click either "Create New Profile" or "View or Update Existing Profile. The following dialog box appears:
Step # 1 (Name of Profile) The "Import Profile" dialog box will appear after you select "Create New Profile" in the first dialog box. At the top of the dialog box, enter a name for the profile. Use a name that will help you remember what sort of data is being imported, i.e. "Product Import." Step # 2 (Type of File) Indicate the type of file that you are using. For more information on file types, see Supported Import File Types. For your convenience, the name of the file that was entered in the previous first dialog box is shown to the right of the Profile Name. Step # 3 (Record Number) Select the record from the import file that you wish to use for developing the profile. Usually, the first record will be used, but if one of the other records in the file is more complete, you're welcome to select it. After indicating the record, click on "Show Import File Fields." A list of fields contained in your import file will appear in the first box ("Fields Making Up the Import File") on the bottom of the screen. If the fields are garbled, you may have selected the wrong file type. Re-check your file type selection. Also make sure the file you are importing is Comma Delimited, Tab Delimited, or a dBase file. Step # 4 (Building the Profile) Now take a look at the three boxes on the bottom of the screen. To develop the profile, first pick a field from the Import file (the first box). Then indicate where that field should be place on the Product Information Screen by choosing from a list of placement locations in the second box. In the first box, you'll see that each field of the import file is numbered. For instance, the first field might be 1) CATALOG_NO. The number is the location of the field in the import file. You'll also see numbers in the second box, i.e. Catalog Number <15> 1. The <15> means that AnyOrder has 15 characters of space available for this field. (If the field is a number, you'll see two numbers separated by a comma, i.e. <8,2> means a eight place number, including the decimal point with 2 decimal places) "1" means that the Catalog Number field is the first field in the Inventory File. The numbers are used by AnyOrder to determine which fields to use from the import file and where to place them. You can disregard the field numbers. They are used internally by AnyOrder to help guide the import process. (Note that some import files that you may use include generic names of each field in the first record. If so, you'll want to use it since it will make developing the profile a little easier. Field names are always available for dBase files: just select zero (0) as the record and the field names will be displayed.) To develop the profile, select a field in the first box by clicking on it to highlight it. Select a field in the second box by highlighting it. Then click on the large + sign. The two fields will be combined in the third box. Here's an example: Let's say you pick "1) CATALOG_NO" in the first box And you pick Catalog Number <15> 1 in the second box. After clicking on + the third box will show 1) CATALOG_NO->Catalog Number <15> 1. That means that when the import is done, the catalog number from the import file will be inserted in the catalog number place in the Inventory File. Now continue the process. Go through each of the fields in the first box. Match them up with fields in the second box. The result will show in the third box. The order the fields appear in the third box is not important. If you make a mistake, you can remove a line by selecting "Remove Line" You don't have to use all of the fields in the import file (the first box), just those you want to move into AnyOrder. When you have finished creating the profile, click on "Save Profile" and then "Close."
|