| Mailing List Module |
|
|
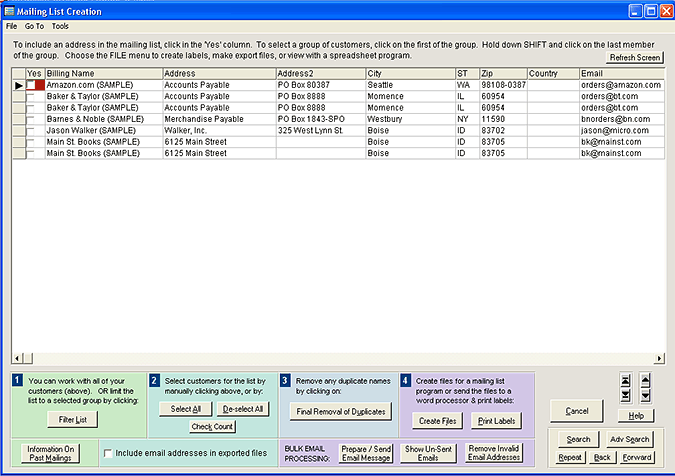
This extensive and versatile module enables you to create mailing lists of your customers. You can create snail mail lists to send information by postal mail. Or you can create email lists. If you have Level 7, you can even use a built-in Bulk Email Application to send out information to selected (or all) customers. The mailing list feature is also available for the Customer Database. You might want to use the lists to send out Christmas cards, make announcements of new products, or pass on information on sale items. The snail mail lists that you create can be imported into nearly all word processing and labeling programs for generating mailing labels or producing mail-merged letters. The Level 7 Bulk Emailing Application is run directly from the Mailing List module. You create the list, compose a message, and send out the emails all from the same location in AnyOrder. There are two prerequisites: (a) you need a non-web based email account. (In other words, you need a typical account available from an Internet Service provider. You can obtain such accounts for around $20 US per year.) And (b) you need an account which provides a high enough daily limit adequate for the size of your customer lists. To reach the mailing list portion of the program, select MAIN TASKS from the Menu Bar and choose MAILING LIST. The following screen appears:
First Steps for Level 1 - 6 Users Level 1 - 6 Users: When the Mailing List Module opens, you'll see a list of all invoices placed in alphabetical order by the Billing Name. You'll probably see lots of duplicate names, but you'll be able to remove those shortly.
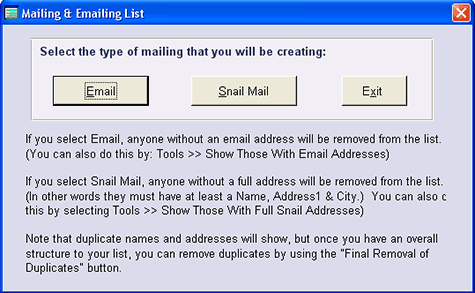
First Steps for Level 7 Users Level 7 Users: When you first enter the Mailing List module, a dialog box will appear asking whether you want to create a snail mail list or an email list:
Select the appropriate response, and the program will automatically prepare the list for you. If you are creating a snail mail list, it will remove anyone without a mailable address (in other words, it removes anyone missing Address1 and City). If you are creating a email list, it will remove anyone that doesn't have an email address. You can do both of these on your own by selecting from the TOOLS menu: SHOW ONLY THOSE WITH FULL SNAIL ADDRESSES or TOOLS >> SHOW ONLY THOSE WITH EMAIL ADDRESSES, but the program does this conveniently for you. More Information.
How to Create a Mailing in a Nutshell The following is a brief description of how to create mailing lists: 1. Select Customers. Once you've eliminated customers without mailing or email addresses, the next step is indicate which customers you want on the list. This is explained in more detail below, but, briefly, you can either check off the customers manually or you can use filters. Filters are really useful. For example, you can set a filter so that the list is made up of customers that purchased a certain product. If you set a filter, only those customers which meet the conditions of the filter will appear on the list. Those that don't meet the conditions disappear from the list. You'll still see duplicate names, but you'll be able to remove those shortly. Once you set the filter, you need to follow it up, by selecting all of the customers showing. That's easily done by clicking on the "Select All" button. 2. Remove Duplicates. Once the selections have been made, the next step is to get rid of duplicate names. To do that click on the button: "Final Removal of Duplicates." The duplicates won't disappear from the screen, but they will no longer be selected. In other words, when you click on this button, AnyOrder will remove the checkmarks from all duplicates. The one name that remains selected will be the most recently entered name. That's the one you want since the most recently created invoice would have the customer's most recent snail mail or email address. 3. Hone the List. At this point, you may wish to examine the list, doing some spot checking, or culling out a few more customers. The best way to do this is to make the unchecked duplicate names disappear from the screen. You can do that by selecting TOOLS >> MAINTAIN FILTERS BUT HIDE UN-SELECTED RECORDS. (More information: here.) When you use this feature, all of the unchecked names will disappear and you'll be left with only those with checkmarks. 4. Create a file - Print labels - Or send emails. If you have Levels 1 - 6 you can create a file (by pressing the "Create Files" button) to be imported into a word processing or label program. Level 4 or higher users can also use the "Print Labels" feature to print labels through a word processing program. If you have Level 7 you have the additional option to send an email to all selected customers. You would do that by clicking the "Prepare / Send Email" button. More information on any of the above steps is found below.
Manually Selecting Customers You can select which names you want on the mailing list by clicking and placing a checkmark in the "Yes" column. By clicking again, you can remove the checkmark. You may also use the spacebar to check or uncheck the "Yes" column. To select a group of customers click on the first of the group. Make sure a checkmark is beside the first member of the group. Hold down the SHIFT key and select the last member of the group. All the customers between the two will be selected. You can de-select a group by doing the same thing, but in this case, the first member of the group should not have a checkmark beside it. You can move up and down on the spreadsheet by using the arrow keys, PageUp or PageDown on your keyboard. You can also use the up and down VCR buttons on the lower right of the screen. You can search for a name (or address or other field) by clicking the "Search" or "Adv Search" buttons. Note the the search feature will only find names, addresses, etc. that appear on the screen. For example, if you have filtered out all customers from Great Britain, and if you try to search for a customer that lives in Great Britain, a "Not Found" message will be triggered. If you turn the filter off, then AnyOrder will be able to find the customer from Great Britain. To find out how many invoices that you've selected, click on "Check Count." To automatically select all of the customers, click the "Select All" button or choose TOOLS >> SELECT ALL NAMES ON LIST from the menu bar. To remove all selected customers, click the "De-select All" button or choose TOOLS >> DE-SELECT ALL NAMES ON LIST from the menu bar.
One of the most powerful ways to work with your mailing list is to use a filer. By the use of a filter, you can create a mailing list for customers who have ordered a certain product, or for customers with a designated invoice code, or for customers from certain country. The filter function provides you with hundreds of different combinations. To access the filter feature, click on the "Filter List" button (or select TOOLS >> FILTER WHICH NAMES ARE DISPLAYED from the menu bar). This will bring up the filter dialog box, and you change what names are displayed by selecting different filters. There's more on how to do this in the Filter chapter. Granted, filter formulas do sound a little like Greek, but the filter dialog box will assist you in constructing sample filters. It's just a matter of clicking on the plus signs: +. Oftentimes that - and a bit of basic knowledge about filters - is enough to figure out what you need. The beauty of this system is that by using a few filter tools, you can produce many different types of mailing lists, exactly tailored to your needs. Once you have the filter set, the list of names appearing on the screen will be limited to the confines of your filter. Any name that doesn't meet the conditions disappears from the screen. Review the names of the customers and make sure the list is correct. If not, you can remove the filter by selecting TOOLS >> TURN FILTER OFF. After setting and filter, and when everything looks correct, use the "Select All" button to select all customers showing in the screen.
When you use a filter, only those customers which meet the conditions of the filter will appear on the list. But they haven't been selected yet. You do that by clicking on the "Select All" button. Checkmarks will appear beside all customers. Now all of the customers on the filtered list are selected. Invariably, however, you will end up with lots of duplicates that have checkmarks beside them. The duplicates come from invoices issued to your customers. Every time you've made out an invoice to the same customer, their name will be repeated on the list. But you can fix that. To remove the checkmarks from duplicate customer names or email addresses, click on the button: "Final Removal of Duplicates." You have three choices:
When you run the removal process, AnyOrder removes the checkmarks from the oldest invoices, but it leaves the customer address (or email address) from the most recently issued invoice. The reason for this is that the newest invoice will have the customer's most recent address, and that's, of course, the address you want to use for mailing purposes Be sure to wait until you've selected the customers on the list either manually or by using the "Select All" button. Once you have the customers selected, then you can click on the "Final Removal of Duplicates" button. If you need to hone the list some more after removing duplicates, you can hide all records without a checkmark by selecting TOOLS >> MAINTAIN FILTERS BUT HIDE UN-SELECTED RECORDS. More about this feature below.
Using the Menu Option: Maintain Filters but Hide Un-selected Records This useful feature is found under the TOOLS menu (at the top of the screen): TOOLS >> MAINTAIN FILTERS BUT HIDE UN-SELECTED RECORDS. This is a special kind of menu item. When it's turned on, you'll see a checkmark beside it on the menu. When it is turned off, no checkmark shows. You'll want to wait before using this feature until after you have selected customers and after you have clicked on "Final Removal of Duplicates." What this feature does is to set another filter in addition to any existing filters. In this case, it filters out any record without a checkmark. (If you were to view the filter, it would look like: .NOT. SELECT, meaning "filter out all names not selected." In fact, if desired, you can view the filters that AnyOrder is using by selecting TOOLS >> VIEW CURRENT FILTER) Once you turn this feature on, all non-selected names disappear from the list. This makes it easier to review your list. You may find other names to remove, and you can do so by manually clicking and removing the checkmark. After you do this, the name will disappear. NOTE: you may notice some doubling up of names while removing checkmarks. That's because you are changing a filtered field, but you can clear things up and refresh the list by clicking the "Refresh" button on the top, right of the screen. Since all names with a checkmark disappear, you won't be able to add any names to the list. If you find that you are missing names - or you decide you need to set a different filter, you'll want to turn off this feature. To turn it off, select TOOLS >> MAINTAIN FILTERS BUT HIDE UN-SELECTED RECORDS again. If you look at the menu, the checkmark will toggle off meaning that the feature is now off.
Bulk Email Application - Level 7 Feature Level 7 Feature The Bulk Email Application is found in the Mailing List module accessed by selecting MAIN TASKS >> MAILING LIST. The Bulk Email Application consists of three buttons on the bottom of the screen:
Before using the Bulk Email Application, if you haven't already, you'll need to get the program set-up to use the email features. That's done in Basic Program Set-up. You'll want to make sure that you have a non-web based email account as described in Basic Program Set-up, and you'll need an account which provides you with enough daily capacity to send out emails to all customers on the mailing list. Helpful Hint: It's a not a good idea to use your primary business email address for bulk emailing. You'll end up getting lots of bounced emails and that will really clutter up your primary email inbox. Use another email address for bulk mailings. Here is more information information on each part of the process: Prepare / Send Email Message. Before beginning the email process, you'll want to create the mailing list. Follow the steps described above so that you end up with a list of selected customers. If you are on a network, it's best to do mailings when usage of AnyOrder is light or non-existent. Because of the time involved, large mailings are best done at the end of the day. To begin the email process click on the "Prepare / Send Email Message" button. A dialog box will appear that allows you to compose a message. The message will be saved. If you get started preparing it, and must return to it later, your work will be retained. You can insert the company or individual's name in the subject line or message by using the [NAME] substitution variable. For example if you wrote "Greetings [NAME]!" and the individual's name is Bill Wilson, the end result would be "Greetings Bill Wilson!." You can also add one or more attachments to each of the emails going out. To do so, click on the "Browse" button and select the attachments. When the message is ready, click on the "Start Sending" button. Before the sending process begins, one last dialog box will appear: "Store Information on This Mailing." This allows you to keep a record of the mailing. Enter a short descriptive title for the mailing. It's optional but you can also enter more detailed information about the mailing. You may wish to include information on how you made the selections and other helpful tidbits of information that will help you next time you do a mailing. Along with the information that you enter, AnyOrder will also save the following: 1. The date and time of the mailing 2. A copy of the filter that you used. 3. The invoice number, billing name and invoice date of the last invoice covered by the mailing 4. The number of addresses you have selected for the mailing After you enter the title of the mailing, the sending process begins. You'll see a mailing form appear with the name of the customer as each email is sent. The amount of time required to send emails is dependent upon connection speeds, but you can figure an average of 12 minutes per 100 emails. That means that 1,000 emails would take approximately 2 hours. Because of the length of time involved, it's best to do bulk emailings at the end of the day or the evening. When the process is complete AnyOrder will trigger a message and indicate how many emails have been sent. That doesn't mean that all emails will get through. It's very likely that you will have bounced emails. You'll be able to take care of those with the "Remove Invalid Email" function (below). (Also, AnyOrder will specifically list any emails that are missing the "@" character. You probably won't have many, if any, of these. But if you do, you'll want to do a search for them in your invoice file and remove or correct the address.) Show Un-sent Emails Sending emails is not always a perfect process. The email server may go down. You may have a glitch with your Internet connection. Your hourly or daily limit may be reached. When something like that happens, everything stops, and you'll need to begin again in some manner. But you wouldn't want to start all over and re-send the same emails to those that have already received them. That's where the "Show Un-sent Emails" function comes in handy. It's utilized after you do a mailing. It's a good idea to click on this button after every bulk emailing - just in case. To use it, ideally, you'll want to stay in the Mailing List module. In other words, if the email process stops, try to avoid exiting and coming back to it. Nevertheless, it will work if your program freezes up for some reason and you need to return to it. When you click on the "Show Un-sent Emails" button, a message will appear telling you how many emails have NOT been sent. If it says zero (0), then you don't have to worry about it. But if you have anything over zero (0), then you'll want to continue with the process by clicking the "Yes" button when asked "Would you like to continue and view the list?" At this point, AnyOrder will run through your list, removing the checkmarks from emails that have been sent and leaving checkmarks beside emails that have not been sent. With the un-sent emails selected, it's just a matter of re-running the Bulk Email Application. Click on the "Prepare / Send Email Message" button to to start the process. You'll see that your original email message have been saved. Continue by clicking the "Start Sending" button. If you run into another snag and not all of this batch of emails are sent, you can repeat this process again. You can repeat it as many times as necessary to get your bulk email sent off to all of your customers. Note that this list does not include bounced emails. (Bounced emails will be taken care of next.) It only lists unsent emails - those that were prevented from being sent because of a server or program problem. Also note that this list is saved temporarily. The list will be re-built if you use the Bulk Email Application again. Remove Invalid Emails Invariably, you'll end up with bounced emails. Soon after the bulk email is sent, you'll find a batch of bounced emails in your inbox, and you'll get more over the next couple of days. Since these are bad email addresses, you'll want to remove them from your invoices. This feature, reached by clicking the "Remove Invalid Emails" button enables you to do that. It highly recommended that you use this feature. Getting rid of invalid addresses greatly speeds up the processing time next time you do a bulk emailing. If you don't use it, the numbers of bounced emails will continue to build up, and it will become more and more difficult to do away with them as time goes on. You do not have to run this process right after a bulk mailing. You can run it at any time. You could, for example, come back to it a couple of weeks later. The way this process works is that you'll provide AnyOrder with a list of invalid emails. AnyOrder will take the first invalid email address, find it on an invoice, and remove it. It will look for another invoice with the same email address, and if found, it will remove it. It continues doing this until it finds all invoices with the same email address. Then it looks for the next invalid email address on the list and repeats the process. You can see that this involves a lot of searching and replacing, so you'll want to give this process time to run. The key to using this process is preparing a list of bad email address. There's a type of software program you can use to make preparing the list relatively painless. The type of software is known as a clipboard extender or a clipboard manager. Clipboard Magic is one example and it's a free program. Clipmate is another example. Clipmate costs ($35), but it's the one we use, and we're sure that you'll find it incredibly useful for this and other tasks. Once you have Clipboard Magic or Clipmate installed. Here are the steps you'll want to take: 1. To make the list, open your email inbox and start going through the bounced emails. 2. Copy the each bad email address to the clipboard. Clipboard Magic or Clipmate will remember each copied email address. 3. When you are finished, open up a spreadsheet program. You'll be pasting the email addresses in the first column of the spreadsheet, starting at the top row. Both Clipboard Magic and Clipmate have a "Series Paste" or "Power Paste" feature. When you turn on "Series Paste," you'll be able to paste each of the email address onto the spreadsheet. You can create a list of bad emails in very little time. By using the copy and a "Series Paste" technique, you are able to copy and paste the exact spelling and format of the bad email address. 4. Once you get the email addresses copied to the first column. Save the spreadsheet as a "TAB DELIMITED" file. Save it with a name like Bad_Emails.txt. Place the file in the My_Files sub-directory of the AnyOrder directory. If AnyOrder is installed to C:\AnyOrder, you'll place it in C:\AnyOrder\My_Files. If AnyOrder is installed to C:\Program Files, you'll place it in C:\Program Files\AnyOrder\My_Files. 5. Click on the the "Remove Invalid Emails" button. A dialog box appears briefly describing the information above. Enter the name of the file, i.e. "Bad_Email.txt." Then click on "Start Process." AnyOrder will remove the bad address. As mentioned above, AnyOrder has to do a lot searching and replacing, and you'll need to allow time for the process to run. If you have correct email addresses for some of these customers, run the above process first to clean out the bad addresses. Then you can add the correct addresses. You can do that from the Main Invoice Screen. Use the search feature to find the customer and type in the new email address. You only need to add the corrected email address to one invoice.
Information on Past Mailings - Level 7 Feature Level 7 Feature If you have the Level 7 program, AnyOrder will trigger a dialog box that allows you to enter a title for your mailing. You can optionally include more descriptive information. Along with your information, AnyOrder will include the date and time of the mailing, the filter used, the number of customers selected, and the last invoice number, date and billing number. You can view this information by clicking on the "Information on Past Mailings" button. The "Information on Past Mailing" dialog box appears. One very useful function that is found on this dialog box is the ability to re-set a filter from a past mailing. Let's say that you filtered for a certain product in your last mailing. You can re-create the same filter by clicking on the "Use Same" button. AnyOrder will open the filter dialog box and paste your filter in place. All you need to do is to set the filter (by clicking OK in the Filter dialog box), and then continue with the rest of the mailing list process . It's also quite useful if you are using Rover to hold some of your mailing lists. You'll initially create a list in Rover, but from time to time, you'll need to update it with new customers. (More about the Rover process, below). When you are ready to update the list in Rover, you can open the "Information on Past Mailings" button dialog box, and use the "> Last Invoice" button (which means "Greater than last invoice"). This will re-create your filter but it will limit the invoices to only those created after the first mailing list. You can then move the newer invoices to Rover.
Filtering and User Defined Fields You may want to utilize User Defined fields for setting up mailing list codes. The longer size of the fields enables you to use more descriptive code names. For instance, you might use "WILD" for customers interested in wildlife books, "COMP" for customers interested in computer books, etc. One User Defined Field can handle several codes. For instance, if you have a customer who is interested in wildlife books and computer books, you could enter WILD COMP in one of the User Defined Fields. You don't have to worry about duplicates. If Tina Baker has ordered from you on several occasions, and you code her invoices the same each time, you'll be able to use "Final Removal of Duplicates" to remove the extras. To create a mailing list from User Defined Fields, filter for one of the codes. Let's say you are using the first User Defined Field for mailing codes and you want to create a "wildlife" mailing list. You would begin by selecting TOOLS and FILTER WHICH NAMES ARE DISPLAYED. This will bring up the filter dialog box. Type in a filter formula. If you are using the first User Defined Field for your mailing codes, the formula would be "WILD" $ UserDef2->UserDef1. If you want to create a list which combines wildlife and computer books, the formula would be "WILD" $ UserDef2->UserDef1 .OR. "COMP" $ UserDef2->UserDef1. After you enter the filter formula and exit from the filter dialog box, a list conforming to the filter will appear on the screen. If the list is what you want, you can use the "Select All" feature - or you can hand select those addresses that you want.
View Mailing List from Spreadsheet - Level 4 or Higher This option is reached by selecting FILE >> VIEW MAILING LIST FROM SPREADSHEET from the menu bar. It gives you an additional way to view selected names and addresses. In order to use this option, you must first select the addresses you want by clicking on them -- or by using a filter and using the "Select All" button. Then you can activate this feature. Microsoft Excel (or a spreadsheet of your choice) will start up with the names and addresses in place. You can use this feature as a way to print a copy of the mailing list for your records. Or you can use this feature to create an Excel file which in turn can be used by your label printing software.
Using Rover for Selected Mailing Lists - Level 6 - 7 Feature You can use the Rover program to hold mailing lists. For example, you could use Rover to hold a mailing list of all of your international customers or use another instance of Rover to hold a list of customers that bought a specific product. Move a Mailing List of Billing Names to Rover. The way to do this is to create your mailing list in the main part of the program (using the steps described above). You'll need to make files for Rover, and when you reach the end of the mailing list process in the main program, click on the "Create Files" button. This will create MailList.dbf and MailList.txt, one of which you'll import into Rover. Install Rover if you haven't already. You'll want to rename the icon something like: Mailing List for XYZ Customers." You'll want to move your set-up information from the main program to Rover. This is particularly helpful if you are sending emails since set-up information includes the email server settings. Set-up information also includes your registration code. More information on how to do this is found here, but, briefly, to move set-up information to Rover, start in the main program and select MAIN TASKS >> PROVIDE UPDATED FILES FOR ROVER. Indicate a directory to place the files. At the bottom of the dialog box, place checkmarks beside everything except "Basic Program Set-up." That's the only file you need. Then click OK. Start up Rover. Select MAIN TASKS >> ACCEPT UPDATED FILES FROM AnyOrder. Indicate the directory where the files for Rover are located and click on OK. This will move the set-up file into Rover. Once you have your set-up values squared away, you can continue with moving the mailing data into Rover. From the Main Invoice Screen in Rover, select FILE >> IMPORT to reach the Import feature. You have you choice of which file to import, but it's probably easiest to use MailList.dbf as the import file. You'll find it in C:\AnyOrder\Labels (if you used the default directory in the main program). Create a profile to import the fields of MailList.dbf into Rover. For the profile, you'll be matching up the Billing Name to Rover's Billing Name, Billing Address1 to Rover's Billing Address1, etc. When the profile is completed, do the import. You now have your mailing list in Rover. Working With the Mailing List in Rover. Once the records are imported into Rover, you can then work with them by going into the Mailing List module. (Rover includes a full featured Mailing List module.) Rover has one additional feature that's not available with the main program, and that is a delete function. In Rover you can permanently customers from the invoice file. That's done by selecting FILE >> DELETE ALL UN-SELECTED. What this does is to delete any customer on the list which is not selected. (It also deletes any customer that is not selected and not visible on the screen.) The delete feature allows you to permanently get rid of names that you don't want. This helps keep your lists to a manageable size and makes maintaining them easier. You wouldn't want to delete invoices in your main program. That's against good accounting practices, and you need the information from invoices for sales reports, billings, etc. But you can do anything with the invoices in Rover. You can change them, delete them, and otherwise alter them. Once the list in Rover has been tweaked to your satisfaction, you can then go ahead and create a mailing list or send emails. Updating Mailing Files In Rover. Later when it's time to update files in Rover, you'll run through the same process in the main part of the program to create a file to import into Rover. This time, however, you can take advantage of a feature to select all new records. In the main part of the program (in the Mailing List module) click on the "Information on Past Mailings" button. The "Information on Past Mailing" dialog box appears. In the "Information on Past Mailings" dialog box, click on the "> Last Invoice" button (which means "Greater than the last invoice"). This will re-create your filter that was originally used, and but it will also limit the invoices to only those added after the previous mailing list. You can then move the newer invoices to Rover by using Rover's Import feature. Creating Mailing Lists of Ship-To Customers. Probably the most beneficial use of Rover is when you need to send information to Ship-to individuals. The mailing list module is set-up for billing names, but you may also want to create a mailing list of ship-to customers. Or you may wish to combine bill-to and ship-to customers into one mailing list. You can do that in Rover. To move ship-to names and addresses into Rover, start in the main program and use the Advanced Export feature. Create an export profile with the shipping name, shipping address, city, state/province, postal code and country. Then export to a file. We'll call the file: "ShipTo_Mailing." Start Rover and use the import feature to import the file "ShipTo_Mailing." When you make the import profile, you want to import the Shipping Name to Rover's Billing Name, Shipping Address1 to Rover's Billing Address1, and so on. When the profile is created, go ahead and do the import. Once the shipping addresses are imported, go into Rover's Mailing List Module. All the shipping names and addresses have now become billing names and addresses which allow you to use all of the Mailing Module's features including setting a filter, removing duplicates and otherwise culling the list. When dealing with shipping addresses, the delete function comes in handy. Use "Final Removal of Duplicates" and other functions to select only those addresses that you want on the list. Then use FILE >> DELETE ALL UN-SELECTED. This deletes all unselected customers. It also deleted unselected customers that don't appear on the screen. Once you do this, your list will be much more manageable. You can combine billing names from the main program to the ship-to addresses in Rover. To do that, use the procedure (above) to create a mailing list of billing addresses. When you import the billing addresses into Rover, you'll append them to the existing shipping names. The result is that the mailing list will will include both. Updating a Ship-to Mailing List in Rover. When you need to update the ship-to list, start in the main program and use the Advanced Export feature. When updating you'll want to limit the export to invoices greater than the last exported invoice in the previous mailing. How to find the the last invoice number? AnyOrder has saved it for you. Select the export profile for your ship-to names and address. Look below the button: View or Update Existing Profile. You'll find it recorded there. Once you have the last invoice number, you ready to export. You can use a range of invoice numbers for the export, starting with the last invoice number (plus one). Or you can filter for invoice numbers greater than the last invoice number. Once the export has been done, the process is the same. Import the ship-to names into Rover and use the Mailing List module to cull out duplicates and names you don't want. Then create the mailing list or send emails. Remove Invalid Emails. The "Remove Invalid Email" feature in Rover works the same as the main program. When you use it, it's a good idea to remove the invalid emails in both Rover and in the Main Program. Since you've already created the list of invalid emails, it only involves a few extra minutes of time to remove the bad emails from both programs. It keeps your records updated and makes the email process run more efficiently.
Show Full Snail Address & Show Email Address Under the TOOLS menu on top of the Mailing List Module screen, you'll see two choices:
The first "Show Only Those With Full Snail Address" removes any customer with an incomplete mailing address. If you are creating a mailing list to send through the post office, then it doesn't make sense to include any customers that don't have an Address1 or City. To remove incomplete addresses, select TOOLS >>SHOW ONLY THOSE WITH FULL SNAIL ADDRESSES. As soon as you do that, you'll see anyone without an Address1 and City disappear from the list. This is a special menu item that is toggled on and off. You'll see a checkmark beside it in the menu when it's turned on (in other words, when those without a full mailing address are not shown). The checkmark is removed when you turn it off (in other words, those customers with incomplete address will be shown.) The second choice removes empty email addresses. You'll want to use it if you are doing a bulk emailing to your customers. To turn it on, select TOOLS >> SHOW ONLY THOSE WITH EMAIL ADDRESSES. This menu item is also toggled on and off. When it's on, a checkmark shows beside the menu item (meaning that empty email addresses will not show). When it's off (empty email addresses will show), the checkmark is removed. If either one or both of these are turned on (a checkmark appears besides the menu item), you can quickly turn them off by selecting TOOLS >> SHOW ALL. Both of these options are actually filters. You can see the filter by selecting TOOLS >> VIEW CURRENT FILTER. When you select "Show Only Those With Full Snail Address," the filter looks like: .NOT. EMPTY(Bill_Name) .AND. .NOT. EMPTY(Address1) .AND. .NOT. EMPTY(City) When you select "Show Only Those With Email Address," the filter looks like: .NOT. EMPTY(EmailAdd) If you are creating your own filters, such as filtering for customers that purchased a specific product, AnyOrder combines your filter with the filters above. You can always see the complete filter that is being used by selecting TOOLS >> VIEW CURRENT FILTER.
Selecting the Directory The default directory where the mailing list is placed is AnyOrder\Labels, but you can change the directory to another of your own choosing. To change the directory, select FILE >> DESIGNATE A DIRECTORY FOR MAILING LIST FILES.
To create the mailing list, click on the button: "Create Files." Or you can select FILE >> MAKE NEW MAILING LIST. Two files will be created: MailList.dbf and MailList.txt. MailList.dbf is a file in a dBase format, a common database format accepted by many word processing and label programs. They will be placed in the directory you've designated for mailing list files. If you haven't designated a directory, they will be placed in the default directory of AnyOrder\Labels. However, just in case you have a program that doesn't accept dBase files, a second, more generic, file is created called MailList.txt. MailList.txt is a "delimited" file where each name or address field is surrounded by quotation marks and separated by commas. Here's an example: "XYZ Company","201 South Main","Boise","ID","83465" A delimited file is a very basic form of a database file and is accepted by nearly all word processing and labeling programs. Once MailList.dbf or MailList.txt are created, you can then open your word processing or labeling program and import the file as you would any database for merging or label making purposes. The documentation that came with your word processing or labeling program will give you details on how to import and use files. After creating MailList.dbf and MailList.txt, you can, if desired, add more addresses to the existing files. To do so, select the additional addresses by typing a "Y" in the "Y" column, and then choose FILE >> ADD TO NAMES ALREADY IN MAILLIST. This takes the existing file and appends the new names to it. For more information on the two files created: File Details on MailList.dbf and MailList.txt Some uses of the mailing list files may require more flexibility in the fields that make up MailList.dbf and MailList.txt. For example, if you are importing the mailing files into a newsletter application on a website, you may need to import the fields in a certain order, and you may need additional fields not found in MailList.dbf or MailList.txt. To change the order of fields or add fields, use AnyOrder's Export module. In the Export module, you can design a profile which has exactly the kind of structure required. After creating the profile, return to the first dialog of the Export series, and under "Select Invoices to be Exported" select the following option: "Use a Combination of a Selection List and Filter." When you start the export, the Mailing List module will appear, and you'll have access to all of the mailing list features with the added advantage of being able to create an export file made up of your selection of fields.
Print Mailing Labels - Level 4 or Higher To reach this option, select FILE>>PRINT MAILING LABELS. When you select this menu option, the "Print Mailing Labels" dialog box appears. This dialog box allows you to select from one or more label formats. Before bringing up the "Print Mailing Labels" dialog box, you'll need to select what addresses you want to include on the mailing list. Once the addresses have been selected, you're ready to print labels. The "Print Mailing Labels" dialog box is very similar to the Print Shipping Labels dialog box (this is a good reference if you need details on any aspect of the "Print Mailing Labels" dialog box). To use the "Print Mailing Labels" dialog box, select which label format you want from the list on upper left of the dialog box. Then click on "Create List and Continue Process." When you click on this button, AnyOrder will automatically open up your word processing program with the labels in place and ready to go. You can make one final review in your word processor, and print the labels when you are ready. The printing of labels is guided by something called label properties. You can review label properties by clicking on the "View or Modify" button. If desired, you can also create your own label formats by clicking on "Create a New Format." For more information, see mailing list properties.
Sample Mailing Labels - Level 4 or Higher Note: If you accidentally delete the sample mailing label document (Mailing.doc) and want to recover the original, you'll find an extra copy named Mailing.bak in the AnyOrder\Labels subdirectory. The sample mailing labels that come with the program are designed to be used in combination with Microsoft Word. If you have Microsoft Word on your computer, it's worthwhile to run through the process described below. The samples assume that you've installed AnyOrder to the default directory: C:\AnyOrder. If you've install it to a different directory, you'll need to do two things. First, check to see if AnyOrder has the correct directory paths in the "Label Properties" dialog box (reached by clicking on "View or Modify" on the upper right of the screen.) See Mailing Label Properties for more information. And, secondly, you'll need to start Microsoft Word and load in the following document: Mailing.doc. Mailing.doc is found in AnyOrder's "Labels\" sub-directory. You'll need to use the Mail Merge Wizard and change the path of the data source (MailList.txt) to the "Labels" sub-directory under the name of the installation directory you've used (see Mailing Label Properties). Once again, this is only necessary if you've installed the program some place other than C:\AnyOrder. Start at "Mailing List Creation" spreadsheet and select several sample customers from the list. Then select FILE >> PRINT MAILING LABELS. The "Print Mailing Labels" dialog box will appear. Make sure "Sample: Mailing Labels" is selected, and click on "Create List and Continue Process." A dialog box will appear asking you for the path to Microsoft Word. Once you've enter the path, AnyOrder will remember it for future sessions. Microsoft Word will start up. (Note: newer versions of Microsoft Word will trigger the following message: "Opening this document will run the following SQL command …" Just click on "Yes." You can remove this message by following these directions: MS Word Hints.) The label document (Mailing.doc) will be automatically loaded. On the Microsoft Word screen, you should see the names and addresses of the selected customers. If instead of the customers' names, you see <<SHIP_NAME>>, you'll need to click on the "View Merged Data" button to change the view so you can see the name and address. (More information on the "View Merged Data" button and other mail merge features are found in Word's help documentation.) This sample uses a common label lay-out for mailing labels. This particular format is an Avery 5160, but other companies sell an equivalent format. You can purchase Avery (or other manufacturer's) label sheets at most office supply stores. You can run a print on ordinary paper to see how it looks. To print it, select FILE >> PRINT. If desired, you can use the sample as a starting point to design your own labels. Use MS Word's Mail Merge Wizard to select the type of label paper you want and format the address to your liking. (Depending up the version of Word, the wizard is commonly found at: TOOLS >> LETTERS & MAILINGS >> MAIL MERGE WIZARD)
Unique & First Appearing Names Most likely you'll rarely, if ever, use this feature. It is reached by selecting TOOLS >> UNIQUE AND FIRST APPEARING NAMES What it does is to remove all duplicate billing names, but, there's an important difference from "Final Removal of Duplicates" described above. In this case, AnyOrder removes the names from the newest invoices and leaves the oldest. Normally, you would want to use the name from the newest invoice since that would have the customer's latest address. This behavior is actually the same of the "Customer Names - No Duplicates" found on the "All Customers Pop-up List. This feature would only be useful if you keep your customers' first invoices updated with the latest snail and email addresses. Once you select this option, you can set a filter and otherwise manipulate which customers are included on the list. You can create files for mailing list and you can send emails using the bulk email application.
|