| Printing Barcode Labels |
|
|
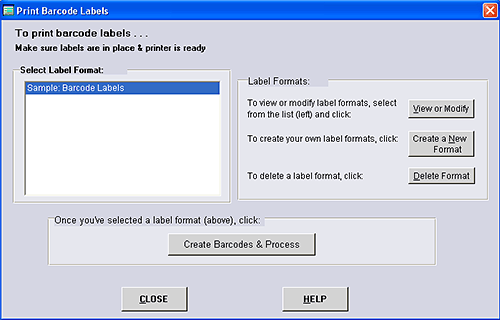
Barcode printing is only available with the Level 5 (or higher) program. To reach the Barcode Printing dialog box, start in the Product Information Database and select FILE >> PRINT BARCODE LABELS. Use this when you are setting up your own barcoding system. This feature produces labels which utilize the Code 39 barcode. While you can use Code 39 for a number of different purposes, you should be aware that the books use the EAN system and a great many products use UPC codes. Both of those systems are different than Code 39. If you need to print product barcode labels that will be used in chain stores and other retail business, you'll want to purchase special barcode printing software. However, you may find that AnyOrder's internal Code 39 printing capability will come in handy for a variety of uses. You can use it to mark boxes for internal inventory purposes. You can use it if you produce products which are not sold in the normal market place. For example if you're an artist or craftsperson, you can barcode your own work with it. You can also use AnyOrder's barcode labels if you have your own store and you want to use your own barcoding system. When you select FILE >> PRINT BARCODE LABELS, the following dialog box appears:
The dialog box looks very much like the Print Mailing Labels and Print Shipping Labels dialog boxes. Both are good references if you need details on any aspect of the "Print Barcode Labels" dialog box. The "Print Barcode Labels" dialog box allows you to select from one or more label formats that you might use in printing labels. To use the "Print Barcode Labels" dialog box, select which label format you want from the upper left of the dialog box. Then click on "Create List and Continue Process." When you click on this button, AnyOrder will automatically open up your word processing program with the labels in place and ready to go. You can make one final review in your word processor, and print the labels when you are ready. The printing of labels is guided by something called label properties. You can review label properties by clicking on the "View or Modify" button. If desired, you can also create your own label formats by clicking on "Create a New Format." The properties are very similar to Mailing Label properties. There are, however, two differences: 1. Do not format barcode numbers for Code 39. The Code 39 barcode font requires that an asterisk (*) be placed at the start and end of the barcode. However, you not limited to using the code 39 font. If desired, you can purchase and use other barcode fonts. If you do use another font, you'll want remove the checkmark, eliminating the asterisks. 2. Number of records to create. The actual number of records that you'll need are determined by how many labels fit on one page of the label paper that you use. By default, AnyOrder will create 100 labels of the same barcode, more than enough to fill out one page. In most cases, you won't have to change the number. But, if desired you can control the number of records you want sent to your word processing program by entering the number here. For information on the rest of the "Properties" dialog box, see mailing list properties. Sample Labels The sample barcode label that comes with the program is designed to be used in combination with Microsoft Word. If you have Microsoft Word on your computer, it's worthwhile to run through the process described below. The sample assumes that you've installed AnyOrder to the default directory: C:\AnyOrder. If you've install it to a different directory, you'll need to do two things. First, check to see if AnyOrder has the correct directory paths in the "Label Properties" dialog box (reached by clicking on "View or Modify" on the upper right of the screen.) See Mailing Label Properties for more information. And, secondly, you'll need to start Microsoft Word and load in the following document: BarCode_Labels.doc. BarCode_Labels.doc is found in AnyOrder's "Labels\" sub-directory. You'll need to use the Mail Merge Wizard and change the path of the data source (BarCodes.txt) to the "Labels" sub-directory under the name of the installation directory you've used (see Mailing Label Properties). Once again, this is only necessary if you've installed the program some place other than C:\AnyOrder. Start at the Product Information Database. Make sure you have entered a number in the Barcode Field. Then select FILE >> PRINT BARCODE LABELS. The "Print Barcode Labels" dialog box will appear. Make sure "Sample: Barcode Labels" is selected, and click on "Create List and Continue Process." A dialog box will appear asking you for the path to Microsoft Word. Once you've enter the path, AnyOrder will remember it for future sessions. (Note: newer versions of Microsoft Word will trigger the following message: "Opening this document will run the following SQL command …" Just click on "Yes." You can remove this message by following these directions: MS Word Hints.) Microsoft Word will start up. The label document (BarCode_Labels.doc) will be automatically loaded. On the Microsoft Word screen, you should see the barcode, name of the product and price. If, instead of the barcode, you see <<BARCODE>>, you'll need to click on the "View Merged Data" button to change the view so you can see the actual data. (Microsoft is always changing things and changing terminology. Information on the "View Merged Data" button (or whatever Microsoft calls it in the latest version) and other mail merge features are found in Word's help documentation.) Important Note: Microsoft Word's merge functions are notoriously finicky and you may not see your current data when the program first opens. In fact, you may see the data from your last export. Because of this, it's always a good idea to do a quick check. In newer Word programs make sure the "Mailings" ribbon is showing. In older Word programs: select Tools >> Letters and Mailings >> Show Mail Merge Tool Bar. Then for newer Word program, click the "Preview Results" button off and on. Or for older Word program, click the "View Merge Data" icon off and on. That refreshes the screen so that you'll see your new data. If you do not see the barcode -- in other words, if you see numbers on the screen rather than the barcode -- it means that you need to manually copy the barcode font to the Windows font directory. For more information, see Barcoding Features. This sample uses a common label lay-out. This particular format is Avery 5160, but other companies sell equivalent label paper. You can purchase Avery (or other manufacturer's) label sheets at most office supply stores -- or on the Internet. At this point, you can run a print on ordinary paper to see how it looks. To print it, select FILE >> PRINT. If desired, you can use the sample as a starting point to design your own labels. Use MS Word's Mail Merge Wizard to select the type of label paper you want and format the address to your liking. (Depending upon the version of Word, the wizard is commonly found at: TOOLS >> LETTERS & MAILINGS >> MAIL MERGE WIZARD) Important Note Microsoft Word has some bad habits, even the most recent, up-to-date versions. When you create your own barcode labels, do the following: 1. Make sure that you turn on Microsoft's space and paragraph symbol so that you can see them. 2. Take care to format only the barcode characters with the barcode font. When formatting characters, Microsoft Word has the bad habit of including spaces and paragraph symbols. Do not format spaces or paragraph symbols with the barcode font. For example after selecting the barcode code number (and asterisks) in the following (after carefully avoiding the paragraph symbol, Microsoft Word will go ahead and include the paragraph symbol: *134567*¶ This is the way is SHOULD look (the paragraph symbol is visible): |||||||||||||||¶ This is the way it should NOT look (no sign of the paragraph symbol): |||||||||||||||||| You'll have to work out a system to keep the paragraph symbol from being included. On suggestion is to add a couple of spaces: *1234567*..¶ When you try to format this, even if you leave out the spaces and paragraph symbol, Microsoft Word will format it all as the barcode font. |||||||||||||||||| After it has done this, however, carefully highlight from the end in a forward direction so that the two spaces are highlighted and remove the barcode formatting, so that it looks like the following: |||||||||||||..¶ Other Barcode Fonts It is possible to use other barcode fonts instead of the Code 39 font that comes with AnyOrder. It is just a matter of installing the font, and reformatting the barcode numbers in Microsoft Word with the new font. Be aware, however, that some barcode fonts (such as Bookland EAN and UPC variations) require check digits. AnyOrder is not set-up to handle check digits. In those cases, you'll want to purchase specialized barcode printing software. More Information For more information on barcodes, see Barcode Features
|