| Creating an Empty Balance File |
|
|
Level II or Higher Feature
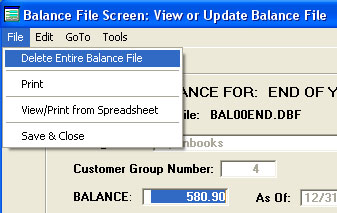
If you have created one or more Balance Files while practicing with the program, you'll want to make sure they are deleted. You'll also want to create one blank Balance File. Balance Files hold the balances of your customers. Creating a blank Balance File gives the program a point to start from. Using this first Balance File as a foundation, the program will automatically keep all future Balance Files updated. The following is a manual procedure that you can use to create an empty balance file. We've left this in the help documentation to give you an internal look at how the procedure works. However, it's much easier to use the new automated procedure built in the program. The automated procedure is reached by selecting MAIN TASKS >> BILLING STATEMENTS AND BALANCES. When the Billing Options screen appears, click on the "More Billing Options" button. The manual procedure is as follows: 1) Select MAIN TASKS >> BILLING STATEMENTS AND BALANCE FILES from the Menu Bar. 2) The Billing Options Screen will appear. Click on: "Manually Update Balances." 3) The "Select or Create a Balance File" dialog box will appear. Look at the small box, just under "Choose and Existing File to View or Update." This box should be empty. 4) If this box is empty, skip to the next step (Step E). If the box is not empty, click on a file listed in the box, and then click OK. The Balance File Screen will appear. From the menu on top of the "Balance File Screen, select FILE and DELETE ENTIRE BALANCE FILE. The Balance File will be deleted. Go to Step B (above) and repeat the procedure until all Balance Files have been deleted and the box is empty.
5) Once you are assured that there are no Balance Files, the next step is to create one empty Balance File. To determine which Balance File to create, go to the Billing Options Screen if you're not there already. (The Billing Options Screen is reached by starting at the Main Invoice Screen and selecting MAIN TASKS >> BILLING STATEMENTS AND BALANCE FILES). Once on the Billing Options Screen, and click on "More Billing Options." Then click on "Balance File Information." The program will tell you the name of the Balance File used for the "Normal" billing process. Write down the name. 6) Now return to the Billing Options Screen. Click on: "Manually Update Balances." Enter the year of the Balance File (that you wrote down) and indicate whether it is "Middle of the Year" or "End of the Year." Once you've done that, press OK. 7)The Balance File Screen will appear. Leave everything the way it is and click on EXIT. A dialog box will come up giving you several options. Choose the first one "Leave Balance File Empty." That's it, you're all finished. |