| Moving Billing Information to the Program |
|
|
Level II or Higher Feature
This is section is for new users of AnyOrder. If you have an existing business and if you have just switched to AnyOrder, you may need transfer billing information from your old software program into AnyOrder. (Note that there is a list of other steps to follow when moving from an old software program to AnyOrder. That's found here: Preparing the Program for Your Use.) If, when you start using AnyOrder, all your customers are paid up, then you're fine. You don't have to worry about the following. But if you have customers that owe you, then you'll want transfer their outstanding balances into AnyOrder. You can use one of two methods to transfer customer balances. One involves creating "re-issued" or "summary" invoices and the other involves creating a Balance File. We recommend the "re-issued" or "summary" invoice method since it is much easier and it can provide you with a traceable record of the transfer. We are no longer recommending the Balance File method. While it accomplishes the task, it's a more complicated procedure.
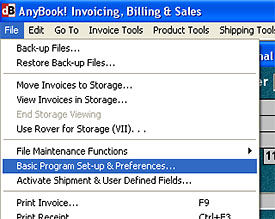
Method # 1: Using "Re-issued" or "Summary" Invoices Method #1 is the recommended method since it provides you with a record of the balance transfer to AnyOrder. It's also to easier to correct if, at a later time, you find an error. 1) First make sure you have set-up the program for your business by entering your business name, address, etc. in Basic Program Set-up. Basic Set-up is accessed by starting at the Main Invoice Screen and selecting FILE >> BASIC PROGRAM SET-UP from the menu (below).
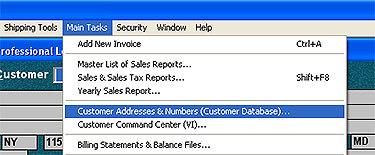
2) If the customers that have a balance due are regular customers (which many of them will be), give each of them a customer number. Customer Numbers are assigned in the Customer Information database. The Customer Database is access from the Main Invoice Screen by selecting MAIN TASKS >> CUSTOMER ADDRESSES & NUMBERS from the menu (below):
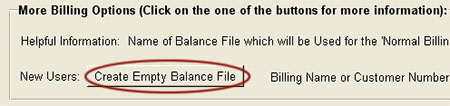
3) If you haven't already, create an empty Balance File. Balance Files hold your customer's balances but since AnyOrderwill be picking up the amount due from the invoices, we need to make sure the starting balance file is empty.) The best way to do this is to start at the Main Screen and selecting MAIN TASKS >> BILLING STATEMENTS & BALANCE FILES. Then click on "More Billing Options." Then click on "Create Empty Balance File."
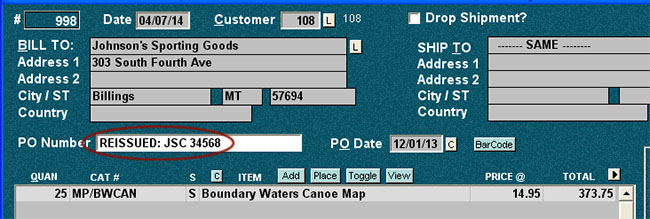
3) The best way to keep track of previous customer balances is to create a new invoice in AnyOrder for each unpaid, old invoice. If you have lots of invoices involved, then you'll want to use another method (described next), but, if it's possible, use this method, since it provides you with a clear record of account activity. The method is quite simple. Create a new invoice in AnyOrder, duplicating the information on the old invoice. In the PO Blank of the new invoice, type in "REISSUED" and the customer's PO number. In other words, you are re-issuing each old invoice with a new invoice number and new date.
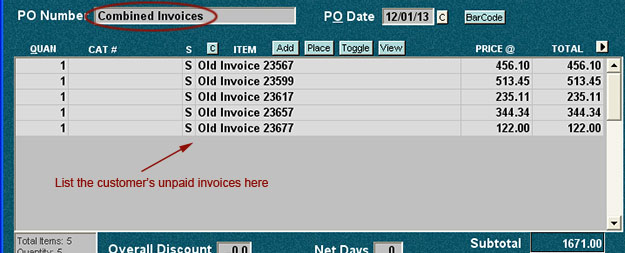
Whatever is recorded in the PO Blank shows up on the billing statements, and using the term "reissued" is a way that you and your customer can keep track of the change in invoicing systems. In the NOTES area of the Invoice Screen, type in the number and date of your old invoice number. From a billing standpoint, that's all you have to do and you're ready to use the program. This may not be practical if you have to create lots of invoices. In that case, go to the next step. 4) Go here only if you didn't use the method described in step 3, above. If you have lots of unpaid invoices and it's too much work to use the technique described above, the other method is to combine all of the unpaid invoices of a customer onto one invoice. You have two options: First Option. In the first option, you create a new invoice and you enter each of the unpaid invoices in the Item Area. Here's how you do it: Select one of your customers that have a balance due and paste their name and address into a new invoice. In the PO Number blank, type in "Combined Invoices." This is to indicate to the customer that you are taking several unpaid invoices and combining them into one. Whatever is in the PO Number blank shows up on the billing statement, thus "Combined Invoices" will be on the billing statement that is sent to the customer. For your own reference, you should have a list of the old invoices that the new combined invoice is based on. The invoices are listed as products in the Item Area in the middle of the Invoice Screen. a) Set "Quan" (quantity) to "1"; b) Leave "Cat #" (Catalog Number) blank; c) Type in "S" for the S-Code; d) In the "Item" (Item Name) column, type in the old invoice number, i.e. "Old Invoice # 1206; e) In the "Price @" column, type in the amount due for that invoice. Note if one of the invoices you are entering is a credit invoice, use "M" in the "S" (Sales Code) column. "M" means credit memo and will change the "Total" column to a negative number. Continue creating new invoices for each customer with a balance due, entering the information as described above. Each customer has their own invoice. Here's a view of what the Item Area might look like:
Second Option. In second option, you also create a new invoice, but in this case you don't list unpaid invoices. You simply enter the customer's total balance owe. The first option is the best of the two since you have a good record of the balance transfer. However, you may not have all of the information necessary to use the first option. If your old system only provides you with the amounts owed by each customer, but no information what invoices are outstanding, then you'll need to use this option. Select one of your customers that have a balance due and paste their name and address into a new invoice. In the PO Number blank, type in "Balance Forward." This is to indicate to the customer that you are taking his balance from your old system and bringing it forward to AnyOrder, your new system. Whatever is in the PO Number blank shows up on the billing statement, thus "Balance Forward" will be on the billing statement that is sent to the customer. You will enter the customer's balance from the old system in the first line in the Item Area in the middle of the Invoice Screen. a) Set "Quan" (quantity) to "1"; b) Leave "Cat #" (Catalog Number) blank; c) Type in "S" for the "S" Column (Sale Code); d) In the "Item" (Item Name) column, type in "Balance Forward from Old System"; e) In the "Price @" column, type in the total balance due from the customer. Note: if the customer has a credit with you, type in "M" in the "S" column (Sales Code) and enter the amount of the credit in the "Price @" column. "M" means credit memo and the total amount will be shown as a negative number. Continue creating new invoices for each customer with a balance due, entering the information as described above. Each customer has their own invoice. 5) After listing the invoices, make sure the "Less Discount" blank is "0" and no tax or shipping has been added. Press CALCULATE. The total amount that your customer owes you should appear in the "Total Due" blank. 6) Once you have finished creating invoices, run a billing statement by selecting MAIN TASKS >> BILLING STATEMENTS & BALANCE FILES. Then click on "Start Normal Billing Process." Your customers will be listed and amounts owed shown on each statement. If you find an error, it's just a matter of returning to one of the invoices and correcting the amount. As each of the customers pay off their balance, you will enter payments in the Payment Box on the Invoice Screen. If it takes more than two payments to pay off the combined invoice, then create a new invoice. Use the "L" button to enter the customer's name and address. The invoice won't have any products on it. The Item Area will be empty and the Total Due will be 0, but you will use the Payment Box to record the additional payments. (The invoice, in this case, is being used simply for recording payments and has no other use.) If you need even more payment space, create another invoice and use the Payment Box. You may need to create several of these payment invoices. When Billing Statements are created, all the payments will show up on the customer's statement.
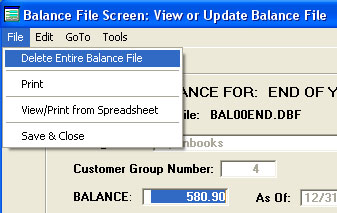
Method # 2: Using a Balance File NOTE: We are no longer recommending that you use the Balance File method. It works but Method # 1 is much easier to use since you don't have to worry about using "Choose Starting and Ending Dates" and then year and half later switching to the "Normal Billing Process." With Method # 1, you always use the "Normal" process which simplifies things greatly. We have retained the information on "Method # 2" for those individuals who might be in the process of using it and may need to refer to the instructions from time to time. Balance Files contain the names of your customers and their balances. The primary function of a Balance File is to provide starting balances of each customer for their billing statement. In this method, you'll create a Balance File and use the outstanding balances from your old program as the customers' starting balances in AnyOrder. The best way to describe this method is to use an example. We'll say that you are starting to use AnyOrder at the beginning of the calendar year, and for the purposes of this example, we'll say that you are starting early in the year 2014. 1) First, make sure there are no balance files. Go to the billing part of the program (MAIN TASKS >> BILLING STATEMENTS AND BALANCE FILES) and click on the "Manually Update Balances" button. Are there any balance files on the list? For example if Bal13End is on the list, we need to get rid of it. Select Bal13End. Then when the Balance File dialog box appears, select File >> Delete Entire File. Do this for any other Balance Files. You want to start with a clean slate.
2) Next make sure all of the customers that owe you at the end of the year are in the Customer Information Database. The Customer Database is access from the Main Invoice Screen by selecting MAIN TASKS >> CUSTOMER ADDRESSES & NUMBERS from the menu (below):
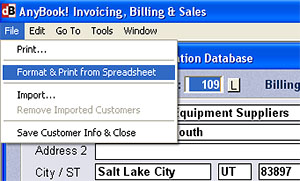
3) Once you have the customers in the Customer Database, stay in the Customer Database. Select FILE >> FORMAT & PRINT FROM SPREADSHEET. That will move your list of customers to Excel. (You may need to tell AnyOrder where it can find Excel. Just follow the directions.) Print the list. You'll be able to list to check off the customers as you run through this process.
4) Exit from the Customer Database. You'll be back on the Main Invoice Screen. Now go into the billing part of the program (MAIN TASKS >> BILLING STATEMENTS AND BALANCE FILES) and click on "Manually Update Balances."
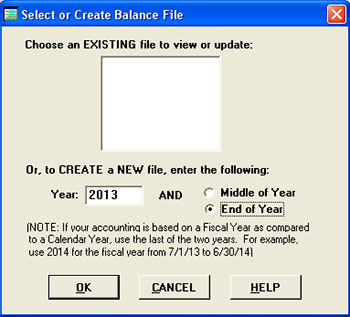
5) The "Select of Create Balance File" dialog box will appear:
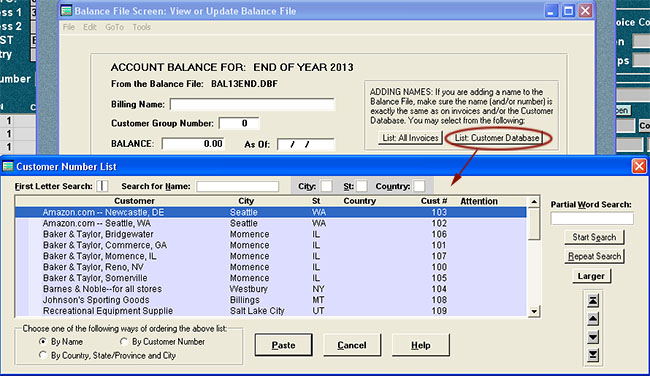
You'll be creating a new file. For our example, we will type in "2013" as the year and select "End of Year." This will create the file: Bal13End.dbf. Bal13End is the file we create in our example that we are using, but you'll need to decide which Balance File to create for your own situation. Which file to create? It depends on whether you are on a calendar year or a non-calendar fiscal year. It also depends on when you are entering the balance information. Here's how to figure it: Fiscal year is based on the calendar year: If you entering the balance information for the months January through June, use "End of Year" of the previous year. In our example, it's January of 2014, so we used "End of Year" of 2013. If you are entering balance information for the months July through December, use "Middle of Year" of the same year. Let's say it's October of 2014, the we would use "Middle of Year" of 2014. Fiscal year not based on calendar year. First you'll need to figure out what 6 months lie in the first half of the fiscal year and what 6 months lie in the second half of the fiscal year. 6) Once the Balance File has been created in # 5, above, the Balance File screen will appear. If the fields on the screen are not accessible, you can unlock them by selecting TOOLS >> UNLOCK. 7) Click on the "List: Customer Database" button. Select the first customer and the customer's name and address will be pasted in place.
8) Type in the amount that they owe you. For "As Of," use 12/31/13. (You would use 12/31/13 since you are using Bal13End, the end of 2013.) You'll need to enter the last date of the Balance File you are using. If you know how old the balance is, type it in the appropriate age field. If you don't know how old it is, enter it in the "Under 30 days" field. 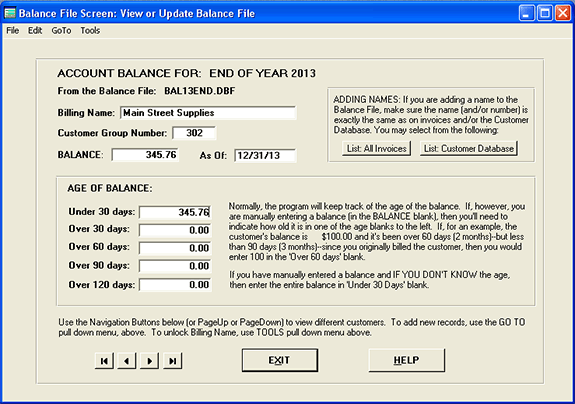 The Balance File Screen is where you enter the balances due from your customer. In the example above, Main Street Supplies owes 345.76. In this case, we didn't know how old the balance was, so we entered the 345.76 in the "Under 30 days" field.
9) Do this for all of your customers. Use the Excel spreadsheet of customers and check each off as you enter them. This way you won't accidentally skip one. 10) Once you have finished entering the information, run a billing statement by selecting MAIN TASKS >> BILLING STATEMENTS & BALANCE FILES. Then click on "Choose Starting and Ending Dates." For the Start Date, select the day after the ending date of the Balance File that you have created. In our example, we created Bal13End. The Balance File ends on December 31, 2013, so for the Start Date, we would enter 1/01/2014 (reverse the months if you use DD/MM/YY system.) Enter the present date for the End Date. The Starting Date that you enter will depend on the Balance File that you created. The easiest way to determine the Starting Date is to look at the Balance File screen (see the one illustrated above). On the Balance File screen, you'll see an "As Of" date. That's ending date of the Balance File, so the Starting Date that you use when generating billing statements is the next day. Once you get the Starting and Ending Date entered, the billing statement will run and the starting balances will be shown on each customer's statement. If you find an error, return to the Balance File and correct the problem amount.
As orders for your products come in, and you create invoices for these customers, be sure to use the customer number pop-up list (the "L" button beside Customer Number on the Main Invoice Screen). This assures that the customer is always grouped together for billing statements. When the customer sends a check to pay off part of the balance, create a new invoice. Use the "L" button to enter the customer's name and address. The invoice won't have any products on it. The Item Area will be empty and the Total Due will be 0, but you will use the Payment Box to record the additional payments. (The invoice, in this case, is being used simply for recording payments and has no other use.) If you need even more space for payments from the customer, create another invoice and use the Payment Box. You may need to create several of these payment invoices. When Billing Statements are created, all the payments that you've entered will show up on the customer's statement. IMPORTANT: For the first year and half, don't use "Normal Billing Process" Instead, continue to use "Choose Starting and Ending Dates" as described above. That's because the "Normal" billing process goes back and tries to assemble up to 15 months of invoices. You don't have those invoices yet, and you also don't have the Balance File which proceeds those invoices (and which the "Normal" process uses). Instead, when you use "Choose Starting and Ending Dates" AnyOrder is directed to use the Balance File immediately proceeding the Starting Date. That's the Balance File that you've created. Once you have used AnyOrder for one and half years, then you'll be able to use the "Normal Billing Process." When that time comes, you will want to switch over to use the Normal Process. It is easier, no dates need to be entered, and it will automatically create Balance Files when the program needs them. Make a note to yourself. If you have Level 6 or 7, you can make a note to yourself by using the Scheduler and have the program remind you when that time in the future comes. Or, if don't have Level 6 or 7, write it down on your calendar. |