| Billing Statements Screen |
|
|
Level II or Higher Feature
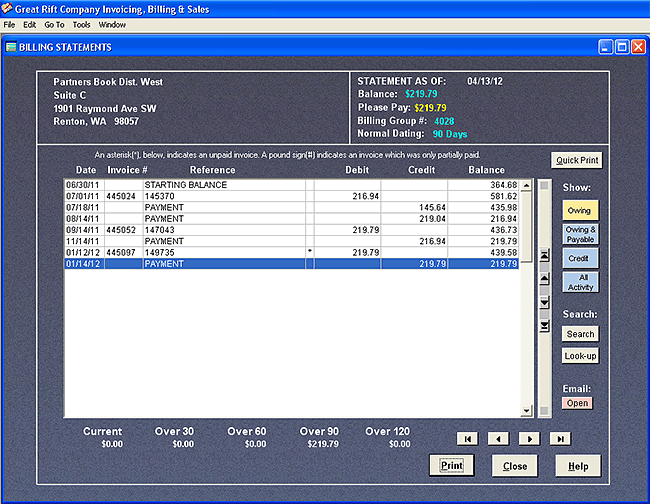
The Billing Statements Screen is the end result of the billing process. It appears after clicking on either the "Normal Billing" or "Choose Ending & Starting Dates of Billing Period" option from the Billing Options Screen. (Billing Options is accessed by selecting MAIN TASKS >> BILLING STATEMENTS & BALANCE FILES from the Menu Bar on the Main Invoice Screen.) After clicking on either of these two options, the program calculates how much each of your customers owe you and prepares statements for each of your customers. The statements appear on the Billing Statements Screen (shown below).
When the above billing statement is printed, it looks like the following:
(Note also that you may wish to refer to a illustrated guide that we have prepared on billing statements. You can reach the guide by clicking: Billing Statements: Preparation, Set-up & Generating)
Topics which follow, below, include the following: Moving From Statement to Statement How Statements Are Ordered (Natural Order) Finding Statements (Search & Look-up) A Note About Unpaid Invoices vs. Age of the Balance Exceeding Customer's Credit Limit Copying the Entire Statement to the Clipboard Edit/Print from Spreadsheet (This Customer) Edit/Print from Spreadsheet (All Customers) Age Report from Spreadsheet (All Customers) Limiting the Itemize List to a Certain Customer Write-off Customer's Starting Balance Message: "No Invoices Were Found That Match Above Name." Fixing Problems: What to Do if One Customer Has Two or More Billing Statements Wrong Address on the Billing Statement
The Billing Statements Screen provides you with a summary of paid and unpaid invoices for each of your customers. The spreadsheet which occupies much of the screen lists each invoice issued to the customer, the date of the invoice, and the amount. Invoiced amounts appear in the "Debit" column, meaning that the customer owes you this amount. The spreadsheet also lists payments that the customer has made. Payments appear in the "Credit" column. The final column ("Balance") provides a running balance of how much the customer owes. The final figure at the bottom of this column is the customer's current balance. The final balance is also repeated in the upper right hand corner of the screen beside the "Balance:" heading. If the final balance is positive, the customer owes this amount. If the final balance is negative, the customer has credit.
To create statements, AnyOrder combines invoices together by the Billing Group Number for the statement period. (For more information on the Billing Group Number, see: Customer Database.) If there is no Billing Group Number, it combines invoices by Billing Name only. Let's say that the Billing Name is "Main Street Books" and the Billing Group Number is "405." All invoices with a Group Number of "405" will be grouped together. From that group of invoices, it extracts the invoice number, date, PO number, and any payments and their date. Now let's say that "Main Street Books" is not in the Customer Database. In other words, it does not have a Billing Group Number. In that case, AnyOrder will group all "Main Street Books" invoices together based on the name. As long as the name was spelled the same on each invoice, then they are would be all grouped on the same billing statement. In either case, just before the grouping process begins, AnyOrder needs a starting balance. Quite often, active customers will carry over a balance due from one billing period to another. A balance due from a previous period becomes the starting balance for the new period of time. Starting balances are kept in Balance Files. Finding the appropriate Balance File, it and locates Billing Group Number of "405." (Or it locates "Main Street Books" if the business does not have a Billing Group Number). Beginning with starting balance, it lists each of the invoices and payments by date. At the same time, it calculates a running balance until it arrives at a final balance figure. Finally, it runs a process which compares payments to the overall balance and apportions the balance by its age.
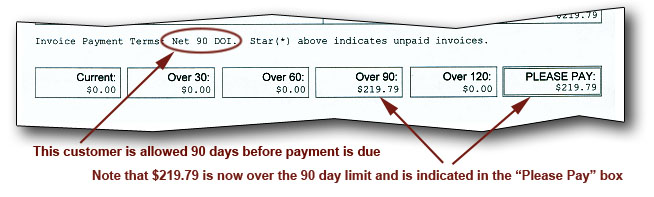
Across the bottom of the Billing Statements Screen are a series of numbers which apportion the age of the customer's balance. The numbers are titled "Current," "Over 30," "Over 60" and so on. On the printed statement, these appear as a series of boxes at the bottom of the statement. Closely associated with the age of the balance is the "Please Pay" amount. That's found on the upper right hand of the screen display or at the bottom of the printed statement. The bottom of the printed statement is illustrated below:
What do they mean? The best way to describe them is to use an example. You can see one example illustrated by the printed statement above, but let's use a slightly different example and look at it in more detail. Let's you that have a customer and you provide them with 30 day dating. In other words, they have 30 days to pay off the invoice. Let's say that you issue them one invoice and the total amount on the invoice is 150.00. Here's how the age of balance and "Please Pay" work. 1. The invoice date (in the upper left hand corner) of the Main Invoice Screen is important. When you do billings, AnyOrder looks at the invoice date. Let's say that you run billing statements 15 days after customer's invoice date. In that case, the amount of the invoice (150.00) will show up in the "Current" box. "Current" means the most recent or current balance. The "Please Pay" box will show zero. Why? The customer technically doesn't owe anything yet. Since you are giving them 30 days, and it's only been 15 days from the invoice, they are still within their time limit. However, the amount in "Current" reminds them that amount is coming due shortly. (Note that many businesses will not send out a statement until an amount appears in "Please Pay." That makes sense. It's more efficient and it cuts back on paperwork. If you have good customers that pay on time, it's not necessary to send them statements. They'll pay off their invoices. However, it's always a good idea to send out a statement once an amount appears in "Please Pay." Even good customers can misplace an invoice, and the statement is a reminder that they have an outstanding invoice. Thus, "Please Pay" is not only helpful from the customer's standpoint. It's also helpful from your standpoint. When an amount appears in "Please Pay" that's your signal that it's time to send a statement.) 2. Now, let's say you run a billing statement 45 days after the invoice date and the customer has not yet paid off the invoice. In this case, the amount of the invoice (150.00) will appear in the "Please Pay" box because now they are over their 30 day limit. They clearly need to get their invoice paid, and it is emphasized by placing the amount in the "Please Pay" blank. Additionally, the amount (150.00) will move from "Current" to the "Over 30 day" Box. That tells you and the customer that their balance of 150.00 is now over 30 days old. 3. Let's say the customer is still behind on payment. You do a billing 75 days after the invoice date. The amount of the invoice (150.00) stays in the "Please Pay" box, but it moves from the "Over 30 days" box to the "Over 60 days" box. Of course, in a real situation the amounts in the age boxes will be derived from several invoices added together. Moreover, a customer may pay off newer invoices before older invoices or they may pay with partial payments. But AnyOrder is able handle all of these situations and provide you with the information that you need to keep close watch on your accounts.
Moving From Statement to Statement You can move from statement to statement by using the navigation buttons on the bottom of the screen. You can also press Page Up or Page Down on your keyboard. To go to the last statement, press Ctrl+Page Up. To go to the first, press Ctrl+Page Down.
The spreadsheet occupies the middle of the statement screen and contains a list of invoices and payments for the billing period. If you have many invoices and payments recorded on the spreadsheet, you may wish to use the navigation bar on the far right of the spreadsheet. By clicking on the up arrow, you'll move up one page of spreadsheet rows. By clicking on the down arrow, you'll move down one page of spreadsheet rows. The up arrow-bar, takes you to the top of the spreadsheet. The down arrow-bar takes you to the bottom of the spreadsheet. You can also use the GOTO Menu, or the following speed keys: Shift+Up Arrow. Up one page of spreadsheet rows. Shift+Down Arrow. Down one page of spreadsheet rows Shift+Page Up. Top of spreadsheet. Shift+Page Down. Bottom of spreadsheet.
How Statements Are Ordered (Natural Order) When the statements first appear, the statements are in Natural Order. In Natural Order, the statements appear in two groupings. The first group is ordered alphabetically by billing name and consists of customers without customer numbers. The second group consists of customers with numbers. They are placed in order according to their Customer Group Number. Also when the statements first appear, all customers with unpaid invoices are listed. Normally, customers are given a grace period (known as dating) in which they can pay their bill. Commonly this is 30 days, but it might be 60, 90 or 120-days depending upon the customer. The order and which customers are displayed can be changed.
You have several different order options. They are activated by selecting TOOLS from the Menu Bar at the top of the screen and choosing one of the following: Natural Order (This the order of invoices as described above), Billing Name, the Amount in Please Pay, and the amount in Balance.
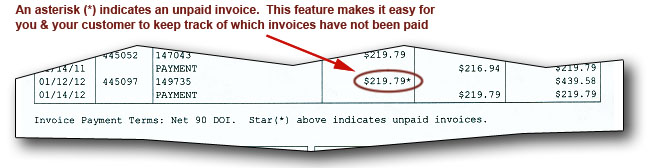
All customer credits are listed in the credit column on the statement. If the customer has a credit for an ending balance, the credit will be indicated as a negative amount. Level 6 - 7 Users: AnyOrder normally places an asterisk (*) beside all unpaid invoices with an amount owing. In the Level 7 program, AnyOrder can also indicate credit invoices in the same manner. Outstanding credit invoices will appear with an asterisk. No asterisk will appear beside credit invoices which have been covered either by issuing a refund or receiving a check from a customer which has taken in account the credit.
You have several different display options. These are activated by clicking on the colored buttons to the right of the spreadsheet or by selecting TOOLS from the Menu Bar at the top of the screen and choosing one of four options: Show Accounts Owing. This is the default and what is displayed when the Billing Statements Screen first appears. All the customers that are listed will have at least one unpaid invoice. Those which haven't exceeded their grace period (30 days, 60 days, etc.) will have a "0" in the "Please Pay" blank. Those who have exceeded their grace period will have the amount owed in the "Please Pay" blank. Show Accounts Owing & Payable. Only those customers who have exceeded their grace period are listed. All will have an amount owed in the "Please Pay" blank. Show Accounts With Credit. Only those customers with credit will be listed. Show All Account Activity. All customers will be listed. This includes customers who have paid and have an account balance of zero, and those customers with unpaid invoices (including those still within the grace period and those who have exceeded the grace period).
Finding Statements (Search & Look-up) To help locate statements, two features are available including "Search" and "Find from Look-up List." Both work similar to those found on the Main Invoice Screen and are accessed by clicking on the buttons ("Search" and "Look-up) on the lower right of the screen or selecting from the GO TO Menu. To move through the "Look-up" list, type the first letter of the customer's name. Continuing to type the letter moves further down the list. The "Look-up" button is particularly helpful if you checking to see if you have two or more billing statements for a customer. If the customer's name appears more than once on the look-up list, that means you need to make corrections on the invoice. You want all account activity for a customer listed on the same billing statement. There's more about this below: Fixing Problems.
If you use the program's Mark Paid feature which is selected by default, the statements will also identify which invoices have been paid, those partially paid, and those remaining unpaid. Unpaid invoices are marked with an asterisk (*). Partially paid invoices are marked with a pound sign (#). Paid invoices are left unmarked.
Note that with the current version of AnyOrder, partially paid invoices are only indicated if the amount has been manually entered on the invoice. If a partially paid invoice was part of a series of invoices paid in a lump sum, AnyOrder will show it paid (by not marking it). This is a rare occurrence, but it's important to be aware of this limitation of the program. If desired, you can turn off the asterisks. Select TOOLS and DON'T IDENTIFY UNPAID INVOICES. This will remove any asterisks or pound signs from the statement. The feature can be turned on or off at will. If you want the asterisks on for some customers, turn it on by selecting TOOLS and IDENTIFY UNPAID INVOICES. And you can turn it off for others. These menu choices are not available if you have turned off the Mark Paid feature in Basic Setup. If, among the statements, you find an invoice incorrectly marked with an asterisk (*) or pound sign (#), you should look up the invoice and correct it. To do so, leave the Billing Statements Screen and find the invoice by using Search. Once you've located the invoice, check to see why it hasn't been paid. You may have forgotten to mark it paid. If the customer has issued a check specifically for the invoice, use the Mark Paid feature and select the first option from the Mark Paid dialog box. This will clear up its payment status, and when you run Billing Statements again, the asterisk will be gone. It's possible, too, that the invoice was one of several paid off by one lump sum payment made by the customer and recorded on another invoice. If you have forgotten to mark this one paid, it can be rectified by using the Mark Paid feature and selecting the third option from the Mark Paid dialog box. When you use the third option, nothing will be entered in the payment blank, but the invoice's status will change to "PAID (Elsewhere)," meaning that it was paid on another invoice. When you run Billing Statements again, the asterisk will be gone.
A Note About Unpaid Invoices vs. Age of the Balance When a customer pays on time and keeps up with their payments, the amounts shown in the age area on the bottom of the screen ("Current," "Over 30," "Over 60," etc.) will match the age of unpaid invoices (indicated by asterisks on the statement). However, if a customer skips a payment or doesn't fully pay off an invoice, the age of the invoices marked with asterisks will not correspond to the amounts in the age area of the screen. That's because whenever a payment is made, as far as aging is concerned, the payment is applied to the oldest amount outstanding. The sum total of the age amounts, however, will always equal the total owed by the customer. Both methods--age of balance and a list of unpaid invoices--have been included on billing statements to provide you with alternative ways of looking at customer debt. Let's look at this a bit more. Let's say that you notice an unpaid invoice that is over 90 days old. You would expect the amount of the old invoice to appear in the "Over 90 days" category. But if the customer has paid off one or more recent invoices, you won't see it. That's because the payments made on the newer invoices have been applied to the older debt. There are two ways of looking at situation described above. If you look at it purely from an invoice standpoint, there's an old invoice that needs to be paid. From an aging standpoint, however, it doesn't matter what invoices are involved. The individual invoices are irrelevant as far as aging is concerned. Aging is concerned only with the customer's total debt and how much money is coming in to pay off that debt. When someone makes a payment, the money from the payment goes to pay off the oldest debt. Thus, because of recent payments, the amounts found in the age categories will be adjusted accordingly. With that understanding, the age figures do, indeed, make sense, and, most importantly, are mathematically correct.
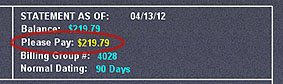
If a customer hasn't exceeded their grace period, the "Please Pay" blank (at the upper right hand side of the screen) will have "0" in it. If they have exceeded their grace period, then the "Please Pay" blank will show the amount due. In the example, below, the customer has exceeded there grace period and owes $291.79.
Any customer with an amount in "Please Pay" should be sent a billing statement. Note that "Please Pay" is built on intervals of 30 days: 30, 60, 90, and 120. AnyOrder will round up the grace period to the nearest 30 day interval. For example, if you have indicated a grace period of 45 days (45 in the Net Days blank), AnyOrder will use 60 days as the cut-off point. Thus, as soon as the invoice is older than 60 days, "Please Pay" will show the appropriate amount due. In the Level 6 - 7 programs, you can configure AnyOrder to set the Please Pay amount to the same as the balance owing. This feature is turned on by selecting "More Options" on the Billing Options Screen.
Exceeding Customer's Credit Limit - Level 6 - 7 Feature In the Level 6 - 7 programs, you can assign credit limits to each of your customer. Credit Limits are assigned in the Customer Database. Additionally, you can have the program alert you to customers that have exceeded their limit. That's done by turning on the credit limit flagging feature found in "More Options" on the Billing Options screen. When a customer has exceeded their limit, a bright yellow "Credit Limited Exceed" note appears on the upper right corner of the statement screen.
Copying the Entire Statement to the Clipboard - Level 3 and Higher Feature Level 3 and Higher. This feature allows you to copy the billing statement to the clipboard. To access the feature, select EDIT and COPY ENTIRE STATEMENT TO CLIPBOARD. You can copy the statement as text or with HTML tags for use in Internet applications. More Information.
This feature (accessed from the FILE menu) allows you to export the contents of the spreadsheet to other software programs. For more information: Billing Data Export.
Edit/Print from Spreadsheet (This Customer) - Level 4 or Higher Feature Level IV or Higher Feature. This feature (accessed from the FILE menu) moves the data from the statement directly to Excel or a spreadsheet of your choice. If desired, you can edit the data and then print it.
Edit/Print from Spreadsheet (All Customers) - Level 4 or Higher Feature Level 4 or Higher Feature. This option is accessed from the FILE menu. Before using it, you may wish to put your customers in alphabetical order. Normal order is an alphabetical ordering of customers without number followed by an alphabetical ordering of customers with numbers. To put all customers in alphabetical order, select TOOLS >> ORDER BY BILLING NAME. This feature moves the data from all statements directly to Excel or a spreadsheet of your choice. The data is in raw form, and you'll want to manipulate the data so that it is format in a manner suitable for your purposes.
Age Report from Spreadsheet (All Customers) - Level 4 or Higher Feature Level 4 or Higher Feature. This option is accessed from the FILE menu. Before using it, you may wish to put your customers in alphabetical order. Normal order is an alphabetical ordering of customers without number followed by an alphabetical ordering of customers with numbers. To put all customers in alphabetical order, select TOOLS >> ORDER BY BILLING NAME. When you select this option, AnyOrder creates a list of customers. For each customer, it calculates the age of the customer's account in 30 day intervals. It also calculates the customer's ending balance and "Please Pay" amount. Once this information is derived, Excel (or a spreadsheet of your choice) is automatically started with the data in place. Once in Excel, you can place the customers in groups, sum up columns, and manipulate it in other ways. When the data is in the desired format, it can be printed. All of the information included on an Age Report is found on the individual statements, but it compiles everything into one neat package, providing you with a broad overview of your accounts. A note about the column names which appear in Excel: You'll notice that the columns are named Day30, Day60, Day90, Day120, Day120Plus. These are AnyOrder's internal field names, and for the sake of clarity, it is helpful to define them in more detail. Day30 is equivalent to 0-30 Days (or Current Amount). Day60 is equivalent to 31-60 days. Day90 is equivalent to 61-90 days. Day120 is equivalent to 91 to 120 days. And finally, Day120Plus is 121 days or greater.
Email Export - Level 3 and Higher Feature Level 3 and Higher. This feature (accessed from the FILE menu) allows you to place the statement in a text, Microsoft Word, HTML file for emailing purposes. It's accessed by selecting FILE and EMAIL EXPORT. The procedure is nearly identical to exporting an invoice for email. This feature includes two options. The first option will identify unpaid invoices with an asterisk (see Identify Unpaid Invoices, below, for more information). The second option ("List Unpaid Invoices Only") limits the statement to a list of unpaid invoices only. This simplifies long statements and concentrates the attention of your customer on unpaid invoices. When you select this option, the statement will not show a running balance, but it will show the total due at the bottom.
To print the statement, you can click on one of two buttons: PRINT or QUICK PRINT. If you click on the PRINT button, the Printing Information dialog box will appear first on which you can indicate the number of copies you want printed. You can also turn off the marking of unpaid invoices (see "Identifying Unpaid Invoices" further down on this page). If you remove the checkmark from "By-pass Printer and Printer Set-up Dialog Boxes," the program will trigger the Windows Printer dialog box, allowing you to change printer settings or switch printers. You can also change printers by clicking on "Change Printer." Quick Print. If you click on QUICK PRINT, all printer dialog boxes are by-passed and the statement is sent directly to the printer. This is handy when you are printing a number of statements. Once you have the printer set-up the way you want, you can use Quick Print to move quickly through the statements without pausing at a dialog box each time. You want to make sure that your printer is turned on before using Quick Print since there are no reminder dialog boxes. Use with Business Envelopes. The printed invoices are set up so they can be folded and placed in a windowed business envelope. Fold the statement along the horizontal line just above the word DATE so that "Statement" at the top shows. Then fold the bottom of the edge of paper so that it fits inside this fold. It will now fit in an envelope, and the billing address will be lined up with the window. HTML Printing. Like invoice printing, you can create an HTML version of the statement by clicking on the "Create HTML File and Print" button. (HTML is a type of formatting used by Internet documents.) By clicking on this button, an HTML file named Billing.htm is created. Once the file is created, the default browser prints the file. Since this feature uses calls directly to the Windows operating system, it may not work on all systems. Our tests show that it doesn't always work with networked printers--and there may be other printers. Nonetheless, we wanted to include it in event that it helpful to some users. Secondary Printer Engine. Additionally, you can access the Secondary Printer Engine from the printer dialog box. In general if you are using the Secondary Printer Engine for invoice printing, you will have already selected as the default, but, for convenience, it can also be selected here as well. List Unpaid Invoices Only. With particularly active customers, you may wish to limit the statement to a list of unpaid invoices only. This simplifies long statements and concentrates the attention of your customer on unpaid invoices. To turn on this printing option, click on "List Unpaid Invoices Only." When you select this option, the statement will not show a running balance, but it will print the total balance at the bottom. Use UK format for postcodes: place postcode at end of address on its own line. This formats the postcode according to United Kingdom postal standards. As long as the name of a country is not found in the address, it positions the postcode at the end of the address on its own line. If you include a country, the postcode is positioned after the city. A sample printed billing statement is illustrated below:
AnyOrder will re-state the customer's terms on the printed billing statement. This is the same notation that appears on the customer's invoices, i.e. "Terms: 30 Days Net Date of Invoice." Reprinting the terms on the statement is a reminder to the customer that they have agreed to pay you within a designated amount of time. (See note below on user defined invoice terms) Note that "Date of Invoice" and "End of Month" are abbreviated on statements as "DOI" and "EOF." "Date of Invoice" (or "End of Month") serves as the starting point for billings. By default, AnyOrder uses "Date of Invoice" for a starting point to calculate when a customer's balance is due, but, if desired, you can also use "End of Month." More information on how to set this up is found in Basic Set-Up. Note on User Defined Invoice Terms. AnyOrder will produce billing statements for customers even if you've set up your own terms messages. You can establish your own terms messages by using codes consisting two-digit negative numbers. Because AnyOrder's billing program is designed to work with 30, 60, 90 and 120 day periods, it can not produce reports which breaks down amounts owed at odd intervals like 15, 45 or 75. Also, AnyOrder does not include the terms message on the statement if it's a user defined message. However, it will produce a statement and it will indicate the amount owed by the customer at any point in time. Even though you may be utilizing your own system of terms, AnyOrder, nonetheless, can produce useable statements. If the statement is not quite what you want, it can alter it by using one of the export routines.
Batch Printing - Level 3 or Higher Feature Level 3 or Higher. Batch Printing allows you to print two or more of billing statements at a time. This is handy since you don't have print each one individually, you can print all of the statements or select several from a list. Batch Printing is a part of AnyOrder Level III (or higher). For more information on the process, see Batch Printing.
To obtain the sum total of what all of your customers owe you (total invoiced accounts receivable) and the total of customer credits (total invoiced payables), select TOOLS and TOTAL RECEIVABLE. This is a particularly handy feature to use at the end of the year when, for accounting and tax purposes, you need total receivables and payables. Note that, in addition to the payable figure generated by the program, you'll probably have other payables (such as equipment, supplies, etc. that were payable at the end of the year). This feature of the program gives you only the total invoiced amount payable to your customers. More information on receivables and payables.
Payment Analysis is a diagnostic tool to help you locate possible recording errors associated with customer payments--and to provide you with an alternative way of reviewing a customer's account. It produces a list which includes payments made by the customer, where the payments are recorded and which invoices the payment pays off. It is activated by choosing TOOLS and PAYMENT ANALYSIS from the Menu Bar. For more information, see Payment Analysis.
Limiting the Itemize List to a Certain Customer - Level 6 - 7 Feature Level 6 - 7 Feature. Some of your customers may be placed in a billing group. This means that you may ship products to individual stores, but the bill is paid by one entity, usually the corporate office. Each individual store will have different Customer Number, but all will have the same Billing Group Number. When AnyOrder creates statements it combines the invoices from all stores with the same Group Number into one statement. Occasionally, you may wish to review the invoices from a selected store in a billing group. In other words, the list of invoices in the billing statement are limited to that store only. All other stores are filtered out. To filer for a one store, select TOOLS >> FILTER FOR A CUSTOMER WITHIN A BILLING GROUP. A dialog box will appear. Select a customer from the list, and AnyOrder will filter the display so it shows only the customer selected. It will also limit the display to UNPAID invoices only. (To remove the filter, page to a new statement.)
Write-off Customer's Starting Balance A write-off feature is available for customers who keep showing up every time you create billing statements. Such customers might be those who after a long period have not paid off a bill and you no longer expect to receive payment from them. Or it might be a customer who has a small, insignificant balance left on their account and you'd just like to clear it off the books. The write-off feature is reached by selecting TOOLS and WRITE-OFF from the Menu Bar. To protect important data, the option is only available when there is no other activity occurring in the customer's account. Note that if "Write-off" seems to be disabled, click in one of the columns (date, invoice #, reference, etc.) in the middle of the screen so that you can see the cursor flashing. When the cursor is not flashing, it means that statement screen is currently not active. Once the cursor is flashing, however, you'll find that as you page through the statements, "Write-off" will be working. What the write-off feature does is to re-set the customer's balance to zero (0) by making the appropriate adjustment in the balance file. Once you use it, the customer's name will no longer appear when you prepare billing statements. CAUTION: Don't use this indiscriminately when dealing with customer debt. It recommended that you wait several years before writing off debt. Sometimes a customer will pay off their debt after a long interval when they try to sell their business or when they need to buy more products from you. Once you re-set the balance to zero, you'll no longer have a regular reminder of the amount owed. Note also, if you are writing off debt or credit for a customer that will be continuing to order from you on a regular basis, issue a credit menu instead of using this method. A credit memo provides you and your customer with a clear track record of activity.
Message: "No Invoices Were Found That Match Above Name." On occasion, you may find the following message printed in the address blank of a billing record: No Invoices Were Found That Match Above Name. This message is triggered if you have a customer with debt that you've carried for some time, and the customer's invoices can no longer be found in the main invoice file. It's likely that the customer's original invoice(s) have been moved to a storage file. Since invoices are no longer accessible, AnyOrder can no longer itemize them. If there's still a chance that the customer will pay you, then your best bet is to do nothing. The record in the billing file will serve as reminder that the customer owes you. If there's no chance that the customer will ever pay, then use the "Write-off" procedure" described above.
Fixing Problems: What to Do if One Customer Has Two or More Billing Statements If you find that the same customer has two or more billing statements, you'll want to fix this. How you approach it depends on whether it is a customer with a number (which means they are included in the Customer Database), or whether it's a customer without a number (they are not in the Customer Database): Customers Without Numbers When AnyOrder puts together billing statements, it looks for the Billing Group Number. If there's no Billing Group Number, then it uses the spelling of the billing name, and it groups together all of those invoices with the same spelling to create the billing statement. If, in this situation, the customer's name is spelled differently on invoices, then two or more billing statements will result. The best way to check this is to click on the "Look-up" button. This provides you with a list of all billing statements in alphabetical order by the customer's name. Run down the list and look for any names which may have alternative spellings. They'll usually be in about the same location on the list. If you find a name with alternative spellings, then you'll need make an adjustment on one or more of that customer's invoices. If it's just one or two invoices, it's easy to fix. Return to the Main Invoice Screen, find the invoices, and make the correct to the billing name. When you run Billing Statements a second time, the extra statement should now be combined with the others. If things are more complicated and you find that you need to change lots of invoices, see Changing Customer Names. Customers With Numbers As noted above, when AnyOrder puts together billing statements, it looks for the Billing Group Number. It gathers all of the invoices together with the same Group Number and creates the statement. Just a quick explanation of Billing Group Numbers and Customers Numbers. Most often, the Customer Number and the Billing Group Number are the same. But when a customer has different shipping locations then the Billing Group Number comes into play. Each shipping location will have different Customer Number, but the Billing Number will be the same. Since it's all the same company, all invoices will be combined together, sent to one central office, and listed on one statement. The Group Number makes this possible. (For more information on the Billing Group Number, see: Customer Database.) If you have two or more statements for customers with group numbers, then you'll need make some adjustments. Here are the two situations that you may run into and information on how to fix things: Wrong Group Number. If you have accidentally given the member of billing group a different Group Number, you'll end up with two statements. You can fix that by going into the Customer Database and changing the Billing Group Number so it is the same as the other customers in the group. Once the change has been made in the Customer Database, return to the Main Invoice Screen. Then go to each of the customer's invoices, click on the "L" button beside "Customer #," and re-select the customer from the pop-up list. This will correct the billing group number. (The Billing Group Number appears just to the right of the Customer #.) When you run billing statements again, the customers will be properly grouped. Group Number vs. No Group Number. You may have a situation where the customer originally did not have a number, but, later, you decided to give the customer a number. In that case, you'll end up with two statements. One statement will be for the customer without a Group Number and one statement for the customer with a Group Number. There's a procedure that you should follow when assigning a number to a past numberless customer. You'll need to run through that process. Additionally, if you'll need to make some changes in the Balance Files to bring things up to speed. That's all explained here: Customer Number Changes
Wrong Address on the Billing Statement If you run the billing statements and you find that you have the wrong billing address for a customer, you'll need either make a change either on the invoice or the customer database. The next section (Billing Address Change) explains in detail how to correct addresses that appear on the billing statement.
If the customer changes their billing address or if you find an incorrect address on the billing statement, you need to make a change in either the Customer Database (if you've included the customer in the Customer Database). Or, if you haven't included the customer in the database, you'll need to make a change on the customer's last invoice appearing on the statement. Here's more information:
If the Customer is in the Customer Database. If the customer appears in the Customer Database, you'll need to change the the billing address found there. After doing that and when that customer is pasted to an invoice, the new address will appear. You'll also probably need to update one or more invoices, see "Update Invoices," immediately below. If the customer has several different shipping locations and each location is billed to the same address, you'll want to update the billing address for each location in the Customer Database. To do this, it's helpful to sort the customers by Billing Name (by selecting Tools >> Order by Billing Name). That way, all of the customer's shipping locations are together as you use Page through the database. Start at the first shipping location and enter the new billing address. Then select Edit >> Address Copy or Paste >> Copy Billing Address. Go to the next shipping location and use Edit >> Address Copy or Paste >> Paste Copied Address to Billing Area. Keep doing this until you have corrected the billing address on all shipping locations. Additionally, you'll also probably need to update one or more invoices, see "Update Invoices," immediately below. Note that if some shipping locations are billed to one address and other shipping locations are billed to another address, you'll want to set-up separate billing group numbers for each. Here's more information on the Billing Group Number If Customer is NOT in the Customer Database. If the customer is not in the customer database, then change the billing address on the most recent invoice for the customer. See "Update Invoices," immediately below, for more information. Update Invoices. In either situation, whether the customer is in the Customer Database or not, you'll likely need to update one or more invoices. To do this, look at the statement and write down the last invoice number found on statement of the customer in question. Then go the Main Invoice Screen and find that invoice. If the customer is in the Customer Database, then click on the "L" button beside Customer Number ("Customer") field and re-select the customer. The new information will be pasted in place. If the customer is not in the database, then type in the correct information. When this is done, return to the billing portion of the program and re-run the Statement again. It should pick up the new billing address. If not, then return to the Main Invoice Screen and change the billing address of all invoices included the statement. To make this easier, you can limit the display on the Main Invoice Screen to a certain customer by using the filter feature.
Other Information about Billing Statements: Balance File Screen (Manually Update Balance Files) Batch Printing Billing Statements Exporting Billing Statement Data
|