| Customer Number (Customer Database) Pop-up List |
|
|
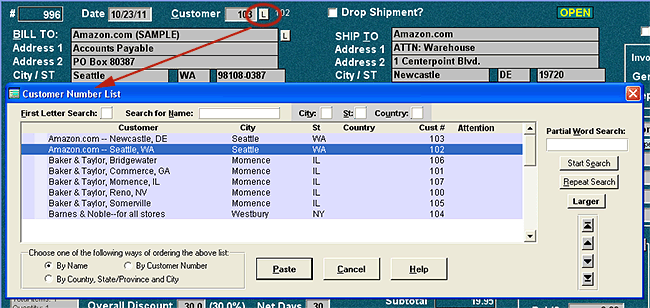
Customers from which you order frequently are kept in the Customer Information Database. You can access the Customer Information Database by clicking on the "L" button next to the "Customer #" blank on the Main Invoice Screen. Once the list appears, select the desired customer, and the customer's name and address will be automatically inserted in the appropriate fields on the purchase order Note that there are two customer pop-up lists in AnyOrder. This one lists the customers in the Customer Database. The other pop-up list includes any customer that has been entered on an invoice. It's reached by clicking the "L" beside the Billing Name field.
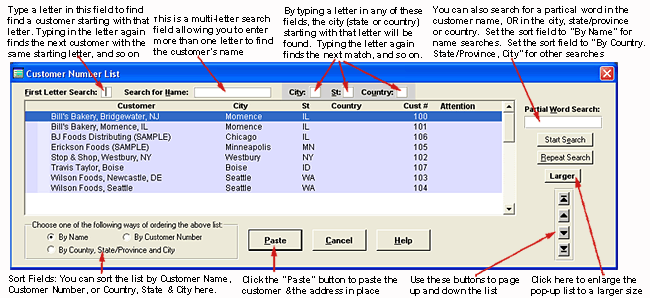
Here's what the Customer Number List looks like:
There are several other ways to access the list:
Be sure to use the pop-up list when you are entering customer names and addresses on the Main Invoice Screen. By using the pop-list, you'll be assured the customer's name will be the same on all invoices and you'll be able to use AnyOrder's billing, search and filter features effectively.
Including Your Own One-letter Code on the List - Level 4 and above You can include a one letter code on the pop-up list. The code will appear in red just before the customer's name. One purpose for the code would be to indicate the customer's credit status. "A" might mean advanced payment only. "X" might mean that the customer has an outstanding balance and you no longer do business with them. Codes are indicated in the Customer Information Database.
Methods of Locating the Desired Customer The pop-up list provides you with several ways of locating a customer: First Letter Search. The cursor automatically appears here first. When the cursor is in this box, you can type the first letter of the customer's name and the list will advance to the first customer starting with that letter. By typing in the first letter again, the list will advance to the next customer starting with that letter. By repeatedly typing in the first letter, you can move through the list until you find the customer you desire. Search for Name. When the cursor is in this box, begin typing the name of the desired customer. Let's say you are looking for Baker. When you type in "B," the list will advance to the first customer starting with a "B". When you type in "a," the list will advance to the first customer starting with "Ba". When you type in "k," the list will advance to the first customer starting with "Bak". Continue until you've reached the desired customer. City. When the cursor is in this box, type in the first letter of the city of the customer that you desire. The "City" box operates the same as a first letter search. You continue typing the first letter until you reach the desired customer. St. When the cursor is in this box, type in the first letter of the state or province of the customer that you desire. The "St" box operates the same as a first letter search. You continue typing the first letter until you reach the desired customer. Country. When the cursor is in this box, type in the first letter of the country of the customer that you desire. The "Country" box operates the same as a first letter search. You continue typing the first letter until you reach the desired customer.
Partial Word Search Another search feature that is found on the Customer Pop-up List is the partial word search. This searches for a portion of the Item's Name. For example, if you search for "WIN," it will find "Winter," "Winner," "Winston," etc. Click on the "Search" button to start the search. Click on "Repeat Search" if the first search doesn't find who you are looking for.
Increasing the Size of the Pop-up List To increase the size of the pop-up list, click on the "larger" button (upper left hand corner).
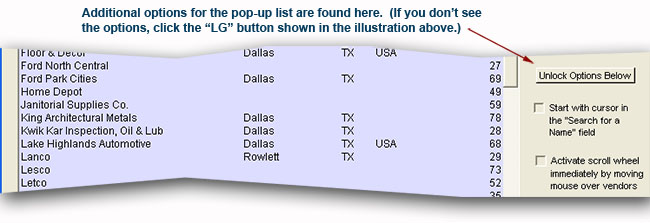
Start With the Cursor in "Search for a Name" field If you have lots of different vendor , it may be more convenient for you if the cursor goes immediately to the "Search for a Name" field when the pop-up list first opens. You can do that by clicking on the "Larger" button (shown above). This increases the size of the box and allows you to see an additional checkbox: "Start with Cursor in 'Search for a Name' field." First, you'll need click: "Unlock Options Below" and then you'll be able to check the box. The program will remember your choice.
Scroll Wheel Configurations The scroll wheel on your mouse can be used to scroll through the customer list. There are two configurations of the scroll wheel. In its default setting, the scroll wheel becomes active when you click in the customer list. However, you can change the setting so that the scroll wheel becomes active when the mouse is passed over the customer list. Under this configuration, it is not necessary to click on the customer list. All that is necessary is to move the mouse over the list. You can tell when the scroll wheel is active by the color in the customer list. When the background color turns white, the scroll wheel is active. To change from one scroll wheel configuration to another, click on the "Larger" button. This increases the size of the box and allows you to see an additional checkbox: "Activate scroll wheel immediately by moving mouse over customers." First, you'll need click: "Unlock Options Below" and then you'll be able to check the box, or remove it, depending on your preference. Note: The scroll wheel configuration that you set here will also be used by the Customer Number pop-up list.
Pasting the Information to the Customer Area To paste the customer's name and address to the invoice, click on "Paste." To exit from the pop-up list without entering any information, click on "Cancel."
Quick Entry Tricks You'll notice that several of the field labels have letters underlined. For example, the "W" in "Partial Word Search" is underlined. That means you can press ALT+W on your keyboard and your cursor will automatically go to the "Partial Word Search" field. This is handy when you are quickly entering vendors and do not wish to remove your hands from the keyboard. You'll also notice that the buttons respond in the same way. When you press ALT+P on your keyboard, it's the same as clicking on the "Paste" button with the mouse. Here are some other keyboard tricks:
When using the mouse, one trick that will help make entries go quicker is to double-click on the desired customer. That's the same as clicking the "Paste" button. The program will exit from the pop-up list and paste the customer and their address in place.
Changing the Order of the List If desired, you can change the order of the list by clicking on the radio buttons on the bottom of the dialog box. You can have the list ordered by the customer name, by its number, or by Country/State/City. When you use the State/City option, all customers without a state (or province) and city will be listed first, followed by an ordered listing. If you ship to different countries, customers will be grouped by country.
Other Information about Customers: Customer Billing Name: Make Sure Names are the Same, Making Changes, and Other Information Customer Number Field on Main Invoice Screen Customer Numbers, Pasting From List Consignment Wholesalers and Distributors
|