| Pop-up List of Products |
|
|
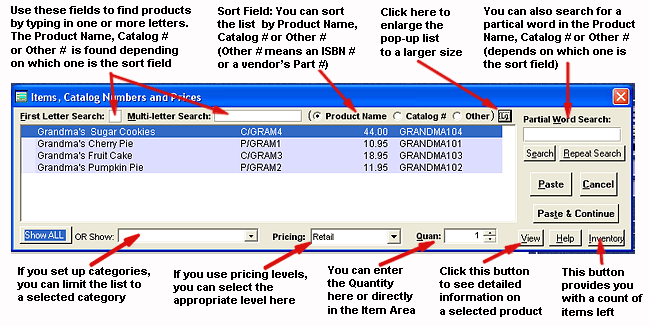
The Product Pop-up List is used to enter products in the Item Area on Main Invoice Screen. Here's what it looks like:
The products on the list are all from the Product Information Database. The pop-up list can be activated in any number of ways:
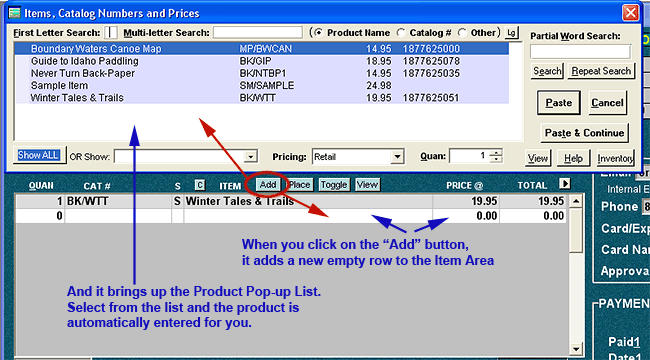
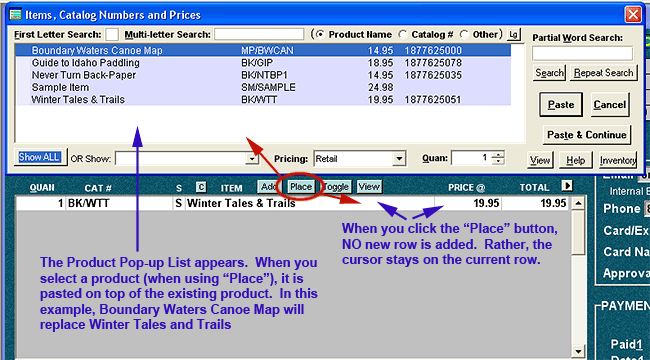
There are two ways you can use it. You can use it to add a new product to the Item Area. Or you can use to overwrite an existing product in the Item Area:
The following describes the Product Pop-up List in more detail: Methods of Locating Products The pop-up list provides you with several ways of locating a product: First Letter Search. The cursor automatically appears here first. When the cursor is in this box, you can type the first letter of the product's name and the list will advance to the first product starting with that letter. By typing in the first letter again, the list will advance to the next product starting with that letter. By repeatedly typing in the first letter, you can move through the list until you find the product you desire. Multi-letter Search. When the cursor is in this box, begin typing the product's name. Let's say you are looking for "Grandma." When you type in "G," the list will advance to the first product starting with a "G". When you type in "r," the list will advance to the first product starting with "Gr". When you type in "a," the list will advance to the first product starting with "Gra". Continue until you've reached the desired product. You can change the object of the above two searches by selecting from the radio buttons. If "Product Name" is selected, the search acts as described above. However, if you select "Catalog #" both of the methods above search for the catalog number instead of a product name. If you select "Other" both of the methods above search for the other identifier (ISBN, Part Number, etc.) Another search feature that is found on the Product Pop-up List is: Partial Word Search. This searches for a portion of the Item's Name. For example, if you search for "WIN," it will find "Winter," "Winner," "Winston," etc. Click on the "Search" button to start the search. Click on "Repeat Search" if the first search doesn't find who you are looking for.
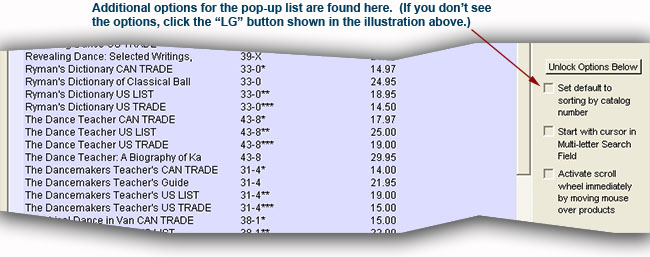
Increasing the Size of the Pop-up List You have the ability to increase of the size of the pop-up list. To increase the size of the pop-up list, click on the "Lg" (for "Larger") button found near the top, right corner of the dialog box (shown below). Or when the pop-up list is large, you can click on the "Sm" (for Smaller) button to reduce its size. By increasing the size of the pop-up list, you can also access additional options.
Start With the Cursor in Multi-letter Search If you have lots of products in the Product Database, it may be more convenient for you if the cursor goes immediately to the "Multi-letter Search" field when the pop-up list first opens. You can do that by clicking on the "Lg" (for "Larger") button. The "Lg" button is found near the upper right hand corner of the pop-up dialog box (see illustration above). This increases the size of the box and allows you to see the checkbox: "Start with Cursor in Multi-letter Search field." First, you'll need click: "Unlock Options Below" and then you'll be able to check the box. The program will remember your choice.
Scroll Wheel Configurations The scroll wheel on your mouse can be used to scroll through the product list. There are two configurations of the scroll wheel. In its default setting, the scroll wheel becomes active when you click in product list. However, you can change the setting so that the scroll wheel becomes active when the mouse is passed over the product list. Under this configuration, it is not necessary to click on the product list. All that is necessary is to move the mouse over the list. You can tell when the scroll wheel is active by the color in the product list. When the background color turns white, the scroll wheel is active. In this setting, the cursor has the same behavior in "First Letter Search," "Multi-letter Search" and "Partial Word Search." If you hold the cursor over any of these fields, the field becomes active without having to click the mouse To change from one scroll wheel configuration to another, click on the "Lg" (for "Larger") button. The "Lg" button is found near the upper right hand corner of the pop-up dialog box. This increases the size of the box and allows you to see the additional checkbox: "Activate scroll wheel immediately by moving mouse over products." First, you'll need click: "Unlock Options Below" and then you'll be able to check the box, or remove it, depending on your preference.
Changing the Default Sort Order When the pop-list first appears, it is sorted by the Item Name. To change it so it is sorted by the Catalog Number when it first appears, place a checkmark beside: "Set Default by Sorting by Catalog Number." (To reach this option make sure the pop-up list is in the "Large" configuration as explained above.
Other Options You have several options at the bottom of the Pop-up List: Category. If you've organized your books and other products by category, you can limit the list to one of the categories. To do so, pick a category from the "OR Show" field. Only those products from the chosen category will be displayed. To show all products, click on "Show All." Pricing. In the Product Database, you can set-up different Pricing Levels or Quantity Breaks (Level 7). The pricing drop-down list, allows you select which level or quantity break you want use for the product. If you accidentally pick a pricing level or break with a price of zero (0), AnyOrder will warn you upon exiting the pop-up list. (Hint: To find out the pricing level of a product that has already been entered in the Item Area, click on "Toggle.") If you have the Level 7 program, and you are using Quantity Breaks, you can configure the program so that it automatically pastes the correct price depending upon the quantity that you've entered (see next). Quantity. To indicate a quantity, type in a number in the white spin box (located on the bottom, middle of the dialog box). Whatever number you enter here will be placed in the Quantity column of the Item Area.
Paste Buttons To paste the catalog number, quantity, item name and price to the Item Area, click on "Paste." If you have more than one product to enter, click on "Paste & Continue." What this will do is to enter information on the first product to the Item Area. Then, the pop-up list will reappear allowing you enter information on the next product, and so on. To exit from the pop-up list without entering any information, click on "Cancel."
Quick Entry Tricks You'll notice that several of the field labels have letters underlined. For example, the "Q" in Quan is underlined. That means you can press ALT+Q on your keyboard and your cursor will automatically go to the "Quan" field. This is handy when you are quickly entering products and do not wish to remove your hands from the keyboard. You'll also notice that the buttons respond in the same way. When you press ALT+P on your keyboard, it's the same as clicking on the "Paste" button with the mouse. Here are some other keyboard tricks:
If you are using the mouse for moving around and making selections, you can take advantage of a couple tricks which will make entries go quicker. If you double-click on the desired product, the pop-up box will act the same as "Paste & Continue." If you press SHIFT on the keyboard and then double-click with the mouse, the pop-up box will act the same as "Paste"
Out-of-Stock Indicators (Flags) - Level 4 or greater The first column of the product list is reserved for the out-of-stock indicators. These are also called flags. The indicators or flags will be either a "B" for temporarily out-of-stock and "N" for permanently out-of-stock. If you select a product with the "B" indicator, the product will be pasted to the Item Area with a sales code of "B" for Backorder. (Out-of-stock indicators are set-up in the Product Information Database.) If you select a product with the "N" flag, the product will be pasted to the Item Area with a sales code of "N" for "No Longer Available." If, for some reason, you don't want to use these S-codes, you can always change them manually after you've finished pasting products. The Level 5 (or higher) program also uses "L" which means "Low Inventory Flag." This flag appears when you have Real Time Inventory Processing turned on. (For more information, see Real Time Inventory Processing.) When your inventory level drops below a certain point designated in the Product Information Database, AnyOrder place the "L" flag beside the product's name to remind you that you are getting low on inventory.
Removing the Indicators (Flags) - Level 4 or greater The term "flags" refers to the red "L", "B", and "N" letters next to the product's name in the pop-up list: L - Low Inventory Flag. The inventory of this item has reached the level that you've established in the Product Information Database. B - Temporarily Out-of-stock. This is item is out-of-stock. If you enter the item on the invoice, it will appear with a "B" sales code meaning "back-ordered." N - Permanently Out-of-stock. This is item is no-longer in stock. If you enter the item on the invoice, it will appear with an "N" sales code meaning "no longer in stock." If you revise your inventory and you need to remove the out-of-stock or low inventory flags, you can so by RIGHT Double-clicking on the Item. Note that this is RIGHT double-clicking, not left double clicking. You can also remove the flags in the Product Information Database (PRODUCT TOOLS >> PRODUCT INFORMATION & CATALOG NUMBERS). To remove the "B" flag, remove the checkmark from "Temporarily Out-of-stock." To remove the "N" flag, remove the checkmark from "Permanently Out-of-stock. To remove the "L" flag, remove the checkmark from "Low Flag."
Checking Inventory Level - Level 4 greater You can also check on the inventory level of any of the items on the pop-up list. To do so, click on the "Inventory" button (shown below).
In the Level 4 program, the inventory figures come from the most recent inventory report. To have up-to-date information, you may wish to run the inventory each morning before beginning order entry. If you have Level 5 (or higher) program, the Real Time inventory feature will provide you with up-to-the minute inventory levels. (For more information, see: Real Time Inventory Processing)
Additional Information about Products: Product Database Screen: General Information Product Database Screen: Indicating a Starting Inventory Product Database Screen: Adding Inventory Entering Products on the Main Invoice Screen Entering Catalog Numbers on the Main Invoice Screen
|