Second Dialog Box (Import Profile)


|
Importing Products: Second Dialog Box (Import Profile) |
|
|
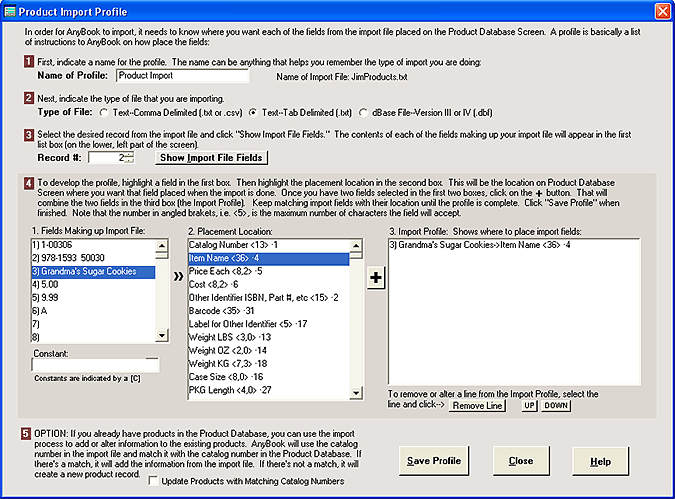
Importing Products - Level 4 and Higher Feature Step By Step Procedure (Developing the Profile) For information on the steps leading up to this point: First Dialog Box (This is the second dialog box for importing products. It is reached from the first box by clicking on either "Create New Profile" or "View or Update Existing Profile. The first box is reached by selecting FILE >> IMPORT from the Product Database Screen.)
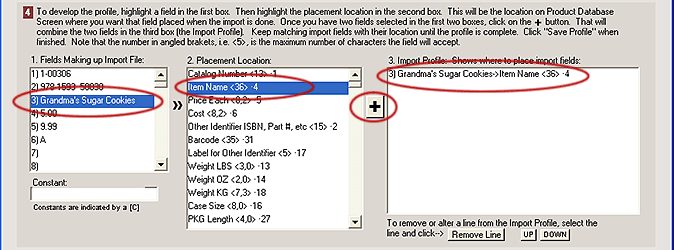
Step # 1 (Name of Profile) The "Import Profile" dialog box will appear after you select "Create New Profile" in the first dialog box. At the top of the dialog box, enter a name for the profile. Use a name that will help you remember what sort of data is being imported, i.e. "Product Import." Step # 2 (Type of File) Indicate the type of file that you are using. For more information on file types, see Supported Import File Types. For your convenience, the name of the file that was entered in the previous first dialog box is shown to the right of the Profile Name. Step # 3 (Record Number) Select the record from the import file that you wish to use for developing the profile. Usually, the first record will be used, but if one of the other records in the file is more complete, you're welcome to select it. After indicating the record, click on "Show Import File Fields." A list of fields contained in your import file will appear in the first box ("Fields Making Up the Import File") on the bottom of the screen. If the fields are garbled, you may have selected the wrong file type. Re-check your file type selection. Also make sure the file you are importing is Comma Delimited, Tab Delimited, or a dBase file. Step # 4 (Building the Profile) Now take a look at the three boxes on the bottom of the screen. To develop the profile, first pick a field from the Import file (the first box). Then indicate where that field should be place on the Product Information Screen by choosing from a list of placement locations in the second box. In the first box, you'll see that each field of the import file is numbered. For instance, the first field might be 1) Grandma's Sugar Cookies. The number is the location of the field in the import file. You'll also see numbers in the second box, i.e. Item Name <36> 4. The <36> means that AnyOrder has 36 characters of space available for this field. (If the field is a number, you'll see two numbers separated by a comma, i.e. <9,2> means a nine place number, including the decimal point with 2 decimal places or <4,0> means a four place number with no decimal places.) "4" means that the Item Name field is the fourth field in AnyOrder's Product Information Database. The numbers are used by AnyOrder to determine which fields to use from the import file and where to place them. You can disregard the field numbers. They are used internally by AnyOrder to help guide the import process. (Note that some import files that you may use include generic names of each field in the first record. If so, you'll want to use it since it will make developing the profile a little easier. Field names are always available for dBase files: just select zero (0) as the record and the field names will be displayed.) To develop the profile, select a field in the first box by clicking on it to highlight it. Select a field in the second box by highlighting it. Then click on the large + sign. The two fields will be combined in the third box. Here's an example (illustrated below): Let's say you pick "1) Grandma's Sugar Cookies" in the first box And you pick Item Name <36> 4 in the second box. After clicking on + the third box will show 1) Grandma's Sugar Cookies->Item Name <36> 4. That means that when the import is done, Grandma's Sugar Cookies will be inserted in the Item Name place on the Product Database Screen.
Now continue the process. Go through each of the fields in the first box. Match them up with fields in the second box. The result will show in the third box. The order the fields appear in the third box is not important. If you make a mistake, you can remove a line by selecting "Remove Line" You don't have to use all of the fields in the import file (the first box), just those you want to move into AnyOrder. Building the Profile: Using Import Fields in More than Once If desired, you can use an import field more than once. For an example, let's say you have field in your import file which is a part number, such as 3) 9887788899. And let's say the part number and barcode are the same. You can move that field into both the ISBN/Part Number and Barcode placement locations in AnyOrder Building the Profile: Using Placement Locations More than Once You can also use the same Placement location in AnyOrder more than one. In the Product Database, you can use it for combining information in the Notes area. You may have information in the Import file which doesn't match any of the normal Placement locations on the Product Database Screen. Often the Notes Area is good location to place such information where you can combine any number of import fields. Here's an example: Let's say you have the following two lines in the first box: 6)Available in Red Only and 7)Minimum Order of 4. First, place "Available in Red Only" in the Notes field. The profile box will show: 1)Available in Red Only->Notes 12. Then, place "Minimum Order of 4" in the Notes field. The profile box will show: 2)Minimum Order of 4->Notes 12. When the import is done, Available in Red Only Minimum Order of 4 will appear in the Notes field on the Product Database Screen. More on Step #4 (Building the Profile): Constants You can also include a constant in the profile. A constant doesn't come from the import file. It's a value that you establish and wish to have inserted in every new product record that is created during the import process. Constants are also handy in the Notes area. You can use them as a label to identify a field from the Import file. Here's an example. Let's say that you wanted a label to go along with "Available in Red Only" in the above example: Type in: "Color Choice: " in the Constant blank. (This will be your label) Highlight Notes 12 in the second box. Click + and [C] Color Choice: ->Notes 26 will appear in the Profile box, the 3rd box. Now that your label is set-up, you need to add the information from the import file. To do so: Highlight : 6)Available in Red Only Highlight Notes 12 in the second box Click + and 6)Available in Red Only->Notes 12 will appear in the Profile box, the 3rd box. When the import is done, the Notes area on the Product Database Screen will include the label and the information on color: "Color Choice: Available in Red Only." A Note About Catalog Numbers If you do not include catalog numbers with the import, AnyOrder will make up a catalog number for you. That's necessary because the Product Database can't function properly without catalog numbers. You don't necessarily need to keep those catalog numbers. The numbers can always be changed at a later time. Option: Update Products with Matching Catalog Numbers. Normally, when you import products, AnyOrder creates a new record in the Product Database for each imported item. There may be times, however, when you wish to update records already in the Product Database. To turn this feature on, place a checkmark beside "Update Products with Matching Catalog Numbers."
When this feature is on, AnyOrder will run through each of the imported records, looking for the catalog number from the import file in the Product Database. If it finds a match, it will update the item in the Product Database. For example, if the import file contains a different item name, it will change the item's name to that of the import file. If the import file contains a barcode, it will add the barcode to the Product Database, and so on. If it doesn't find a match, it will add the item to the database as separate product. When the process is complete, AnyOrder will provide a count of how many records were updated and how many were added. There are two things that you should keep in mind. First, there is no "Undo" with this process, so you should do a back-up of your files first. If there's a problem with the import you can select FILE >> RESTORE to get the original files back. Secondly, you'll need to include the catalog number in the import profile. Since AnyOrder is comparing the catalog number with those in the Product Database, it must be included among the imported fields.
More Information on Importing Working with Import Files in Excel
|