| Billing Statement: Printing Information Dialog Box |
|
|
Level II or Higher Feature
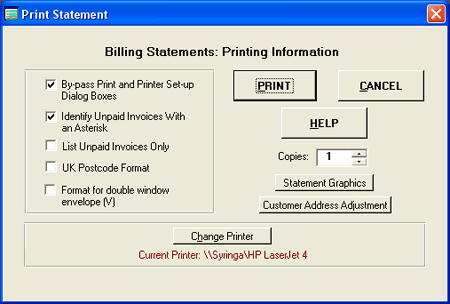
The Print Statement dialog box appears when you click on the PRINT button on the Billing Statements screen or choose PRINT THIS STATEMENT (Normal Method) from the Menu Bar. (To by-pass this dialog box click on the QUICK PRINT button on the Billing Statements screen, or choose QUICK PRINT from the Menu Bar.) The Print Statement dialog box looks like:
A sample printed billing statement is shown below:
Options Available on the Print Statement Dialog Box Near the top of the Print Statement dialog box, you can indicate the number of copies you want printed. Other options include: By-pass Printer and Printer Set-up Dialog Boxes. This is one of two ways in which you can change printer or print settings. (Also see, "Change Printer" below.) To use this method, take the checkmark off of "By-pass Print and Printer Set-up Dialog Boxes" and the program will flow through the Windows Printer dialog box, allowing you to change printer settings or switch to a different printer. Normally, AnyOrder skips the Windows Printer dialog box to save time, but if you need to make adjustments, it's just a matter of turning the by-pass off. Identify Unpaid Invoices with an Asterisk. The other checkbox allows you to activate or deactivate the feature which marks unpaid invoices. This is only available if you use the program's Mark Paid feature which is selected by default when the program is installed. The feature identifies invoices on the statement which have been paid, those partially paid, and those remaining unpaid. Unpaid invoices are marked with an asterisk (*). Partially paid invoices are marked with a pound sign (#). Paid invoices are left unmarked. To turn off the asterisks, remove the checkmark. (Asterisks can also be turned off by selecting TOOLS and DON'T IDENTIFY UNPAID INVOICES from the Menu Bar on the Billing Statements screen.) Note that this feature will be disabled if you have turned off the Mark Paid feature in Basic Setup. For more detailed information on invoice markings, see Billing Statements Screen. List Unpaid Invoices Only. With particularly active customers, you may wish to limit the statement to a list of unpaid invoices only. This simplifies long statements and concentrates the attention of your customer on unpaid invoices. To turn on this printing option, click on "List Unpaid Invoices Only." When you select this option, the statement will not show a running balance, but it will print the total balance at the bottom. Use UK format for postcodes: place postcode at end of address on its own line. This formats the postcode according to United Kingdom postal standards. As long as the name of a country is not found in the address, it positions the postcode at the end of the address on its own line. If you include a country, the postcode is positioned after the city. Format for Double Window (V). Level 5 (or higher) feature. Some businesses use double windowed envelopes (sometimes referred to as "statement envelopes"). Such envelopes have two clear windows: one for the customer and one for your return address. By selecting this option, AnyOrder will add a return address to the upper left-hand corner of the statement. The return and the customer's address will line up with the windows of a standard double window envelope.
More Features Statement Graphics. Click on this button to add graphics to the billing statements. Customer Address Adjustment. When you click this button, a dialog box will open which will allow you to adjust the placement of the customer's address so that it lines up properly in an envelope with a window. It will also adjust the placement of the return address if you use double-windowed envelopes. (See: "Format Original & Copy for doubled-window envelope," above, for more information on double windows.) Change Printer. By clicking on this button, a dialog box will appear from which you can select a different printer. You can also change printers by removing the checkmark from "By-pass Print and Printer Set-up Dialog Boxes." HTML Printing. Like invoice printing, you can create an HTML version of the statement by clicking on the "Create HTML File and Print" button. (HTML is a type of formatting used by Internet documents.) By clicking on this button, an HTML file named Billing.htm is created. Once the file is created, the default browser prints the file. Since this feature uses calls directly to the Windows operating system, it may not work on all systems. Our tests show that it doesn't always work with networked printers--and there may be other printers. Nonetheless, we wanted to include it in event that it helpful to some users. HTML Print is not available with AnyOrder Level I and II. Secondary Printer Engine. Additionally, you can access the Secondary Printer Engine from the printer dialog box. In general if you are using the Secondary Printer Engine for invoice printing, you will have already selected as the default, but, for convenience, it can also be selected here as well.
How to Prepare the Statement for Mailing The printed invoices are set up so they can be folded and placed in a windowed business envelope. Fold the statement along the horizontal line just above the word DATE so that "Statement" at the top shows. Then fold the bottom of the edge of paper so that it fits inside this fold. It will now fit in an envelope, and the billing address will be lined up with the window. AnyOrder uses a standard windowed envelope. Be aware that there are also non-standard sized envelopes on the market. To make sure you purchase the correct envelopes, print out a statement. Take the statement to the store where you purchase your envelopes. Fold the statement with the writing out as described above. Place the statement in the envelope and make sure the address lines up correctly in the window. (Note: that if you already have a non-standard sized envelope, it is possible to adjust the placement of the address. See "Customer Address Adjustment," above, for more information.) Note that most businesses purchase their envelopes from a local printer. That way you can have your return address (and logo, if desired) printed on the envelope. Be sure, however, to bring a statement with you to the printer and make sure the address lines up properly in the window of the envelope they will be using.
For information on printing a group of billing statements, see Batch Printing.
Other Information about Billing Statements: Balance File Screen (Manually Update Balance Files) Batch Printing Billing Statements Exporting Billing Statement Data
|