Item Area: Add, Place & Toggle Buttons


|
Parts of the Invoice Screen: Item Area: Add, Place & Toggle Buttons |
|
|
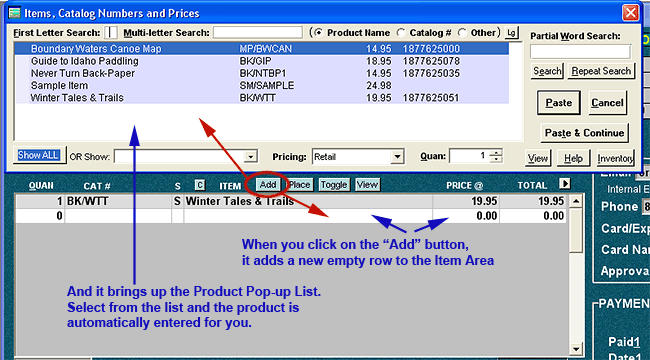
Just above the Item Area midway down on the Main Invoice Screen are four small, light blue buttons: Add, Place, Toggle and a small button with "C" on it. These are used for entering product information:
Add Button If you click on the "Add" button, a new row will be added to the Item Area and a pop-up list of products will appear. The pop-up list will show all the products that you've entered into the Product Information Database.
Once a product is selected from the list, it will be placed in the newly created row in the Item Area. It's a quick way entering products. Just click "Add," select a product, and the product is entered. (Note that if there is already a blank row at the end of the item list, the "Add" button will use the existing blank row. This is done to conserve space in the database file.)
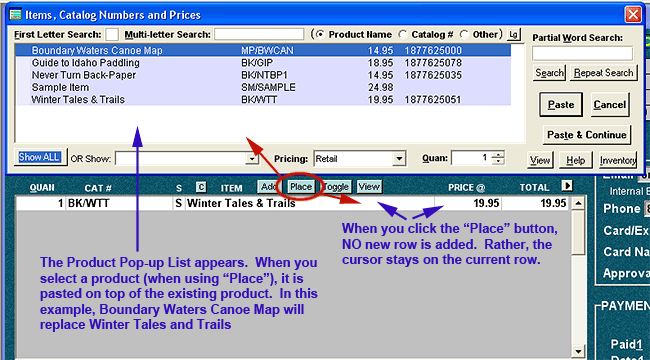
Place Button Place is used when you want to "place" a product in the Item Area. It's usually utilized when you want to overwrite a product already on the item list. To do so, position your cursor on the row of the product you want to overwrite, then click the "Place" button. The product pop-up list will appear.
Select a product and click on "Paste." The new selection will overwrite the old product on the list. You can also place your cursor on a blank row and the selected product will be pasted on that row.
Toggle Button Click on "Toggle" to activate the Alternative Product Entry Screen.
"C" Button The "C" in C-button means "Column" adjustment. You can use this button to adjust the size of the columns in the item area. When you click on the C-button, a set of column labels will appear at the top of the item area. By dragging the lines between the column names with the mouse, the columns can be narrowed or widened. To lock this setting in place, click on the C-button again. The column names will disappear and the new column sizing will be retained as you continue work in AnyOrder. You can return to default column widths by refreshing the screen. To do a Refresh, select INVOICE TOOLS >> REFRESH SCREEN from the Menu Bar. Whenever you do a Refresh, the invoice screen is re-drawn in its original format and the column widths will return to the default sizes.
Cat # The word "Cat #" is a text (or quick) button. It doesn't really look like a button, but if you click on it, it acts like a button, duplicating one of the functions of the pull-down menu. In this case, double-clicking on the word "Cat #" is the same as selecting PRODUCT TOOLS >> LOOK-UP CAT # AND PASTE NAME/PRICE from the Menu Bar. What this does is to allow you to enter just a catalog number--and no other information--in the Item Area. Then if you double-click the word "Cat #", AnyOrder will search for the catalog number in your Product Information Database, locate it, and paste the product's name and price. There's also a configuration option available. For details: More Information
|