Second Dialog Box (Import Profile)


|
Importing: Second Dialog Box (Import Profile) |
|
|
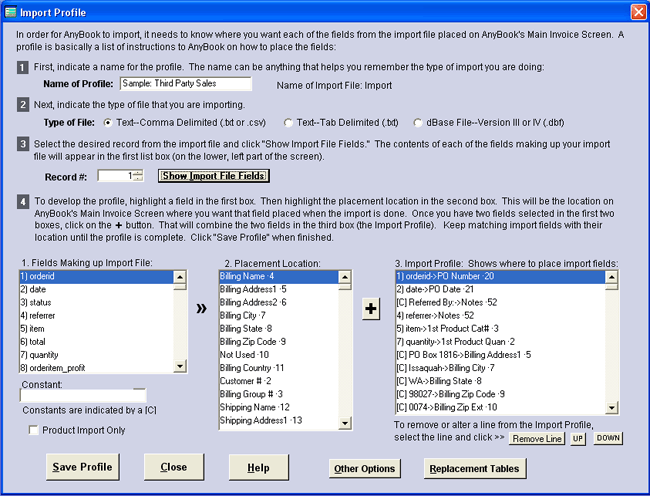
Import: Creating the Profile - 2nd Dialog Box - Level 3 and Above Step By Step Procedure (Developing the Profile) For information on the steps leading up to this point: First Dialog Box (This second dialog box in the Import series is reached from the first box by clicking on either "Create New Profile" or "View or Update Existing Profile.) The Import Profile dialog box looks like:
Step # 1 (Name of Profile) The "Import Profile" dialog box will appear after you select "Create New Profile" in the first dialog box. At the top of the dialog box, enter a name for the profile. Use a name that will help you remember what sort of data is being imported, i.e. "Internet Sales" or "Sales from Trade Show", etc. Step # 2 (Type of File) Indicate the type of file that you are using. For more information on file types, see Supported Import File Types. For your convenience, the name of the file that was entered in the previous first dialog box is shown to the right of the Profile Name. Step # 3 (Record Number) Select the record from the import file that you wish to use for developing the profile. Usually, the first record will be used, but if one of the other records in the file is more complete, you're welcome to select it. After indicating the record, click on "Show Import File Fields." A list of fields contained in your import file will appear in the first box ("Fields Making Up the Import File") on the bottom of the screen. If the fields are garbled, you may have selected the wrong file type. Re-check your file type selection. Also make sure the file you are importing is Comma Delimited, Tab Delimited, or a dBase file. Step # 4 (Building the Profile) Now take a look at the three boxes on the bottom of the screen. To develop the profile, first pick a field from the Import file (the first box). Then indicate where that field should be place on AnyOrder's Main Invoice Screen by choosing from a list of placement locations in the second box. In the first box, you'll see that each field of the import file is numbered. For instance, the first field might be 1) Bill Wilson. The number is the location of the field in the import file. You'll also see numbers in the second box, i.e. Billing Name 4. The "4" means that the Billing Name field is the fourth field in AnyOrder's invoice file. The numbers are used by AnyOrder to determine which fields to use from the import file and where to place them. You can disregard the numbers. They are used internally by AnyOrder to help guide the import process. (Note that some import files that you may use include generic names of each field in the first record. If so, you'll want to use it since it will make developing the profile a little easier. Field names are always available for dBase files: just select zero (0) as the record and the field names will be displayed.) To develop the profile, select a field in the first box by clicking on it to highlight it. Select a field in the second box by highlighting it. Then click on the large + sign. The two fields will be combined in the third box. Here's an example: Let's say you pick "1) Bill Wilson" in the first box And you pick Billing Name 4 in the second box. After clicking on + the third box will show 1) Bill Wilson->Billing Name 4. That means that when the import is done, Bill Wilson will be inserted in the Billing Name place on AnyOrder's Main Invoice Screen. Now continue the process. Go through each of the fields in the first box. Match them up with fields in the second box. The result will show in the third box. The order the fields appear in the third box is not important. (Note that order is important when exporting, but not for importing.) If you make a mistake, you can remove a line by selecting "Remove Line" You don't have to use all of the fields in the import file (the first box), just those you want to move into AnyOrder. Building the Profile: Using Import Fields in More than Once If desired you can use an import field more than once. You can, for instance, place 1) Bill Wilson in the Billing Name and Shipping Name placement locations in AnyOrder Building the Profile: Using Placement Locations More than Once You can also use the same Placement location in AnyOrder more than one. Most commonly this is used for combining first and last names. Here's an example: Let's say you have the following two lines in the first box: 1)Tina and 2)Johnson. First, place Tina in the Billing Name field. The profile box will show: 1)Tina->Billing Name 4. Then, place Johnson in the Billing Name field. The profile box will show: 2)Johnson->Billing Name 4. When the import is done, Tina Johnson will appear in the Billing Name field on the Main Invoice Screen. Note that in this case, order is important. The first name (1) Tina->Billing Name 4) needs to appear first on the profile list and the last name (2) Johnson->Billing Name 4) after it. The other place where you may combine fields is in the Notes area. You may have information in the Import file which doesn't match any of the normal Placement locations on the Main Invoice Screen. Often the Notes Area is good location to place such information. You may combine any number of import fields in Notes. You may also combine fields for a credit card expiration date. If your import file has a month field and a year field, the two may be combined in the Credit Card Exp field found in the Placement location box (2nd box). AnyOrder will place a slash betweent the: 04/14. Another situation where you might combine fields is when you have an import file with a billing name and address occupying 4-lines. (AnyOrder's name and address only occupies three lines) Here's an example. Let's say your import file fields (1st box) consist of the following lines: Name, Company, First Address Line, and Second Address Line. AnyOrder in its normal configuration, however, has only the following Placement locations (2nd box): Billing Name, Address1 and Address2. (There is a way to configure AnyOrder with an extra address line. See "exception" information below the next couple of paragraphs.) To move all of the address information into AnyOrder combine the last two fields. Here's what the profile box (third box) would look like: Name-> Billing Name Company-> Billing Address1 First Address Line-> Billing Address2 Second Address Line-> Billing Address2 In this situation the First Address Line and the Second Address Line will be combined in the Address2 blank on the Main Invoice Screen. Note that there a few places where you can't combine fields in a Placement location. These are all associated with the Item Area: quantity, catalog number, product name and price. You'll need to use a separate field for each of these. Exception to above example. There is an exception to the above example. AnyOrder has the ability to designate two of the User Defined Fields as extra address fields. If you configured the program with the extra address fields, you could get around combining fields by setting up the profile box (third box) thusly: Name->Billing Name Company-> Billing Address1 First Address Line->Billing Address2 Second Address Line->Bill Address3 For more information on importing addresses see: "Building the Profile: More Information on Addresses," found at the bottom of this page.
More on Step #4 (Building the Profile): Constants You can also include a constant in the profile. A constant doesn't come from the import file. It's a value that you establish and wish to have inserted in every new invoice that is created during the import process. For example, let's say that you contract some of your sales out to a third party. We'll call this third party "Sales Unlimited." Every so often, Sales Unlimited provides you with a file which itemizes all of your sales, including each customer and what was sold to the customer. Since Sales Unlimited will be paying you, you'll want their name to appear in the Billing Name location on the Main Invoice Screen. In other words, "Sales Unlimited" is a constant. Their name should be in Billing Name for every record imported. Using the above example, here's how you would enter a constant: First, type in "Sales Unlimited" in the constant blank. Highlight Billing Name 4 in the second box. Click on + and [C] Sales Unlimited->Billing Name 4 will appear in the Profile box, the 3rd box. The [C] means "constant." Whenever you use a constant, the value in the constant blank will be placed in every invoice created. In the example above, "Sales Unlimited" will appear on all of the imported invoices. Constants are also handy in the Notes area. You can use them as a label to identify a field from the Import file. Here's an example. Let's say that your import file contains a second phone number for the customer and you'd like to place the second phone number in the Notes area. To add a label, you would first set up a constant: Type in: "Second Phone Number: " in the Constant blank. (This will be your label) Highlight Notes 52 in the second box. Click + and [C] Second Phone Number: ->Notes 52 will appear in the Profile box, the 3rd box. Now that your label is set-up, you need to set-up the second phone number from the import file. To do so: Highlight the second phone number in the first box. Let's say, it's: 10) 209-888-7773 Highlight Notes 52 in the second box Click + and 10) 209-888-7773->Notes 52 will appear in the Profile box, the 3rd box. When the import is done, the Notes area on the Main Invoice Screen will include the label and the phone number: "Second Phone Number: 209-888-7773."
Building the Profile: Products There are five methods that you can use to import invoice data and products: 1. Use one file to import invoice data and products. Products do not need to be arranged in any particular pattern. No limit on the number of invoices created. But there is a limit of five products per invoice. This should be used when you never expect to exceed five products on any one invoices. 2. Use one file to import invoice data and products. Product Group Mode. This type of file consists of a series of records. Each record has one product along with billing, shipping and other information. If a customer orders three products from you, then there will be three records associated with that customer. Each of the three records will have the customer's name, their address, and shipping information. That information is always the same. But what changes in each of the three records is the product. 3. Use one file to import invoice data and products. Repeating Pattern Mode. Products must be organized in a regular pattern in the file. No limit on the number of invoices created. No limit on the number of products imported per invoice. 4. Use two files to import invoice data and products. No limit on the number of invoices created. No limit on the number of products. 5. Use the clipboard to import products to an existing invoice. No limit on the number of products (other than clipboard memory). Note About Products: When importing products, if the quantity of a certain product is a negative number, AnyOrder will assume that it is a returned item and automatically use a "R" sales code. The item is credited on the invoice. If the quantity is a positive number, AnyOrder will assume that the product is a regular sale and use the "S" code. You can override these settings by importing a sales code from your import file. Here's more information on these five methods 1. Use one file to import invoice data and products. (No product patterns required) If a third party contractor provides you with only one file (or you have only file from which to import), then this is first of two possible methods to use. With this "one-file" method, you are limited to 5 different products, but it works just fine if you need to import data for only a few products at a time. (If you need to import more than 5 products, see the next method.) It's the method we use for selling AnyOrder. We contract the registration of our software out to a company called Register Now. Each time, a program is sold, Register Now sends us an email with the import data. We copy the import data to the clipboard and then drop it right into an invoice without any additional typing. Since the email we receive from Register Now covers only one product at a time, this is the method we utilize to move the data into AnyOrder. As mentioned above, using this method, you can import up to five products. When setting up the profile, match the first product in the import file with "1st Product Item" on the placement list (2nd box) and the second product with "2nd Product Item," etc. If you are importing products, you'll want to make sure that you have at least two pieces of information: 1) quantity and 2) catalog number (very important if you use catalog numbers; optional, if you don't). (Other information can be included, but this is the minimum.) This works only if the catalog number in the import file matches the catalog number you have entered AnyOrder's product information database. Once you get the catalog number imported, you can use Catalog Number Look-up and Paste to insert the name of the product and price. This also works only if the price in the import file and price in the Product Information Database matches. If the catalog number in the import file doesn't match the catalog number in the Product Information database, then you'll need to use a replacement table. The replacement table will automatically will insert the price and product name (or catalog number) as the import is being done. 2. Use one file to import invoice data and products: Product Group Mode Another way of importing products is to use the Product Group Mode. This is another "one-file" method of importing that is becoming more common among shopping cart programs. This type of file consists of a series of records. Each record has one product along with billing, shipping and other information. If a customer orders three products from you, then there will be three records associated with that customer. Each of the three records will have the customer's name, their address, and shipping information. That information is always the same. But what changes in each of the three records is the product. For more information on this type of import, see "Product Group Mode" in Other Options. 3. Use one file to import invoice data and products. (Product pattern required) This is the third method that you might use to import a file from a shopping cart (or a third party contractor). In this system one file contains customers and products sold. Each record of the file includes the customer, the customer's address, shipping information, and the products sold to the customer. When using a file like this, there is no limit to the number of products (per customer) that you can import, but the products must appear in a regular pattern. A regular pattern means that product fields within the file are spaced at a constant interval. For example, let's say that the field numbers for the first product are as follows: Quantity (First Product) - Field 30 Catalog Number (First Product) - Field 31 Product Name (First Product) - Field 32 Price (First Product) - Field 33 To maintain a regular pattern, the second set of product fields would need to have the following field numbers: Quantity (Second Product) - Field 34 Catalog Number (Second Product) - Field 35 Product Name (Second Product) - Field 36 Price (Second Product) - Field 37 And the third set of product fields would need to have the following field numbers: Quantity (Third Product) - Field 38 Catalog Number (Third Product) - Field 39 Product Name (Third Product) - Field 40 Price (Third Product) - Field 41 Note that each corresponding product field repeats every fourth field. For example, each Quantity field repeats every four fields. Each Catalog Number repeats every four fields, and so on. This four field separation is called the Pattern Interval. As long as the file maintains a regular Pattern Interval, then you can use AnyOrder to import the file. There is one other term associated with this type of import: Total Patterns. Total Patterns is the same as the number of products that a record in the file can hold. For example if your shopping cart software generates a file that can hold 20 products per record, then you have 20 Total Patterns. Not all of those 20 fields may used. One record in the file may only use fields for 3 products, and another record may use fields for 4 products, but, if needed, there's room for as much as 20 products. Most files that you'll receive from a third party (or generated from shopping cart software) will maintain a regular pattern of product fields. It doesn't matter where the product fields start in the file. As long as the fields have the same Pattern Interval, then you can use this method to import the file. Note that AnyOrder assumes that each file you receive from the vendor has the same Pattern Interval. If the Pattern Interval varies from file to file, AnyOrder will be unable to properly do the import. Fortunately, such variability is not common, but it's good to be aware of this limitation. It also assumes that the product fields always start at the same place in each file that you receive from the vendor. As mentioned above, if you use this method, there is no limit to the number of products you can import. The file, for instance, could contain fields for 100 products per customer. Since the fields are in a regular pattern, you need only to create a profile for the first set of product fields. If AnyOrder knows it is dealing with "Repeating Pattern" file, and you have provided AnyOrder with the Pattern Interval and starting and ending field numbers, then AnyOrder will take it from there and extract the proper data from the file. Here's a step by step procedure on how to use this method: 1) On the first import dialog box, you need to indicate the file name that you wish to import and its location. You might want to name this file "StartFile," or write the name of the file and keep it with your AnyOrder materials. If you ever need to change the profile, you'll want to use this same file. (You find information on why this is in the explanatory information about Repeating Pattern files in Other Options. 2) Once you've done that, you can move on to the second dialog box. Indicate the type of file (comma delimited, tab delimited, etc.) and click on "Show Import File Fields." 3) Create the profile as you would any other. (See the explanatory information at the top of this page for more information on creating profiles.) Match the customer name, address, shipping information and other fields found in the first box with AnyOrder's placement fields in the second box. The combined fields will show in the third box. 4) When you reach the product fields, use only the first product. That's important. AnyOrder needs to know where to start extracting product information. A. Highlight the first quantity found in the import file (first box, on the left). Highlight "1st Product Quan" in the second box (Placement Location). Click on the "+" to move the two fields into the third box (the Profile box). B. Then highlight the first catalog number in the first box. Highlight "1st Product Cat#" in the second box. Click on "+" to move these two fields into the third box. C. Highlight the first item name in the first box. Highlight "1st Product Item" in the second box. Click on "+" to move these two fields into the third box. D. Continue doing this for any additional product fields. You may also use the "Product Extra Line" field (found in the second box) to include additional product information. (More information on "Product Extra Line" is found at the bottom of this page.) Remember: set up the profile for the first product only. In other words, do not use any of the fields for the Second, Third, Fourth or Fifth products. 5. Once you get the profile set-up, you need to turn on the Repeating Pattern Mode. To do so, go to Other Options. Place a checkmark beside: "Turn ON Product Repeating Pattern Mode." 6. There two ways such files are constructed. Some have a StartProducts and EndProducts field. If so, you will need to indicate three numbers associated with the Repeating Pattern Mode: "Starting Field of Products," "Ending Field of Products" and "Pattern Interval." If the file instead has a field which tells you how many products are included in each record, then you will need to know the "Number of Products Field," plus you will need the Starting Field of products and the Pattern Interval A. To determine the Starting Field, use the "List" button to view a list of fields in the Import File. Often, the import file will have a field named "StartProducts" or "Products Start" or similar. If so, select the field and the field number will be automatically entered for you. If the "StartProducts" field is not present, select the first field that has product information. B. If there a "Number of Products" field does not exist, then you will need the "Ending Field of Products." It is much like the starting field. Look for "EndProducts" or "Products End" or similar. If you find it, select the field and field number will be entered for you. If "EndProducts" is not present, select the last field that has product information. C. Pattern Interval has been discussed above, and you'll want to look carefully at the Import File fields and determine the interval. Once you determined the number, type it in the appropriate blank. D. If you do have a "Number of Products Field," then use the "List" button to view a list of fields in the Import File and select the appropriate one. 7. Some shopping cart software programs will vary the number of products in each file they create. If that's the situation, there are two ways to approach this: A) You can enter the name of the field which signifies the end of the products. As mentioned above, this is often called "EndProducts" or "Products End" or similar. Use the "List" button. Select the field from the list and the name will be automatically entered for you. IMPORTANT: The field name which signifies the last of the products must appear on all records in the file. B) You can use the "Pad Fields" option. Look down on the Profile Options dialog box (the dialog box that you are in now). You'll see: "Pad Fields: Fixes Excel (and others) Last Field Problem. Put a checkmark beside. In addition, you must enter a number beside "Max. # of Fields Possible." To determine that number, you must decide on the maximum number of products that might be ordered by one individual. Once deciding upon that figure, then you calculate how many totals fields that would involve. For example, if the Starting Field is 40, and you have a Pattern Interval of 8, and you decide that 10 products is the most any one person might order. Then, the maximum number of fields possible would be 40 + (8 x 10) or 120. You would enter 120 in this field. That's it. Save the profile and try a test import. If you need to tweak things, you can remove the imported records by select FILE >> REMOVE IMPORTED RECORDS. Make whatever changes are necessary and try it again. More detailed information on this method of importing is found in Other Options. 4. Use two files to import invoice data and products. When you use the two-file system of importing, one of the files contains general invoice data such as Billing Name, Address, PO number, etc. The other file contains product information only: catalog number, quantity, etc. The advantage of this system is that there is no limit to the number of products than you can import per invoice. How It Works. In order to use the two-file system, the files must have a common field which relates them. This can be PO Number or another kind of number which is unique and is found in both files. As an example, let's set up a scenario. We are importing two related files. The first file contains general invoice data and it has a field called ID_Number. This will be our common field. The first record in that file has the number "45689" in the ID_Number field. In the second file (our product file), we also have an ID_Number field. This file has quite a number of records, but 6 of the records have "45689" in the ID_Field. Each of the 6 records contains a different product. You're probably beginning to see what will happen. We'll import the general invoice data first. In other words, we import the records from the first file. Then we'll import the records from the second file (our product data). All the product records with the same common field will be matched on the invoice with the identical common field. Thus, the six products with the ID_Field of "45689" will appear on the invoice that has common field of "45689." Third party software and contractors use a variety of terms when they talk about importing two related files, and it's helpful to look at few terms. Understanding what they mean will help you decide on what AnyOrder import method will work best for you. Terminology. Let's look at terminology used for the first file. It can be called the "General Invoice Data File" since it contains general invoice data like the billing name and address. It can be called the "Parent File" since it is parent to one or more children records of the product file. Or it can also be called the "Header File" since it's the first file to be imported and contains "header" information (common field) to get the process rolling. The second file is called the "Product Only File" since it contains product data. Or some times, it's called the "Child File" since one or more child records (products) will be attached to each record of the Parent File. And finally, it's also called the "Detail File" since it provides the details to go along with the "Header" file. Preparing the Profiles. To set up the two-file system, you need to create two profiles. The first profile is set up for the General Invoice Data File (or Parent File or Header File). This profile is set-up just like you would any other profile. The only extra step you take is to match the Common Field. Find the Common Field on the list of import fields in the first box. Using our example above, let's say it's "45689." You would match it with "Common Field" found at the very bottom of the list in the second box. Here's how you would do it: Pick "1) 45689 " in the first box Then pick Common Field 200 in the second box. After clicking on + the third box will show 1) 45689 ->Common Field 200 When the profile is finished save it. You might give it a profile name that includes "# 1" to remind you this is the first file to import. You can also use some of the other terminology: General, Parent or Header. Next, set up a profile for the second file. This is the Product Only file (or Child or Detail File) depending upon the terminology used.) Enter the name of the file on the first import dialog box. Then in the second dialog box, type in a profile name. You might give it a name that includes "# 2" to remind you this the second fie to import. You can also use some of the other terminology: Product, Child or Detail. Indicate what type of file it is at the top of the dialog box. Then, click on "Show Import File Fields." The fields in the import file will appear in the first box. Place a checkmark in "Product Only Import." When you do that, the fields listed in the second box will change. You'll notice that the only fields listed now deal with products: Quantity, Catalog Number, Item Name, etc. Match the fields in the first box with those in the second, creating the profile in the third box. Finally, you need to match a field in first box with "Common Field" in the second box. It's done the same way as described above. Find the Common Field in the Product File and match it with "Common Field." When you are finished, save your work. Importing the Two Files. With both profiles constructed, you're ready to import. Order is important in this process. You need to import the file with general invoice data (or the Parent or Header) file first. After the first file is finished, import the second file (product only, Child or Detail File. When the first import takes place, it places a notation in the Notes Area on the Main Invoice Screen that looks like: [Common Field 45689]. When the second import takes places, AnyOrder looks for the notation. All products with "45689" in the common field are placed in the item area of that invoice. This same process continues until all the products are imported. If something goes wrong, you can undo an import. Just like any other import, however, you need to undo it before adding any more records. If you import more records (or add new invoices) then you no longer undo the original import. 5. Use the clipboard to import products to an existing invoice This is a way of importing products from the clipboard directly to an existing invoice. For instance, let's say that one of your customers sends orders in the form of a spreadsheet. The spreadsheet will likely have the products, quantities, catalog numbers and prices listed in tabular form. Using your mouse, you can highlight the products on the spreadsheet and copy them to the clipboard. Once in the clipboard, they can be imported or pasted directly to an existing invoice. To do so, you need to set your profile up as a "Product Only Import." AND, you need click on "Other Options" and place a checkmark beside "Product Only Import: Import Records to Current Invoice Only." Here's a step-by-step procedure on how to set up the profile and import products: 1) Begin by copying the import data to the clipboard. (Note that you can import a file using this method, but most commonly you'll be using it with the clipboard.) Start by copying only one line of the spreadsheet or table to the clipboard. The fields become confused if you try to use two or more lines. To avoid confusion, stick with one line. (Later on, you'll be able to copy more than one line. Just use one line for setting things up.) 2) Now you are ready to set-up the profile. To create a profile using the contents of the clipboard, select EDIT and IMPORT FROM CLIPBOARD (see Importing from the Clipboard). 3) To view the fields in the clipboard, click on "Show Import File Fields." Then place a checkmark on "Product Import Only." Indicate where the import fields (first box) should be placed in AnyOrder's fields (second box). More information on how to do this is found on above. Just a note: when working with a Product Only Import, the list on the left may show more than one record. In that case, make sure that you select only fields from the first record. 3) Save the profile. 4) This is an important step. Don't forget it if you plan to use this method. Click on "Other Options" and place a checkmark on "Product Only Import: Import Records to Current Invoice Only." 5) If you will be importing two or more product at a time, place a checkmark beside "Clipboard Override: Allow More than 1 Record." More information about this feature is found here: Other Options (Third Dialog Box). 6) When you are ready to import, first, create an invoice on which you want to copy the products. The invoice should have a billing name, address, PO Number, etc. 7) Make sure the invoice appears on the invoice screen before doing the import. (When you use this technique, the products will be imported to the invoice currently showing on the Main Invoice Screen.) 8) Copy the product data from the spreadsheet or table. 9) Finally, import it by selecting EDIT and IMPORT FROM CLIPBOARD and clicking on "Start Import Process." You'll also find this technique useful if you receive orders on an HTML document and the products are in a table. The table can be copied and data imported to an invoice.
Building the Profile: Product Other ID You'll notice that the list of product fields in the second box (Placement Location -- in the bottom, middle of the screen) includes a "Product Other ID" field. This refers to the "Other Identifier" field in the Product Information Database. Publishers often use the Other Identifier field for ISBN numbers. Other businesses might use this for part numbers. This field is useful when you have ISBN or part numbers in the import file but not catalog numbers. (It's not used, however, if catalog numbers are found in the import file.) During the import process, AnyOrder will look up the ISBN or part number in the Product Database and paste the matching catalog number in the Item Area.
Building the Profile: Payment Method You'll notice that the list of fields in the second box (Placement Location -- in the bottom, middle of the screen) includes a "Payment Method" field. Payment methods include cash, check, card, etc. You might want to use this field if all of the records you are importing have been paid. That would be the situation if your shopping cart has already processed your customers' credit cards. When importing to this field, use a number. You can tell which number to use by activating the payment method pop-up list (click on the "L" beside "Payments" on the Main Invoice Screen): 1 = Check, 2 = Cash, 3 = Card and so on. If the field in the import file contains text data, use a replacement table to convert it to appropriate number (see Replacement Tables). If all of the imported records have the same Payment Method, you can use a constant. For example, if all the imported records have been processed by a credit card, type in "3" in the "Constant" blank in the dialog box, choose "Payment Method" from the second box and click on the +. All records being imported will show they have been paid by credit card.
Building the Profile: Amount Paid1 and Paid Date1 Among the list of fields in the second box (Placement Location -- in the bottom, middle of the screen) are "Amount Paid1 and "Paid Date1." These correspond to "Paid1" and "Date1" in the Payment Box on the Main Invoice Screen. You can use these fields to indicate that an invoice is paid. Import the amount paid to the first and the date to the second of the two fields. After the import is completed, and when you view the customer's invoice on the Main Invoice Screen, it will be shown as marked paid. AnyOrder will include the notation: "Paid" in the Payment Box. Important: In order for AnyOrder to mark the invoice paid, be sure to import both the amount paid and the date. Note that there is also a "Paid?" field on the list. You can import to this field as well. Usually, the best procedure is to use Amount Paid1 and Paid Date to mark an invoice paid. However, if the amount paid is not important to you, and you only want to have a record of whether the invoice was paid or not, you can use this field. When you use the Paid? field, you must also import a date to the "Paid Date1" field. If you don't, the program will disregard Paid. When you make your profile and you are using "Paid?" always combine it with Paid Date1 The "Paid?" field is a so-called logical field. When it's true, a checkmark shows. When it is false, no checkmark shows. When you import to this field, you must import a TRUE, T, YES or Y. A common way of importing to this field is to use a constant. Here's how you might use it: First, type in "TRUE" in the constant blank. Highlight Paid? in the second box. Click on + and [C] TRUE->Paid 34 will appear in the Profile box, the 3rd box. AND You must import a date into Date1. You might have something like PayDate -> Paid Date1 36
When you import the file, all invoices will include the notation: "PAID - Elsewhere." Normally "PAID - Elsewhere" means that the invoice has been paid by a lump sum recorded on another invoice. In this case, it means that you are keeping track of the payment amounts in another program, and AnyOrder is simply being used to indicate if the invoice has been paid.
Building the Profile: Taxable? Tax Rate, and Tax Included on the list of fields in the second box (Placement Location -- in the bottom, middle of the screen) are "Taxable?", "Tax," and "Tax Rate." These correspond to "Taxable?", "Tax" and the tax rate (found beside the tax field) on the Main Invoice Screen. You can use these fields for customers in your state or province that should be charged tax (and the tax is included in the import file). Dealing with tax in an import file is never an easy thing to handle, but here are some suggestions that you might find helpful. Handling Tax: Method #1 Let's say that your business is located in Indiana and you need to charge the same sales tax rate for all Indiana customers. Here's a method: 1. Go to the Import Profile. In Box #1, select some field that you won't be using. There's usually an import field that you won't be importing to AnyOrder. Let's call the field "Miscellaneous." In Box #1, highlight "Miscellaneous." In Box #2, select "Taxable.: Click on the plus sign ( + ). (We really don't import Miscellaneous to the Taxable field; rather what this does is to force AnyOrder to include the Taxable field on the list of fields which allows us to build a replacement table. 2. Save the Profile. 3. Click on "Replacement Tables" 4. Type in "Tax" and click on "New Replacement Table" 5. For Matching Field: Scroll down the list and find Billing State -> Billing State and click on the + 6. For Replacement Field1: Scroll down the list and find Miscellaneous -> Taxable and click on the + 7. In the spreadsheet at the bottom, type in "IN: in the Matching Field column, and TRUE in the Replacement Field1 Column. (The Taxable? Field is a so-called logical field. When it's true, a checkmark shows. When it is false, no checkmark shows. We are telling AnyOrder that if the customer's billing state is IN (Indiana), then import TRUE to the Taxable field.) 8. Click on "Save." When you run the import, tax will be added to any customer with "IN" for the billing state. AnyOrder will use the default tax rate that you set up in Basic Set-up. Usually, this is the rate that you will use. If you need to use a different rate, and the rate is included in the import file, you can import the rate to the "Tax Rate" field. Note that AnyOrder expect the tax rate to be in whole number form. In other words if your tax rate is 7.5%, it should come in as 7.5, not as .075. Handling Tax: Method #2 In this situation, you want to make sure that the amount of tax shown on the invoice is always the same the amount of tax in the import file. This can be helpful if you have a situation where the tax rate may vary from customer to customer. 1. When you create the profile, match the tax amount from the import file to Tax. Thus, in Box #1, highlight the tax amount "Tax." In Box #2, select "Tax" Click on the plus sign ( + ). 2. That's pretty much all you have to do. AnyOrder will take it from here. AnyOrder will calculate the tax rate based on the amount of tax. When you view the invoices, the tax on the invoice form will be the same as the imported amount. Here's some background: whenever AnyOrder calculates tax on an invoice, it uses the subtotal of the items listed on the invoice (after any discounts) and multiplies it times the tax rate. When you import a tax amount, AnyOrder first figures out the subtotal of the imported items. It then takes the amount of tax that is imported and works backward, calculating the tax rate. Thus, the tax rate is adjusted based on the subtotal so that the imported tax amount is not changed. Whether or not shipping is included in the tax calculation is also taken in account. (Whether shipping is taxed or not is set-up in Basic Program Set-up.) Handling Tax: Method #3 Let's say you live in a state or province that has varying rates depending on location, and you need to track sales for each of the rates. That means that you've probably already set up a series of tax codes corresponding to each taxing location or district. When things are set-up in this manner, AnyOrder is able to calculate how much should be allocated to each taxing district for tax reporting purposes. Important: in order to use this method, the import file must have a field which holds the name of the taxing district or tax code. 1. When you create the profile, match the name of the taxing district with the AnyOrder's Tax Code. Thus, in Box #1, highlight the tax amount "Tax District." In Box #2, select "Tax Code" Click on the plus sign ( + ). 2. You'll need to convert the name of tax district to the tax code that you've set-up in AnyOrder. To do that, click on the "Replacement Tables" button. Create a new table and name it "Tax Code Conversation." At the top of the Replacement Table dialog box, you'll need to indicate a Matching Field and Replacement Field1. Select Tax District -> Tax Code for the Matching Field. Select the same for Replacement Field1: Tax District -> Tax Code. Then in first column of the spreadsheet, type in the name of the tax district in the import file and the second column, type in your corresponding code for that district. Continue doing this until you've covered all of the districts that might be in the import file. 3. You have two choices at this point. A. You can import the tax amount by including the tax amount in the profile: Tax Amount -> Tax. When you do this, the same process occurs as was described in Method # 2 above. AnyOrder will work back and calculate the tax rate. It's a good idea to check through the tax invoices and make sure the proper rates are being use. B. This the second of the two choices. Instead of importing the amount of tax, wait until the import is done. Then page through each of the imported invoices. For any Invoice with a tax code, re-select the code from the pop-up list and tax will be added and the proper rate will be charged. This is not an automated feature, but assures you that proper rate is being used for each of the taxing districts. Handling Tax: Method #4 Some import files treat tax as an item. In other words, when the tax amount is imported, it appears in the Item Area as a product. You can use the Tax Exchange feature to move the amount of tax to its proper location lower on the invoice screen. The Tax Exchange feature is described in more detail in the Third Dialog Box (Other Options). Handling Tax: Method #5 A final method, and one that is used rarely, is to import the tax rate if it's available in the import file. The tax rate will imported as long as the amount tax is not imported. The tax amount has precedence. If the amount of tax is imported, then the tax rate is not used. Whenever dealing with tax, it's always a good idea to import the tax amount (if available) to the Notes area (whether or not it is imported elsewhere). That allows you to be able to compare the original tax amount in the import file to calculations being made in AnyOrder.
Building the Profile: Product Extra Line There is one special field which is found at the end of the product fields (in the second box--Placement Location--in the bottom, middle of the screen). The name of this field is "Product Extra Line." This field is used for additional product information. If the file that you are importing contains additional details about the product that do not fit in any of the other placement fields, this is the place to put it. For example if you are importing data from a website shopping cart, the file may contain information on color, size or weight or dimensions. You can use this field to instruct AnyOrder to create a second line in the Item Area to contain this information. Here's how to use it: Start by highlighting the appropriate field from the import file in the first box. Then highlight "Product Extra Line" in the second box. Finally, click on "+" to move the two fields to the third box. If desired, several fields can be added together. In other words, you can match more than one field from the import file with "Product Extra Line." Be aware, however, that there is a limit to the size of this field. The maximum number of characters it can handle is 34, and you'll want to be careful not to exceed this amount. Building the Profile: Entering a Zero (0) in the Quantity Field There may be times when you are importing product information and you wish to import a zero (0) to AnyOrder's Quantity field. Normally, if you leave this field empty, AnyOrder assumes that you have at least one product that you are selling and places a "1" here. Sometimes, however, you may be importing descriptive information, such as a brief product note or whether a product should be gift wrapped. Or you simply might want to indicate that a certain product has not been ordered. In these cases, you may want to place a "0" in the Quantity field. For descriptive product information (such as a brief product note), it's also helpful from a formatting standpoint to have "0" in the quantity field. When zero (0) is in the quantity field, AnyOrder leaves the number off when it prints the invoice. When one (1) is in the quantity field, however, AnyOrder include the number "1" on the printed invoice. To tell AnyOrder that you do not want to change a "0" to "1," click on the "Other Options" button and place a checkmark beside: "If the quantity is zero (0), keep it zero (0)." Note that, in past versions, you could force AnyOrder to keep a quantity zero by importing a negative number. However, this only worked for constant fields. It did not have any effect for other data being imported. This new feature allows you to clearly indicate that you want to retain zero quantities.
Building the Profile: More Information on Addresses Importing addresses has been covered to some degree above, but it's helpful to look at the topic in more detail. When importing addresses from a shopping cart or another type of software, you may find that you don't have enough fields in AnyOrder. Here's what you may have in the import file: First Name Last Name Company Name Address1 Address2 City State/Province Postal Code Country Here's what's available in AnyOrder: Name Address1 Address2 City State/Province Postal Code Country The First Name and Last Name field in the import file can be taken care of fairly easily. It's just a matter of combining them. (Combining fields is described above in the section entitled: "Building the Profile: Using Placement Locations More than Once.") When you do so, the Profile Box (third box) would look like: First Name -> Billing Name Last Name -> Billing Name That leaves Company Name and Address1 and Address2. First, you should ask yourself: is the "Company Name" used frequently? If it is, then you'll want to include it in the profile. However, if your import file primarily consists of individuals who have ordered from you, and rarely include a company name, then you may want to leave it out altogether. If it is infrequently used, one way to treat the company name is to import it to the "Notes" area. To do so, the Profile Box (third box) would look like: Company Name -> Notes When the import is complete, you could then look through the imported invoices. If you felt that the company name was important to include on one of the invoices, you could manually make an adjustment in the address on that invoice. The same reasoning applies in reverse. Let's say you mostly get orders from businesses. In that case, the First Name and Last Name will rarely be used. You would set up your profile as the following: Company Name -> Billing Name Similarly, if you occasionally had individual names associated with the order, you could import the names to the Notes area: First Name -> Notes Last Name -> Notes There is another place you can put the individual's name. Some AnyOrder users will designate one of the User Defined Fields as an "Attention" Field. The field that is utilized for this purpose is one of the 16 character fields that appear on the printed invoice. (See: User Defined Fields) If you use this technique, you could import the name to this field (this assumes that you've assigned the name "Attention" to the User Define Field): First Name -> Attention Last Name -> Attention If you happen to have a long name, you may wish to import name to both the "Attention" field and to Notes. This way you could review each of the imported invoices and manually any changes to any individuals with names longer than 16 characters. The Profile box would look like: First Name -> Attention Last Name -> Attention First Name -> Notes Last Name -> Notes Now let's say that both the individual's name and company name are important. There are two methods you can use: Method #1. The first method combines Address1 and Address2 from the import file into AnyOrder's Address2: First Name-> Billing Name Last Name-> Billing Name Company-> Billing Address1 First Address Line-> Billing Address2 Second Address Line-> Billing Address2 In this situation the First Address Line and the Second Address Line will be combined in the Address2 blank on the Main Invoice Screen. If you don't often have second address lines in the import file, you may find this works adequately. But if you often have second address lines, then you may want to re-configure AnyOrder with an additional address line as described in Method # 2, next. Method # 2. AnyOrder has the ability to designate two of the User Defined Fields as extra address fields. To reconfigure the program, select FILE >> ACTIVATE SHIPMENT & USER DEFINED FIELDS. Make sure User Defined Fields are turned on, and select the option: "Turn ON Extra Address Fields." By re-configuring the program, you'll find a Bill Address3 and a Ship Address3 in the "Placement Location Box (second box). You can use these extra fields to provide a full complement of locations on AnyOrder for the import. After building the profile, the Profile Box (third box) will look like the following: First Name->Billing Name Last Name->Billing Name Company-> Billing Address1 First Address Line->Billing Address2 Second Address Line->Bill Address2 City -> Billing City State/Province -> Billing State Postal Code -> Billing Zip Code Country -> Billing Country
To continue the step by step procedure: Third Dialog Box (Other Options) More Information on Importing Other Options (Third Dialog Box) Working with Import Files in Excel
|