| Graphics on Printed Invoices and Statements |
|
|
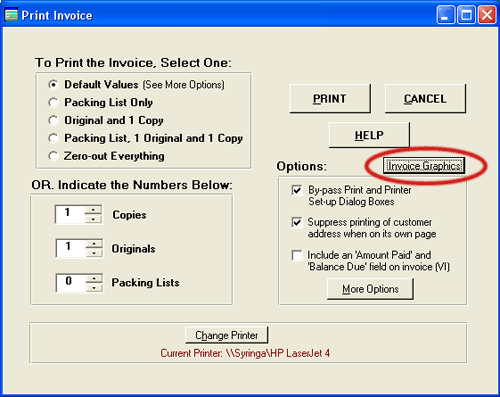
Level 2 and Higher If desired, you can add a logo or other graphic elements to your invoices or statements. The dialog box which enables you to add graphics to invoices is reached by selecting FILE and PRINT INVOICE from the Main Invoice Screen. Click on the "Invoice Graphics" button, shown below:
Once you click on the Invoice Graphic button, the following dialog box appears:
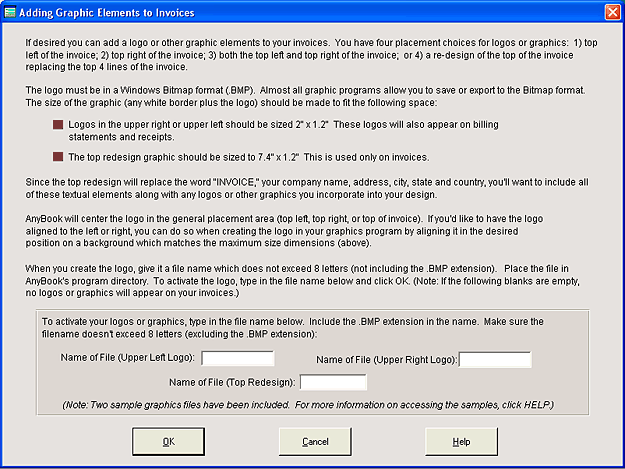
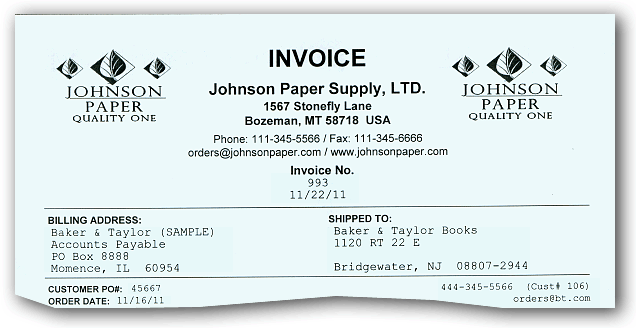
Note that if you'd like to add graphics to statements, you can access the proper dialog box by selecting FILE and PRINT THIS STATEMENT from the Billing Statement Screen. Click on the "Statement Graphics" button. Also note that adding graphics to invoices or statements can slow down printing times. Actual printing times will vary depending on your printer and computer's processing speed. If time and efficiency is a priority, you may decide to forgo the use of graphics. Where Graphics Can Be Placed You have four placement choices for logos or graphics: 1) top left of the invoice or statement 2) top right of the invoice or statement 3) both the top left and top right of the invoice or statement 4) a re-design of the top of the invoice or statement replacing the top 4 lines of the invoice Logos placed in the top left or top right positions are shared between invoices and statements. In other words, if you use a graphic for the top left corner of invoices, the same graphic will be used for the top left of statements. The top re-design of an invoice, however, is an entirely different graphic than the top re-design of a statement. Formatting the Graphic The logo must be in a Windows Bitmap format (.BMP). Almost all graphic programs allow you to save or export to the Bitmap format. You'll get the best result if you size the logo to the following dimensions. (Note that the overall size of the graphic is often called its "canvas size." The canvas size is the logo, itself, and any white border that might be around it when it is created in a graphics program.): Upper Left or Right. The size of logos in the upper right or upper left should 2" x 1.2" These logos will also appear on billing statements and receipts. Top Re-design. The size of the top redesign should be 7.4" x 1.2" This is used specifically for invoices or specifically for statements. Here's what a logo on the upper left and upper right looks like. You have your choice of left only, right only or both as shown below.
The top redesign will replace the word "PURCHASE ORDER". It will also replace your company name, address, city, state and country. Because of this, you'll want to include all of these textual elements along with any logos or other graphics incorporated into the design. Here's what a sample top redesign looks like:
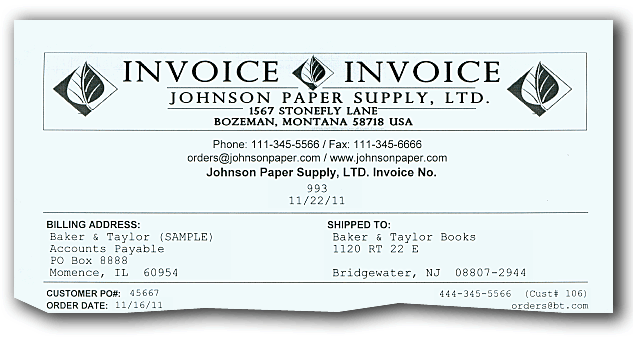
The top redesign will replace the word "INVOICE" (or "STATEMENT"). It will also replace your company name, address, city, state and country. Because of this, you'll want to include all of these textual elements along with any logos or other graphics incorporated into the design. AnyOrder will center the logo in the general placement area (top left, top right, or top of invoice). If you'd like to have the logo aligned to the left or right, you should do so in your graphics program. When the graphic is designed, align it in the desired position (left, right, middle) on a background which matches the maximum size dimensions (above). Naming the Graphic & Activating It When you create the logo, give it a file name which does not exceed 8 letters (excluding the .BMP extension). Place the file in AnyOrder's program directory. When the file has been placed in AnyOrder's program directory, you can activate it by entering the file name in the dialog box. If you wish to remove graphics from the invoice or statement, delete the file names in the dialog box. When the Graphic Overlaps Your Business Name or Address: Reducing the Size of the Graphic If you have a particularly long business name or address, it possible for the upper left and right graphic to overlap into the text. You can reduce the width of the graphic. For more information on how this done, see UDF Fields Adjustment. Important Information on Backing-up Your Graphic Files NOTE: When you back-up files in AnyOrder (FILE and BACK-UP FILES graphic files are not included among those that are backed up. Thus, you'll want to keep a back-up your graphic files on either the back-up disk you use for AnyOrder's files or to another disk. If you un-install AnyOrder--or if you install a new or existing version to a new directory--you'll need to re-copy the graphic to AnyOrder's program directory. Sample Graphics AnyOrder comes with four sample graphics files.
The first two graphic files are named InvLogo1.bmp and InvLogo2.bmp. InvLogo1.bmp is sized 2" x 1.2" and can be used in the upper right or upper left (or both) corners of the purchase order. These samples are reversed: white text on a black background. This is to give you an idea of the maximum size available for each graphic. Your graphic, of course, can be black on white or take whatever design approach you desire. To try out the first sample, type "InvLogo1.bmp" in either the first or second blank at the bottom of the dialog box. Leave the third blank empty. InvLogo2.bmp is sized 7.4" x 1.2" and is an example of a top re-design. To try it out, type "InvLogo2.bmp" in the third blank. Leave the first two blanks empty.
Two other graphic files are included. InvLogo3.bmp is an example of upper left or right logos. InvLogo4.bmp is an example of top re-design. Both of these represent something more along the lines that you might use for your company. They were created in a graphics program. The proportions are the same and they fit in the allocated space, but they were saved in a larger size. The graphics that you use don't have to be rectangular. If you have a round logo, place the graphic on a white background, and it will appear round on the printed purchase orders. You can also align the graphic to the left or right of its available space by aligning left or left on a white background in your graphics program. |