Adding Inventory


|
Product Information Screen: Adding Inventory |
|
|
Level 2 or Higher
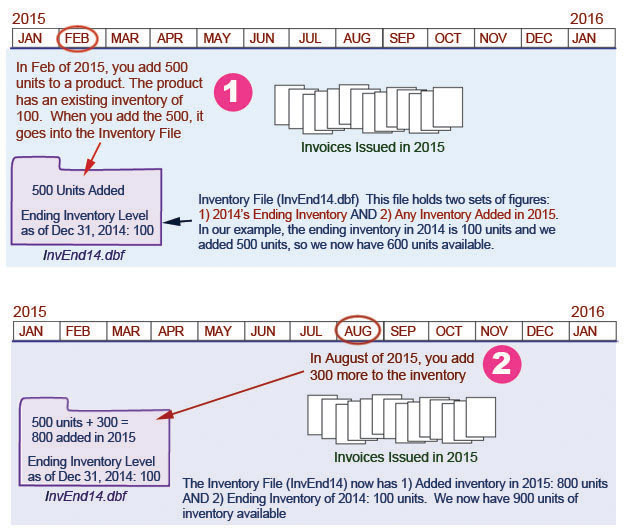
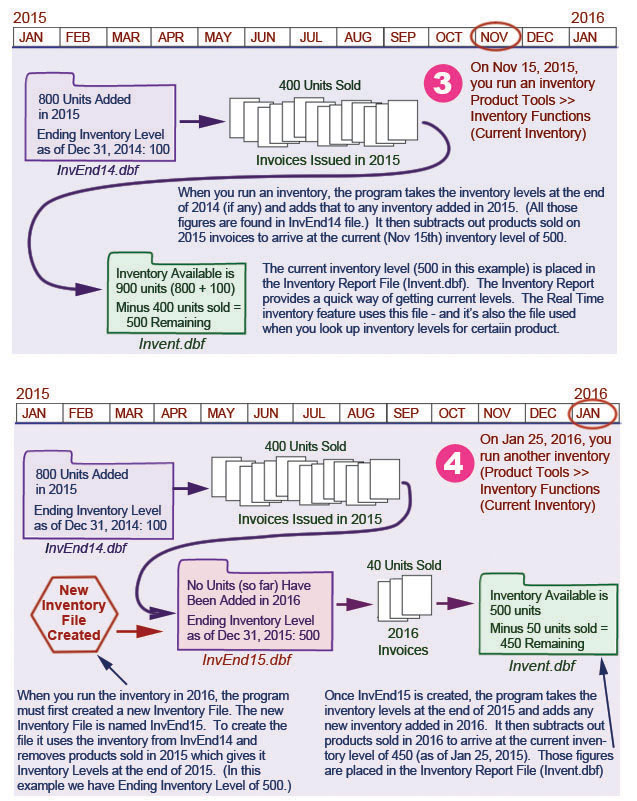
On the bottom half of the Product Information Screen (reached by selecting PRODUCT TOOLS and PRODUCT INFORMATION from the Menu Bar), is a place to enter information on inventory levels. While, you don't need to enter this information, it is helpful if you want to keep tabs on how many items are left in your inventory. How to Add Inventory. Whenever you add inventory to an existing inventory, use the "Inventory Added" blank. If you are entering an inventory level for the first time, use the Starting Inventory button (see Starting Inventory). The Inventory fields are located on the lower left of the Product Information Screen as shown below: 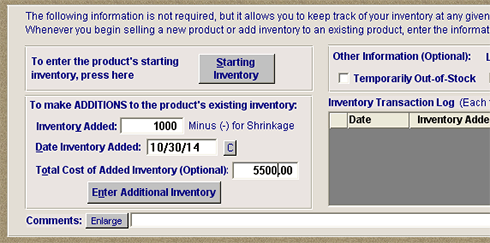 To add inventory, use the area on the lower left of the Product Information Screen. Enter the amount, date and cost and click the "Enter Additional Inventory" button. Enter the amount of inventory that you are adding and the date that it is added. You can leave out cost if you don't want to keep track of it, but you'll need to enter both the added inventory amount and the date. The date generally will be the date you make the entry, but if the inventory has been available for a while, you'll want to enter the approximate date you added it. In the cost blank, enter the total cost of the added inventory. If you purchased the inventory, include its cost, shipping and any other charges you incur in acquiring the goods. If its inventory that you have produced include labor costs, materials, plant overhead and any costs going into its production. Once you enter the cost, the program will calculate the cost per item and averages the new cost with the existing cost. The resulting cost per item takes in consideration existing and new inventory levels. For instance, let's say we have an existing inventory of 100 items, each costing $1.00. To that you add 100 more items, each costing $2.00. The resulting cost per item for the combined inventory is $1.50. (This is what accountants call the inventory Average Costing method. There are other methods that are used, but it's the most common.) Press OK and the information will be saved in a file called an Inventory File. It will also record the information in the Inventory Transaction log at the bottom of the Product Database Screen. If desired, you can write additional notes in the "Comments" field. Or you may use the Product Notes area. You may want to detail out what went in your total cost calculations, from whom the inventory was purchased, or any problems you had with product quality. Undoing. If you make a mistake and need to completely undo the inventory you added, select FILE >> UNDO: REMOVE ROW FROM TRANSACTION LOG. Reducing Inventory. You can also enter inventory reductions. Instead of using a positive number in the "Inventory Added" blank, use a negative number. You might use a negative number if you are removing non-saleable returns, items that were damaged in your storage area, items lost through theft, or items which are removed because of quantity problems. And you may enter a negative number if an earlier count of inventory was inaccurate, and you are adjusting it to its true level. In the Notes area of the Product Information, a reduction in inventory will be indicated as "Inventory Shrinkage." For the purposes of this program, "shrinkage" means the same thing as "reduction." Adjusting the Inventory in AnyOrder so it Matches Actual Counts. You may find that you need to adjust your inventory if the actual physical count doesn't match the inventory level shown by AnyOrder. For example, let say that you do an inventory of "The Adventures of Huckleberry Finn." You find that you have 10,500 copies in stock. But when you run an inventory in AnyOrder, it shows that you have 10,450 in stock. When you have a case like that, you need to reconcile AnyOrder's inventory with the actual inventory. You can do that by adding or reducing inventory. For the example above, you'll need to reduce your inventory by 50. Thus, you would enter - 50 in the Inventory Added Blank. In Level 5 (or higher), you can use the Inventory Reconciliation feature. (For more information, see Inventory Reconciliation) Inventory Files. When you add inventory, you are adding it to an Inventory File. Inventory Files are created by the program each year and contain the ending inventory of that year and any added inventory the following year. They have a fairly simple naming system. For example, an Inventory File which holds the end of the year inventory levels for 2014 is named InvEnd14.dbf. One that holds the end of the year inventory levels for 2015 is named InvEnd15.dbf. The following illustration shows how inventory is added to Inventory File. It uses a specific example, ranging in time from January of 2015 to January of 2016. You'll see that in February (see # 1 in the illustration), 500 units are added to the Inventory File (InvEnd14.dbf). In August, (see # 2 in the illustration), 300 more units are added. The illustration also shows how the Inventory File is used when you actually run an inventory (PRODUCT TOOLS >> INVENTORY FUNCTION >> "Current Inventory." In November, 2015 (see # 3 in the illustration), an inventory is run. Another inventory is run in January of 2016 (see # 4 in the illustration). When this inventory is run, the program needs to create a new Inventory File. It creates the new file and enters the end of the year inventory for 2015. It then calculates the current inventory level.
.
Important Note: Adding Inventory to an Older Inventory File. Normally, you'll be adding inventory to the most recent inventory file. However, there may be a situation where you add inventory to an older inventory file. If you do that, you'll need to use something called Automatic Update to update the inventory information in the newer inventory files. (More information on Automatic Update is found in Inventory Functions under the heading "Automatically Update Inventory.") Inventory files build upon one another. The data from the 2013 file is used by the 2014 file. Data from the 2014 file is used by the 2015 file, and so on. Thus, if you make a change in the 2013 file, you need to carry the change forward to 2014 and 2015. The best way to understand this is to set up a scenario. Let's say that the current fiscal year is 2015. As long as you are adding inventory with 2015 fiscal year dates, the AnyOrder will enter all added inventory in InvEnd14.dbf. A quick note about Inventory files. InvEnd14.dbf holds the inventory levels of your products at the end of 2014 and any added inventory during 2015. That can be a bit confusing. At first glance, you might think that inventory would be added to InvEnd15.dbf file, but the ending inventory level is always calculated by the program, taking in account what has been sold during the year. Since an ending level is not known until the year is over with, the file needs to allow for added inventory as the year goes on. Once the year is over with, then the ending inventory figure is firmed up. As you get more comfortable with the program, it will become clearer. Let's go back to our scenario. Our current year is 2015. If for some reason, you have to backtrack and add some inventory with a 2014 date, AnyOrder will enter that information in InvEnd13.dbf. (Remember InvEnd13 has the inventory ending in 2013 and inventory added in 2014.) Because an older file has been changed, you'll need to carry that change forward to the data in InvEnd14.dbf. The way to do this is to use Automatic Update (reached by selecting PRODUCT TOOLS and INVENTORY FUNCTIONS and clicking on the "Automatic Inventory Update" button.) Continuing with our example, we would type in "01/01/14" as the starting date and "12/31/14" as the ending date in the Automatic Update dialog box. When you click on OK, AnyOrder will use InvEnd13 (the one we updated) as the starting inventory file. It will run through all the invoices from 01/01/14 to 12/31/14, figure out how much has been sold, and update the inventory levels in InvEnd14.dbf. InvEnd14 is now back in synch. All is well and we can go on our merry way, continuing to add inventory in 2015 You may never have to worry about this. If you're making inventory additions in chronological order, then it's not necessary to worry about an automatic update, but the option is available should you need it.
Here's some other helpful information about the inventory process: How Starting Inventory is Recorded in an Inventory File.
|