(Manually Update Inventory)


|
Inventory File Screen (Manually Update Inventory) |
|
|
Level 2 and Higher
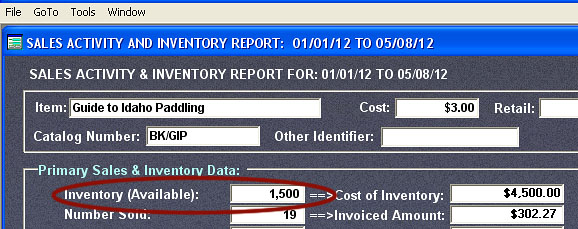
This chapter deals with the Inventory File Screen. The Inventory File Screen allows you to view Inventory Files and/or to make changes to the information found within them. But first a few basics about Inventory Files . . . Inventory Files hold the levels of each of your products at the end of the year. They provide key data during the preparation of inventory reports. When you generate the Sales Activity and Inventory Report, you'll notice that it begins with a product's "Available Inventory" (shown below). "Available Inventory" comes from an Inventory File.
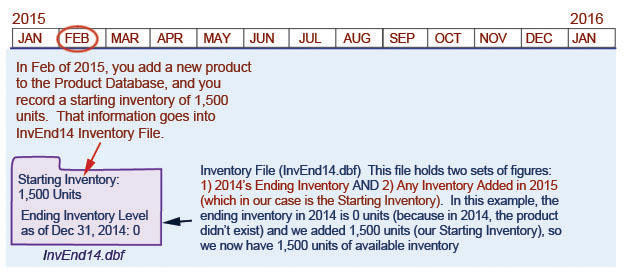
Here's a visual look at an Inventory File when entering the starting inventory for a product:
Inventory File Screen - Introduction The Inventory File Screen enables you to look at directly at the contents of a Inventory File. If desired, you can make changes to inventory levels and other information contained in the file. In rare cases, you can use this portion of the program to delete inventory data for a product - or even to create, or delete, a Inventory File.
How to Reach the Inventory File Screen The Inventory File Screen is reached from Inventory Options (select PRODUCT TOOLS and INVENTORY FUNCTIONS from the Menu Bar). At Inventory Options, click on "Manually Update Inventory." A list of Inventory Files will appear. Select the Inventory File that you want, and the Inventory File Screen will appear:
General Information Each Inventory File consists of a series of records. Each record is a different product. You can page through the different products by pressing Page Up or Page Down. Along with each product is the catalog number. Catalog numbers are important since they are matched up with one another whenever the inventory is processed. To help prevent inadvertent changes, all of the blanks are locked, but you can unlock them by selecting TOOLS and UNLOCK from the Menu Bar. The product's name and catalog can be unlocked by selecting TOOLS and UNLOCK ITEM NAME.
Creating a New Inventory File You may never ever have to worry about creating an Inventory File. AnyOrder does it automatically for you. However, if needed, you do have the ability to create a file. To do so, click on the Manually Update Inventory button from the Inventory Functions Screen and type in the year of the file. However, be very careful about creating an Inventory File. You should never create an Inventory File later than the current year. You can determine the current Inventory file by clicking on the "More Options" button on the Inventory Functions screen. Then click on "Inventory File Information." If you have created an Inventory File with a year greater than the current Inventory File year, it should be deleted. For example, if the current inventory file is InvEnd13 and you have InvEnd14. The InvEnd14 file should be deleted. The FILE menu from the Inventory File Screen has a function which enables you to delete an Inventory File.
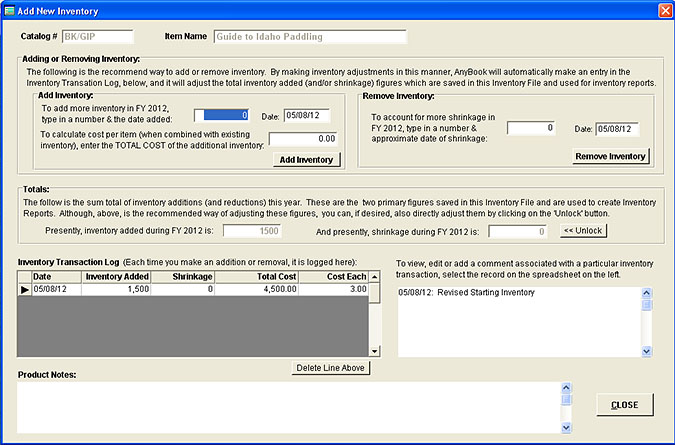
Making Changes and the "Add New Inventory Dialog Box" Generally, the reason that you access an Inventory File is to make additions or corrections to an existing inventory. The best way to make an addition is to click on the "Press to Add or Remove Inventory" button. When you press the button, the "Add New Inventory" dialog box appears:
In the box, you can enter the amount of inventory that is being added to the existing inventory, the date that you added it, and its total cost. The total cost figure is not needed, but it is helpful if you want to keep the current cost of the item updated. The program will average the new cost with the cost of the existing inventory. You can also enter inventory shrinkage in the "shrinkage" blank. Shrinkage or a reduction of inventory may be caused by one or more factors. You may have returned items which are no longer saleable and which must be removed from inventory. You may have items that were damaged in your storage area or items lost through theft. You may have to eliminate items which have quantity problems. And you may need to indicate a reduction or shrinkage of inventory if an earlier count of inventory was inaccurate. In the Notes area of the Product Information Database, a reduction in inventory will be indicated as "Inventory Shrinkage." The "Add New Inventory" dialog box is also used to enter the starting inventory levels of your products. For more details, see How Starting Inventory is Recorded in an Inventory File. On the bottom of the "Add New Inventory" dialog box is the Inventory Transaction log and any associated with the product. Each time you add inventory (or record shrinkage), the information about how much was added and when it was added will be included in the Transaction log. You can also type in your own notes. After you enter numbers in the dialog box and click on OK, inventory levels will be updated in the Inventory File.
Adjusting Inventory Level to Correspond with Actual Counts You can use Manually Update Inventory when you've inventoried one or more items in stock and you find that actual physical count doesn't match the inventory level shown by AnyOrder. For example, let say that you do an inventory of "The Adventures of Huckleberry Finn." You find that you have 10,500 copies in stock. But when you run an inventory in AnyOrder, it shows that you have 10,450 in stock. To bring you inventory in line, you need to remove 50 copies from the Inventory File. In Level V and higher, there is an easier way. You can use the Inventory Reconciliation feature which will automatically make the correct adjustments for you. For more information, see Inventory Reconciliation
Total Inventory Available One of the most important figures in the Inventory File is "Total Inventory Available." This number is used as a starting point whenever the inventory processed. It is arrived at by taking the ending inventory, adding any additions and removing any shrinkage. You'll see it listed as "Inventory (Available)" listed in one of the top blanks on the Sales Activity and Inventory Report. That figure comes directly from the Inventory File.
How Cost Per Item is Calculated AnyOrder uses the Cost Average method of inventory valuation. For more information on how AnyOrder calculates cost, see Inventory Cost.
Importing Inventory Counts This feature is described in greater detail here: Import Inventory. The following provides a quick summary. You can import inventory counts for your products. The import feature is found by selecting FILE >> IMPORT INVENTORY COUNTS. The feature works the same as other import functions in AnyOrder. You'll need to create a profile which indicates where the fields from your import file should placed in the Inventory File. Be sure to use the "current" Inventory File when you do the import. You can find that out by clicking on "More Options" from the Inventory Functions Screen. In "More Options" click on "Inventory File Info." AnyOrder will warn you if you are not using the current file. If the inventory file doesn't yet exist, you can create it by selecting "Manually Update Inventory" and entering the year. (More about creating an inventory file is found above). Your import file needs to hold at least a catalog number, item name and inventory count. It's helpful, however, to have the item's cost also in the import file if you want AnyOrder to calculate COGS (Cost of Goods Sold) for taxes and balance sheets. The import feature will search through existing catalog numbers in the inventory file. If it finds a catalog number, it will update the "Current Inventory" figure. (The Starting Inventory figure is set to the same as the "Current" inventory and both Inventory Added and Shrinkage are set to zero. That assures that the Current inventory is the same as the inventory count in the import file.) If it doesn't find an existing catalog number in the Inventory File, it will add the catalog number, item name and inventory count to the file. In other words, it will update any existing records with the inventory counts and it will add records when none exist. If your import file doesn't contain item name or if the item names are different than those in AnyOrder's product database, you can use the "Update Item Names" process described next to coordinate the names.
This process updates the names of the items in the Inventory File with the names found in the product database. It is primarily used if you have imported inventory counts (see above). The file that you use for importing the counts may not include item names -- or the names are different than what are found in AnyOrder. When you run this process, it goes through each item in the Inventory File and looks for the catalog number in the Product Database. If a match is found, it will copy the name of the item from the Product Database to the Inventory File. It only copies the name of the item. Nothing else is changed.
Other Features The Inventory File Screen allows you complete flexibility when dealing with Inventory Files. It allows you to add a product to the file by selecting GO TO, and ADD A NEW PRODUCT. You can search for a product name or catalog number by selecting GOTO and SEARCH. To bring up a list of available products, place the cursor in the Catalog # blank and double-click. You can delete a product, by selecting EDIT and DELETE THIS PRODUCT. You can also print a copy of the inventory information for a product by selecting FILE and PRINT. The Calculated Totals button appears whenever you unlock the blanks. It can be used to re-calculate "Total Inventory Available" if any changes have been made to the numbers. To view the Inventory File in spreadsheet form, select FILE and VIEW/PRINT FROM SPREADSHEET. The data from the Inventory File will appear in Excel or a spreadsheet program of your choice. While you can't make changes to the data, this provides an alternative way of viewing or printing an Inventory File.
Important Note about Making Changes to an Inventory File One question that you need to ask yourself when making changes to an Inventory File is the following: are there any newer Inventory Files which follow this one? If so, you'll need to use Automatic Update to update the inventory information. (More information on Automatic Update is found in Inventory Functions.) Inventory files build upon one another. The data from the 2013 file is used by the 2014 file. Data from the 2014 file is used by the 2015 file, and so on. Thus, if you make a change in the 2013 file, you need to carry the change forward to 2014 and 2015. For example, let's say that you need to make a change in InvEnd13.dbf, but the current fiscal year is 2015. In 2015, whenever you run an inventory, the program will use InvEnd14.dbf as a basis for the starting inventory. If you've made a change in InvEnd13.dbf, you'll need to update the data in InvEnd14.dbf. The way to do this is to use Automatic Update (reached by selecting PRODUCT TOOLS and INVENTORY FUNCTIONS and clicking on the "Automatic Inventory Update" button.) Continuing with our example, we would type in "01/01/14" as the starting date and "12/31/14" as the ending date. When you click on OK, AnyOrder would use InvEnd13 (the one we updated) as the starting inventory file. It will run through all the invoices from 01/01/14 to 12/31/14, figure out how much has been sold, and update the inventory levels in InvEnd14.dbf. When using Automatic Update, you need to be aware that you only want to use it for files dated after the one that you've changed. Let's say you've changed InvEnd13.dbf. You would not want to do an automatic update of InvEnd13. That would overwrite any changes that you made to InvEnd13.dbf. You would, however, want to do an automatic update of InvEnd14.dbf, since it uses InvEnd13.dbf to obtain its figures. You may not have to worry about this. If you're just making changes to the most recent inventory file, then it's not necessary to do an automatic update, but the option is available should you need it.
Here's some other helpful information: How Starting Inventory is Recorded in an Inventory File.
|