Starting Inventory


|
Product Information Screen: Starting Inventory |
|
|
Level 2 or Higher
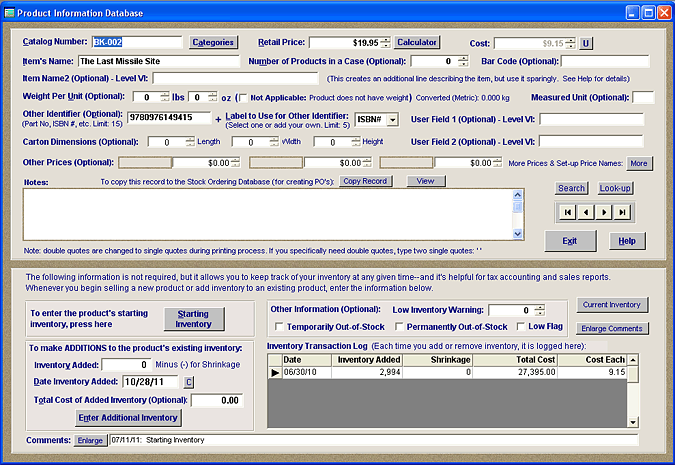
On the bottom half of the Product Information Screen (reached by selecting PRODUCT TOOLS and PRODUCT INFORMATION from the Menu Bar), is a place to enter information on inventory levels. While, you don't need to enter this information, it enables you to keep tabs on how many items are left in your inventory. The Product Information Database Screen is shown below. The Inventory features are found on the lower half of the screen:
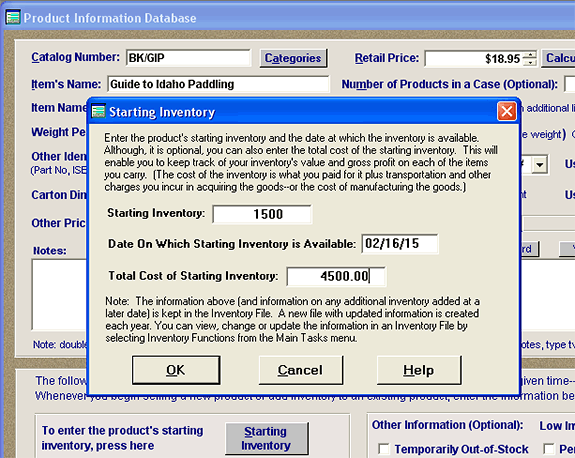
Entering a Starting Inventory. To enter a starting inventory, press the "Starting Inventory" button. A dialog box appears which allows you to enter the starting inventory level, the date, and the total cost (shown below).
You can leave out cost if you don't want to keep track of it, but you'll need to enter both the starting inventory level and the date. The date generally will be the date you make the entry. However, if you started selling and invoicing the product in the proceeding year, you'll want to use the date of the first invoice that you made in AnyOrder for that product. (For more information, see below: "Revising a Starting Inventory and Changing the Original Year"). In the cost blank, enter the total cost of the inventory. If you purchased the inventory, include its cost, shipping and any other charges you incur in acquiring the goods. If its inventory that you have produced include labor costs, materials, plant overhead and any costs going into its production. Once you enter the cost here, the program will calculate a cost per item. For more information on how AnyOrder calculates cost, see Inventory Cost. Press OK and the information will be saved in a file called an Inventory File. Using the Product Information Database screen is the best method of entering a starting inventory level. When it comes to adding inventory, you have a couple of choices, but the Product Information Database dialog box is the simplest (see Adding Inventory). The other way of adding inventory is to use Inventory Functions accessed from PRODUCT TOOLS on the Menu Bar.
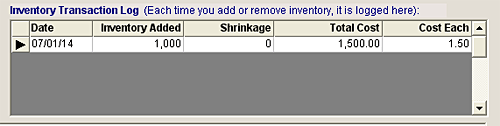
Inventory Transaction Log. After you complete the process, you'll notice that a notation about the starting inventory will be placed in Inventory Transaction Log at the bottom of the screen (shown below):
It's highly recommended that you not to erase or alter the inventory information in the Comments area. However, feel free to write additional notes in the Comments area -- or if you need more room, you can use the Product Notes area. You may want to detail out what went in your total cost calculations, who the inventory was purchased from, or any problems you had with product quality.
Revising a Starting Inventory. If you find, after entering a starting inventory, that you've made a mistake, you can re-enter it. Click on the "Starting Inventory" button. A message will come up telling you that a starting inventory is already entered. It reminds you that if you are adding inventory, you should press the "Add Inventory" button instead. It asks if you want to go ahead and continue with the "Starting Inventory" process. In this case, you do want to continue, and you would select "Yes." When a starting inventory is re-entered, all the values for that catalog number are zeroed out and the new inventory level is entered. (You can also re-enter a starting inventory by using Manual Update feature.
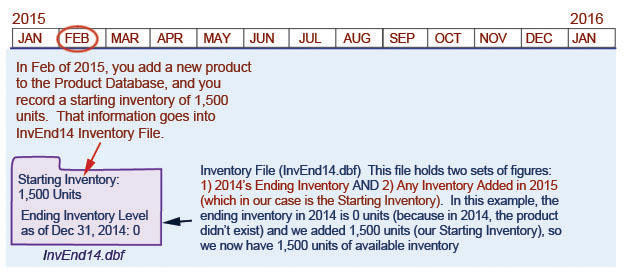
Inventory Files. When you record a starting inventory, you are recording it to an Inventory File. Inventory Files are created by the program each year and contain the ending inventory of that year and any added inventory the following year. They have a fairly simple naming system. For example, an Inventory File which holds the end of the year inventory levels for 2014 is named InvEnd14.dbf. One that holds the end of the year inventory levels for 2015 is named InvEnd15.dbf. The following illustration shows how the starting inventory is recorded in an Inventory File. It uses a specific example in which a new product is added to the Product Database. The starting inventory of the product (1,500 units) is entered in February of 2015. The program will use the InvEnd14.dbf Inventory File for recording the inventory. (A few more details on the example below are found here.):
Revising a Starting Inventory and Changing the Original Year. If you are re-entering a starting inventory for a different fiscal year than when it was originally entered, you'll need to take an extra step or two. The reason for this is that two different inventory files are being used. When the original starting inventory is entered, it will placed in the Inventory File associated with that year. But if the year is changed when the starting inventory is re-entered, a different Inventory File will be used. For example, let's say you first entered a starting inventory on 09/10/14. (In that case, InvEnd13.dbf will be used as the Inventory File.) But after it was entered, you realize that you've made a mistake. When you re-enter it, you use 09/11/15 as your starting date. This time, InvEnd14.dbf will be used as the Inventory File. InvEnd14.dbf will be fine, but you'll still have information remaining in InvEnd13.dbf which will need to be zeroed out. To make the change, you'll need to use "Manually Update Inventory" which is found in Inventory Functions (accessed by selecting PRODUCT TOOLS and INVENTORY FUNCTIONS). Click on "Manually Update Inventory," select InvEnd13 from the list. Find the appropriate product and zero out the inventory values. If the new year is earlier than the original year, there's one more thing you need to do. After zeroing out the values in the Inventory File, do an Automatic Update on the most recent inventory file. This process will update the inventory values in the more recent Inventory File, based on the new starting inventory in the earlier Inventory File. For more information on how the process works, see the section on "Automatic Update" found in Inventory Functions.
Here's some other helpful information about the inventory process: How Starting Inventory is Recorded in an Inventory File.
|