| How Starting Inventory is Recorded in an Inventory File |
|
|
Level 2 or Higher
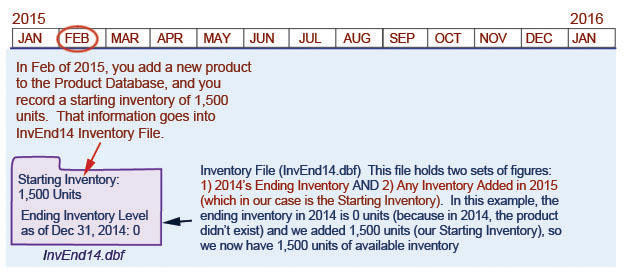
Inventory Files are used by the program to keep track of inventory levels. The files are identified by the year of the ending inventory. For example, an Inventory File which holds the end of the year inventory level for 2014 is named InvEnd14.dbf. Inventory files also hold the amount of any added inventory. InvEnd14.dbf holds the inventory levels of your products at the end of 2014 and any added inventory during 2015. That can be a bit confusing. At first glance, you might think that you should add it to the InvEnd15.dbf file, but the ending inventory level is always calculated by the program, taking in account what has been sold during the year. Since an ending level is not known until the year is over with, the file needs to allow for added inventory as the year goes on. Once the year is over with, then the ending inventory figure is firmed up. As you get more comfortable with the program, it will become clearer. Starting Inventory is treated just like added inventory. Let's say in February of 2015, you introduce a new book titled Guide to Idaho Paddling and your first printing is 1,500 copies. At the end of 2014, the book hasn't been published yet, so the inventory of Guide to Idaho Paddling is zero (0). In 2014, however, the available inventory becomes 1,500. You have, in essence, added 1,500 to the book's zero inventory level at the end of 2014. All this information would be contained in one Inventory File: InvEnd14.dbf file. Here's a visual view of the above example:
This is the way in which starting inventory levels are recorded when Product Information is used. To help clarify this, let's expand upon on the above example. Here's how you would enter information on Guide to Idaho Paddling, and how the program records the information in a file: You would begin by accessing the Product Information Screen (reached by selecting PRODUCT TOOLS and PRODUCT INFORMATION & CATALOG NUMBERS from the Menu Bar). From the Product Information Screen, Page-Up until you have located Guide to Idaho Paddling. Then click on the "Starting Inventory" button. The "Starting Inventory" dialog box will come up.
In the first blank of the Starting Inventory dialog box, enter 1,500 books as the starting inventory. Enter the date. For this example, we'll say the date is February 16, 2015. Finally, enter the total cost of the inventory (cost of printing, shipping and the other costs involved in producing the book). When you click OK, the program looks for the appropriate inventory file. In this case, the program looks for InvEnd14. If it doesn't find InvEnd14.dbf, it will create it. Once InvEnd14.dbf is found (or created), the program enters a zero (0) for "End of Year Inventory" for 2014. It also enters 1,500 for "Inventory Added" in 2015, and 1,500 for "Inventory Available" in 2015. The process is complete, and the program notifies you that the information has been entered in the appropriate Inventory File (InvEnd14.dbf). If you manually enter starting inventory levels using the Manual Update feature reached from the Inventory Options Screen, you'll want to record the information in a similar manner. In Manual Update, it is possible to enter a starting level by adjusting the "End of Year" figure in the Inventory File, but it is not recommended. Although used rarely, Automatic Update (also accessed from the Inventory Options Screen) can change End-of-Year figures. Automatic Update, however, will not change an "Added Inventory" figure.
Here's some other helpful information about the inventory process:
|