| Inventory Functions |
|
|
Level 2 and Higher
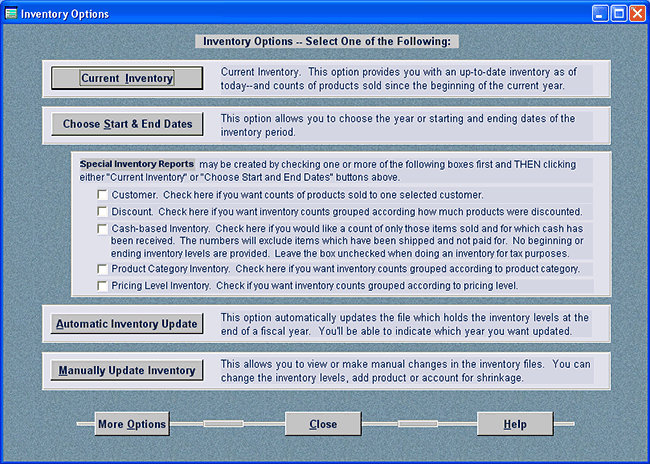
Having up-to-date inventory information is invaluable in any business situation. AnyOrder is designed to keep track of your inventory and provide inventory levels whenever they are needed. The program also keeps tabs on consignment inventory which is particularly helpful if you place consignment items at several retail locations or if you consign items to one or more wholesalers. (For more information see, Working with Consignment Wholesalers and Distributors or Consignment Retailers) Most of the procedures involving inventory are found on the Inventory Functions Screen (accessed by selecting PRODUCT TOOLS and INVENTORY FUNCTIONS from the Menu Bar), but the Product Information Database also provides some important inventory assistance. In fact, it is the easiest place to enter information on a starting inventory or to record additions to an existing inventory. The Inventory Functions Screen, on the other hand, is used to obtain current or past inventory levels or to give you complete control over the content of Inventory File which hold all of your inventory information. Here's what the Inventory Options Screen looks like:
Once you arrive at the Inventory Options Screen, you can choose from one of several options. Here's more detailed information on each option:
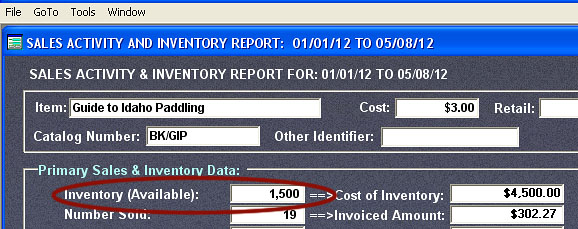
This provides you with an up-to-date inventory. You can find how much is left of each of your products. You can find out how much has been sold since the beginning the current year, among many other figures. The program will calculate how many items have been sold, the amount of inventory left and other helpful information. All this information will be displayed on the Sales Activity and Inventory Report. You can page from product to product by pressing Page Up or Page Down. More information: Sales Activity and Inventory Report Form. You'll notice when you look at the Sales Activity and Inventory report that it begins with a product's "Available Inventory" (shown below):
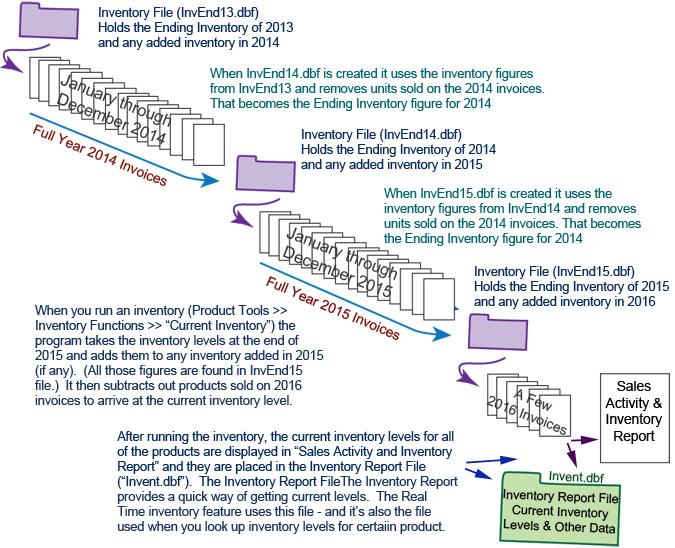
"Available Inventory" comes from an Inventory File. (The program tells you which Inventory File will be used before it starts the inventory process.) Inventory Files hold the levels of each of your products at the end of the year. It also holds any inventory added the following year. The sum of the two figures is the amount of available inventory and which becomes the starting figure for the inventory report. The chart below shows how Inventory Files are utilized in the process:
Choose Start and End Dates The option, above, gives you inventory information as of the current date. You may also want to choose your own starting and ending dates which this option allows you to do. When you click on the "Choose Start and End Dates Button," a dialog box appears allowing you to enter a year or a range of dates. If you enter a year in the "Year" blank, inventory information for the year will be prepared and will appear on the Sales Activity and Inventory Report Form. You can also enter a "Range of Dates." You can enter any dates, but if you want to know how much inventory left was left at the end date, the starting date must be the first of your fiscal year. For instance, if you use the calendar year, the starting date must be 01/01. If you don't care about the levels, but rather just want counts of how many products are sold during a period of time, you can use any starting date. If you click on the TD button ("Today's Date"), the current date will be pasted in the ending date blank. You can access pop-up calendars by clicking the "C" buttons. One additional option is available along with "Range of Dates." Select this option when you wish to run a consignment inventory for a selected customer--and, at the same time, be able to obtain data on "Additions," "Take-backs," and "Number Remaining." Normally, these figures are replaced by an N/A (meaning non-applicable). The reason for N/A is that inventory data for a selected customer is not available in the Inventory File. (Information stored in an Inventory File is accumulative for all customers.) However, if you select a period of time which covers all possible invoices issued to that customer, then AnyOrder can provide valid data. In order to obtain reliable data, the range of dates selected should include all invoices issued in the current year and all invoices issued in past years. When you place a checkmark on this box, AnyOrder will automatically insert dates which will cover all possible invoices. In almost all cases, you can accept these figures and continue the process. Note: that this feature will not provide accurate figures if you have moved invoices to storage and the invoices in storage include relevant consignment activity.
Special Inventory Reports Before you create an inventory report by clicking on either the "Current" or "Choose Start and End Dates" button, you can select one or more options and refine the report. You have five options. You can base the inventory report on the activity of one customer, produce an inventory report broken down into discount ranges, create an inventory report based on cash sales. To create a special inventory report, first select one or more options from the list. Then click on "Current Inventory" or "Choose Start and End Dates." More information on each of the options follows: Customer. The first special inventory option provides information on a selected customer. To use it, first check the box and then click on either "Current Inventory" or "Choose Start and End Dates." When the inventory process begins, a dialog box appears asking you to select a customer. You may use one of three methods to obtain customer inventory information:
Choose the customer you want, and then the process will proceed in a normal manner. (For more information on selecting customers from the list, see Pop-up List of Past Customers.) The resulting report will provide you with counts on the number of products sold for that customer (or billing group) only. Discount. The second special inventory option will provide information on how many products are sold based on the discount offered to customers. As above, first check the box to select the discount option and then click on either "Current Inventory" or "Choose Start and End Dates." A dialog box will appear on which you can indicate the discount ranges you want data for. For more information on this dialog box, see Inventory Discount Ranges. When the inventory report appears, it will list the number of products sold in each designated discount range. Cash Based. The third checkbox on the bottom of the Inventory Options Screen provides counts based on actual cash received. This is a cash-based inventory. In other words, it doesn't consider an item sold until you've actually received cash for it. This is a useful way of doing inventory if you pay royalties to authors or others. It assures you that you have cash in hand before issuing a check to the royalty holder. This feature works best when you have the Mark Paid feature turned on (the program default). The Mark Paid feature is turned on or off in Basic Program Set-up. To start the cash-based inventory process, check the box first and then click on either "Current Inventory" or "Choose Start and End Dates." Note that you want to make sure this is not checked if you are doing an inventory for tax purposes. Product Category Inventory. This option provides you with counts and sales information for product categories. It only works if you've organized your products in categories by using prefixes. For more information: Categories. To start a category inventory, check this box first and then click on either "Current Inventory" or "Choose Start and End Dates." Pricing Level Inventory. Level 4 and Higher. If you select this option, the inventory of each product will be broken down into Pricing Levels. Pricing Levels (such as wholesale, list, etc.) are established in the Product Information Database. To start a Pricing Level Inventory, check this box first and then click on either "Current Inventory" or "Choose Start and End Dates." You can check two or more boxes if desired. For example if you check the first three, the results will show a cash-based inventory for a selected customer broken down into discount ranges.
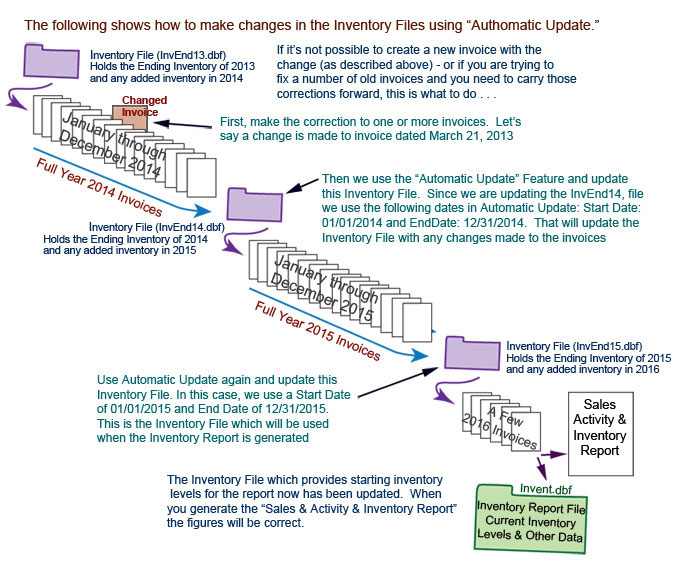
Automatically Update Inventory This option will be used rarely, if ever. It creates or updates an Inventory File. If you do an inventory using the program at least once a year, an Inventory File will be automatically created or updated. The Inventory File contains the inventory levels at the end of the year (and additions you might make to the inventory during the following year). If, for some reason, you haven't been using AnyOrder to do an annual inventory. You may need to create an Inventory File. Or if invoices have been changed after an Inventory File has been created, you'll need to update the Inventory File. Normally, the best way to change invoices is to create a new invoice with the indicated changes. That way you and your customers have a record of a change, but, in the event, you have made invoice changes without making new invoices, you can update the existing Inventory File by choosing this option. Note to our International Users: The following discussion uses a MM/DD/YY format. If you use a DD/MM format, reverse the numbers. When you click on this button, a dialog box will appear asking you to enter a starting date and ending date. Choose the beginning of the year and the end of the year. For instance, if your fiscal year is the calendar year and you want to update the Inventory File for 2015, enter 01/01/15 for the Starting Date and 12/31/15 for the Ending Date (use 31/12/15 for Day/Month/Year date format). The Inventory File at the end of 2015 will be updated. This file is named: InvEnd15. For more information, see Inventory Files. When the program does an Automatic Update, it re-calculates the inventory level for the requested year and updates the inventory file. It will not make any changes to added inventory levels. For an example, the file InvEnd15 holds the inventory levels at the end of 2015 and any inventory that you may have added during 2016. When an Automatic Update is done, the program will re-calculate the end-of-year inventory for 2015, but it will not change the amount of added inventory for 2016. Inventory files build on one another. If the inventory level in one file changes, then you'll need to update the levels in any files which follow. For an example, let's say you have the following inventory files InvEnd13, InvEnd14 and InvEnd15. If after doing an Automatic Update of InvEnd13, the ending inventory level changes, you'll also need to do Automatic Updates of InvEnd14 and InvEnd15. The following illustrates how the Automatic Update process works:
.
Let's review. If an inventory file has been created, and you later change invoices that are used by that inventory file, then you should use Automatic Update. Automatic Update will recalculate the ending inventory based on the changes that you have made to the invoices. You don't necessarily have to use Automatic Update. If you know what the ending inventory should be, then you can manually change the level in the Inventory File. Let's say, you did a physical count of one of your products at the end of 2013. You find that the number doesn't match AnyOrder's end of the year level. In that case, you can manually change the end of year figure in InvEnd13 so it matches the physical count. (More information on making manual adjustment in the "Manual Update Inventory," described in the next section.) The Inventory Reconciliation feature also changes by inventory levels by changing numbers in the inventory file. When using Automatic Update, you need to be cautious in its use if you've changed inventory levels in an Inventory File either manually or by using Inventory Reconciliation. Let's you've changed the inventory levels in InvEnd16.dbf so they were accurate as of the end of 2016. (You can do that by using Manual Update, described next -- or you can do it by using the Inventory Reconciliation feature.) If that's the case, you would not want to do an automatic update of InvEnd16. That would overwrite any changes that you made to InvEnd16.dbf. You can, however, do an automatic update of InvEnd17.dbf, since it uses InvEnd16.dbf to obtain its figures. Note that the information found in Inventory Files is always based on accrual accounting. It's the accepted standard and is required for tax purposes. If any of the special report options have been checked (Cash-based, Customer or Discount Range), AnyOrder will disregard them while doing an automatic update of a file.
Manually Update Inventory This allows you to view or make changes to the Inventory Files. Inventory Files are created each year and hold the inventory levels at the end of the year (and any additions during the following year). The main use of this option is to view an inventory file. If you are attempting to make adjustments in inventory levels, it may be helpful to look at the contents of an inventory file. With an understanding of what information is kept in the file, you may be better equipped to decide on a course of action. You can also use this option to add or remove inventory. The simplest way of adding (or removing) inventory is to use the Product Information Database Screen. However, if you want total control of adding and removing inventory, then this is the method you'll want to use. The Product Information Database screen shields you from the Inventory File, but this method allows you to view the contents of the file and make any changes you desire. (Note that when entering a starting inventory for a new product, we still recommended that you use the Product Information Database Screen. It will create a file, if necessary, or it will attach starting levels to the proper existing file.) If you click on this button, a list of Inventory Files will appear. Select the Inventory File that you want, and the Inventory File Screen will appear.
Inventory Functions: Menu Bar Choices Two additional options are available by selecting FILE from the Menu Bar. One option is "BY PASS & DISPLAY MOST RECENT INVENTORY." This can be used when time is short and you need a quick summary of the most recent inventory report that you've prepared. It allows you to skip the calculation process and go immediately to the inventory report. When the Sales Activity and Inventory Report Form appears, the date and time of the most recent report will be indicated on top of the screen. Details such as date range, inventory type (cash or accrual), discount range, etc are not indicated. (If you need such information, use the "Current Inventory" button.) The other option available is "REPLACE CATALOG NUMBER IN INVENTORY FILES." This is used if you change a catalog number in your invoices and need to make the same change in the Inventory Files. For more information, see Find and Replace.
Inventory Functions: More Options You can access the two options (described above under "Menu Bar Choice") by clicking the "More Options" button. You also have an additional choice which provides information on the file that AnyOrder uses for a "Current" inventory. This is helpful information. No other Inventory Files should be dated later than the "Current" file. Any file with a later year is incomplete and can throw off your inventory numbers. If you find one, it should be deleted. For example if your "Current" Inventory File is InvEnd09.dbf, and you find that InvEnd10.dbf exists, it should be deleted. To check to see what Inventory Files exist, select "Manually Update Inventory." A list of files will appear. If you see any file dated after your "Current" file, select them. The Inventory File screen will appear. To delete the file, select FILE >> DELETE INVENTORY FILE. AnyOrder will create the necessary inventory file when it's needed.
Check Inventory Level Feature Note that you can also obtain quick inventory checks by placing your cursor on one of the rows in the Item Area on the Main Invoice Screen. Select PRODUCT TOOLS and CHECK INVENTORY LEVEL FOR CURRENT ITEM. You can also press CTRL+J on the keyboard. Check inventory features are also available in the Product Pop-up list and Product Information Database. What this feature does is to look-up the product in the most recent inventory report file and report back with the inventory level and number of units sold since the beginning of the year. More Information
Here's some other helpful information: How Starting Inventory is Recorded in an Inventory File.
|