Phone - Email - Barcode Button


|
Parts of the Invoice Screen: Phone - Email - Barcode Button |
|
|
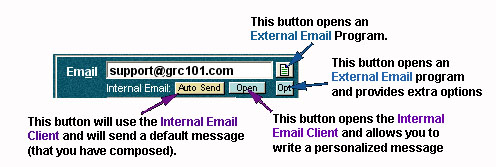
Email Address On the right side of the Main Invoice Screen, midway down, is a blank for the customer's email address. This blank is optional, but you may find it handy if you communicate with the customer via email. Along with the email address, there are four buttons:
External Email Program Button Next to the email blank is a light blue email button. By clicking the button an external email program will be activated and the address inserted in the "To" blank. For more information on using the button, see Email. (Note that Level 7 has internal email program which can be utilized instead of your external program.) External Email Options Near the light blue email button is the "Opt" (Options) button. This is used with external email programs such as Outlook and Thunderbird. If you click on this button, the Emailing Options dialog box appears. You can use this dialog box to insert the Billing Name or Shipping Name into the "To" blank of your email program. You can also select a prepared note to insert in your email message. (Note that the Level 7 program has integrated email program which takes the place of this feature.) Auto Send Button - Internal Email Client (Level 7 Feature) The Auto Send button will send an email to the customer along with a standardized message. (You prepare the standardized message for the email in Basic Program set-up.) Additionally, the Auto Send feature attaches an html copy of the purchase order, and will also attach a text copy of the purchase order. The text version of the purchase order assures that it will get through to the customer no matter what settings they have on their email program. This is a very quick and efficient way to send invoices to customers. If you use this feature, you should monitor the email account to make sure you don't get any bounced back mails. AnyOrder doesn't receive emails, but you can monitor the account with your normal email program. You'll also want to send a blind copy to a company email address so that you have a record of the invoices sent. When you set-up the standardized message in Basic Set-up, you can indicate an address for blind copies. Open Button - Internal Email Client (Level 7 Feature) The "Open" button is used when you want to personalize the message to the customer. You can use it to add instructions or ask for more information. When you click on the Open button, a form appears on which you type out a message to the customer. By default it will attach a copy of the invoice. If you don't want to attach the invoice, remove the checkmark. You can also insert you standardized message. Do that by clicking on the "Defaults" button. The standardize message along with any CC, BC, or Reply To addresses that you have indicated in Basic Program set-up will all be pasted in place. You can, then, alter the text and send the mail to the customer. Long Email Addresses On rare occasions you may run into an email address that doesn't fit in the email address field on the Main Invoice Screen. In those cases, leave the email address field blank and enter the address in the "Notes" area. Surround the address in double angle brackets, like this: <<jacqueline.zimmermann@someverylongnamedcompany.com>> If you click on either the "Open" or "Auto" buttons and if AnyOrder doesn't find an email address in the email address field on the Main Invoice Screen, it will look in the Notes area. If it finds an address surrounded by double angle brackets, it will use that address.
Phone Number Just below the email field is a blank for the customer's phone number, shown below:
Just to the right of the field is a button with "Dial" printed on it. By clicking the button, AnyOrder's internal Phone Dialer program will be activated. Note that, you can determine how you want the button to function. You may wish to change the function of the button from Dial to Copy or Copy to Dial. The button's function is set in Basic Set-up. If the number is a long distance number, include the "1" before the number, i.e. 1-208-232-6857. If an extension is associated with the customer's number, follow the number with an "x" and the extension, i.e. 234-5678 x456. When you activate the Advanced Dialer, the extension will be extracted and will be entered when you click on the extension button. Note that the Level I program doesn't have telephony features. Instead of the "Dial" button, you'll see a "Copy" button which copies the phone number to the clipboard.
Barcode Button Just to the left of the phone field and just to the right of the PO Date field is the "Barcode" button (shown below). This is a Level 5 (or higher) feature.
If you click on the "Barcode" button, the Barcode Scanning dialog box opens, allowing you to start scanning products. Pass your scanner across the product's barcode and the product's name, catalog number and price will be entered automatically in the Item Area. For more information, see Scanning Product Barcodes. The Level 5 (or higher) program will also print barcodes on invoices for you. When you scan a printed invoice, AnyOrder will immediately find the invoice and display it on the screen. You don't have to distinguish between product and invoice barcodes. AnyOrder will automatically detect an invoice barcode. If it's not an invoice barcode, then AnyOrder assumes that you are scanning in a product. Note that it is not necessary to use the barcode button if you have programmed your barcode scanner as describe in Barcode Features. A programmed scanner will automatically open the Barcode dialog box and make entering barcodes even easier yet.
Other parts of the Invoice Screen include: Invoice # - Customer # - Drop Shipment PO Number - PO Date - Invoice Date Item Area: Quan - Cat # - Item - S-Code - Price - Item Summary Item Area: Add, Place & Toggle Buttons Code Box- Discount - Less Discount Net Days - Taxable - Ship Via - Shipping - Consigned Item - No Royalty Payment Box (Payment1, Date1, Payment2, Date2) Credit Card # - Credit Card Name - "1", "2" - Notes Invoice Screen Buttons: Navigation (VCR Buttons), Calculations, Help |